Start a New Flow
- Go to Agent Design > Create Flow.
- Add a Start Flow trigger.
- Add a Collect, Ask Exactly, or Talk block to gather information that you want to write into Google Sheets.
- Example variables you might collect:
caller_name, phone_number, order_number, email_address
- Example variables you might collect:
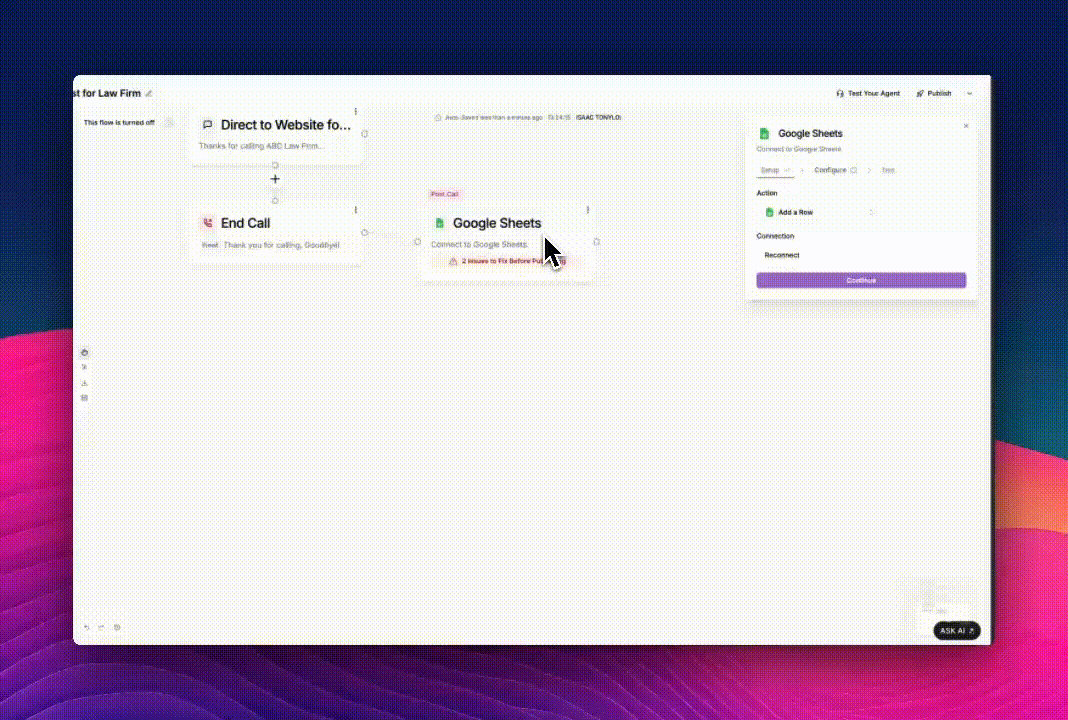
Add the Google Sheets Action
- Click the (+) icon under the block where you want to write the data.
- Under Post Call Actions, select Google Sheets.

- In the Action dropdown, choose: Add a Row. This action inserts a new row into your selected spreadsheet.

- Click Connect to Google Sheets.
Connect Your Google Account
When prompted:- A Google login window will appear.
- Select the Google account you want to use.
- If needed, click Use another account.
- Review the permissions required:
- View Google Drive files
- Read/write to Google Sheets
- Click Continue.
Configure the Row Data
The Configure panel allows you to define exactly where data should go in your sheet and which values should be written. Spreadsheet Select the target spreadsheet from your Google Drive.Click the refresh icon if you just created or renamed a sheet. Tab Choose the specific worksheet (tab) in the spreadsheet.
Refresh the list if needed.
Sync Column Names
Click Sync Column Names to automatically load all column headers from your sheet. This ensures your row data maps correctly to the right columns.
Map Columns to Variables
Under Row Data, you will see a list of column names pulled from your sheet: Example:- Column “customer name”
- Column “order number”
- Column “email”
- Column “timestamp”
- Click the field.
- Choose a variable from the left-side Available Variables panel.
caller_name, phone_number, order_number, email_address
Example mapping
| Spreadsheet Column | Value Written to Sheet |
|---|---|
| customer name | caller_name |
| order number | phone_number |
email_address | |
| created_at | {{now}} |
Advanced Settings (Optional)
Interim Message
If enabled, Phonely will speak a short message while writing to Google Sheets.Example: “Please hold while I save your details.”
Post Interim Message Delay
Adds a brief pause after the interim message to avoid interrupting the API call.Interim Message Prompt
Choose:- Promptable – LLM rewrites your message more naturally.
- Fixed – your exact text is used verbatim.
Call Outcome Tagging
Add tags such as:row_added, lead_saved, followup_logged, order_logged
These appear in analytics and are useful for automation.
Click Continue when ready.
Test your Google Sheet Configuration
In the Test tab:- Review the row data that will be created.
- Click Test.

- Check permissions.
- Verify the tab exists.
- Ensure column names match exactly.
- Re-sync column names.
Publish Your Workflow
Once everything works:- Click Test Your Agent to simulate a call.
- Verify that the row is added correctly.
- Click Publish.