What is it?
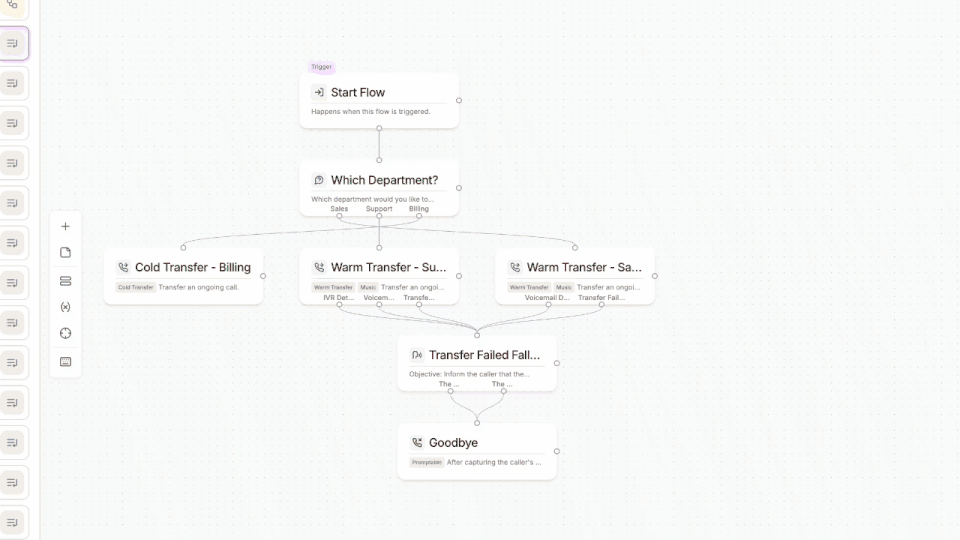
The Transfer Call block lets your agent seamlessly hand off a live call to another person, department, or fallback destination. This dramatically simplifies call routing by replacing large, branching, hard-to-manage flows with a single intelligent block that can handle warm transfers, cold transfers, failover logic, caller triage, and on-hold experience, all in one place. This guide walks through the current Transfer Call block, how it works, and how to set it up step by step.What the block can do
The Transfer Call block supports:- Add multiple destiantions.
- Automatically triage callers with AI.
- Automatically retry alternative numbers if one doesn’t pick up.
- Choose warm transfer or cold transfer.
- Customize the caller’s hold experience.
- Set advanced rules like tagging, timeout durations, and human-answered outcomes.
How it works
The Transfer Call block has three main sections:
Let’s walk through each part in detail.
Setup - Choose the Type of Transfer
At the setup step, you decide which transfer style your agent will perform.Cold Transfer
A cold transfer hands the caller off immediately to another phone number without an introduction. The agent does not brief the recipient, once the transfer begins, Phonely connects the caller to the destination directly. Cold transfers are best when you want fast routing and the receiving person or team does not need context from the agent (for example: reception, front-desk routing, “press 0” style handoffs, or sending callers to a shared support line).Choose Cold Transfer in Setup
Open the Transfer Call block.In the Setup step, under Action, select Cold Transfer.Click Continue.
Configure destinations in On Transfer
In the on transfer step, you define where Phonely can transfer the caller.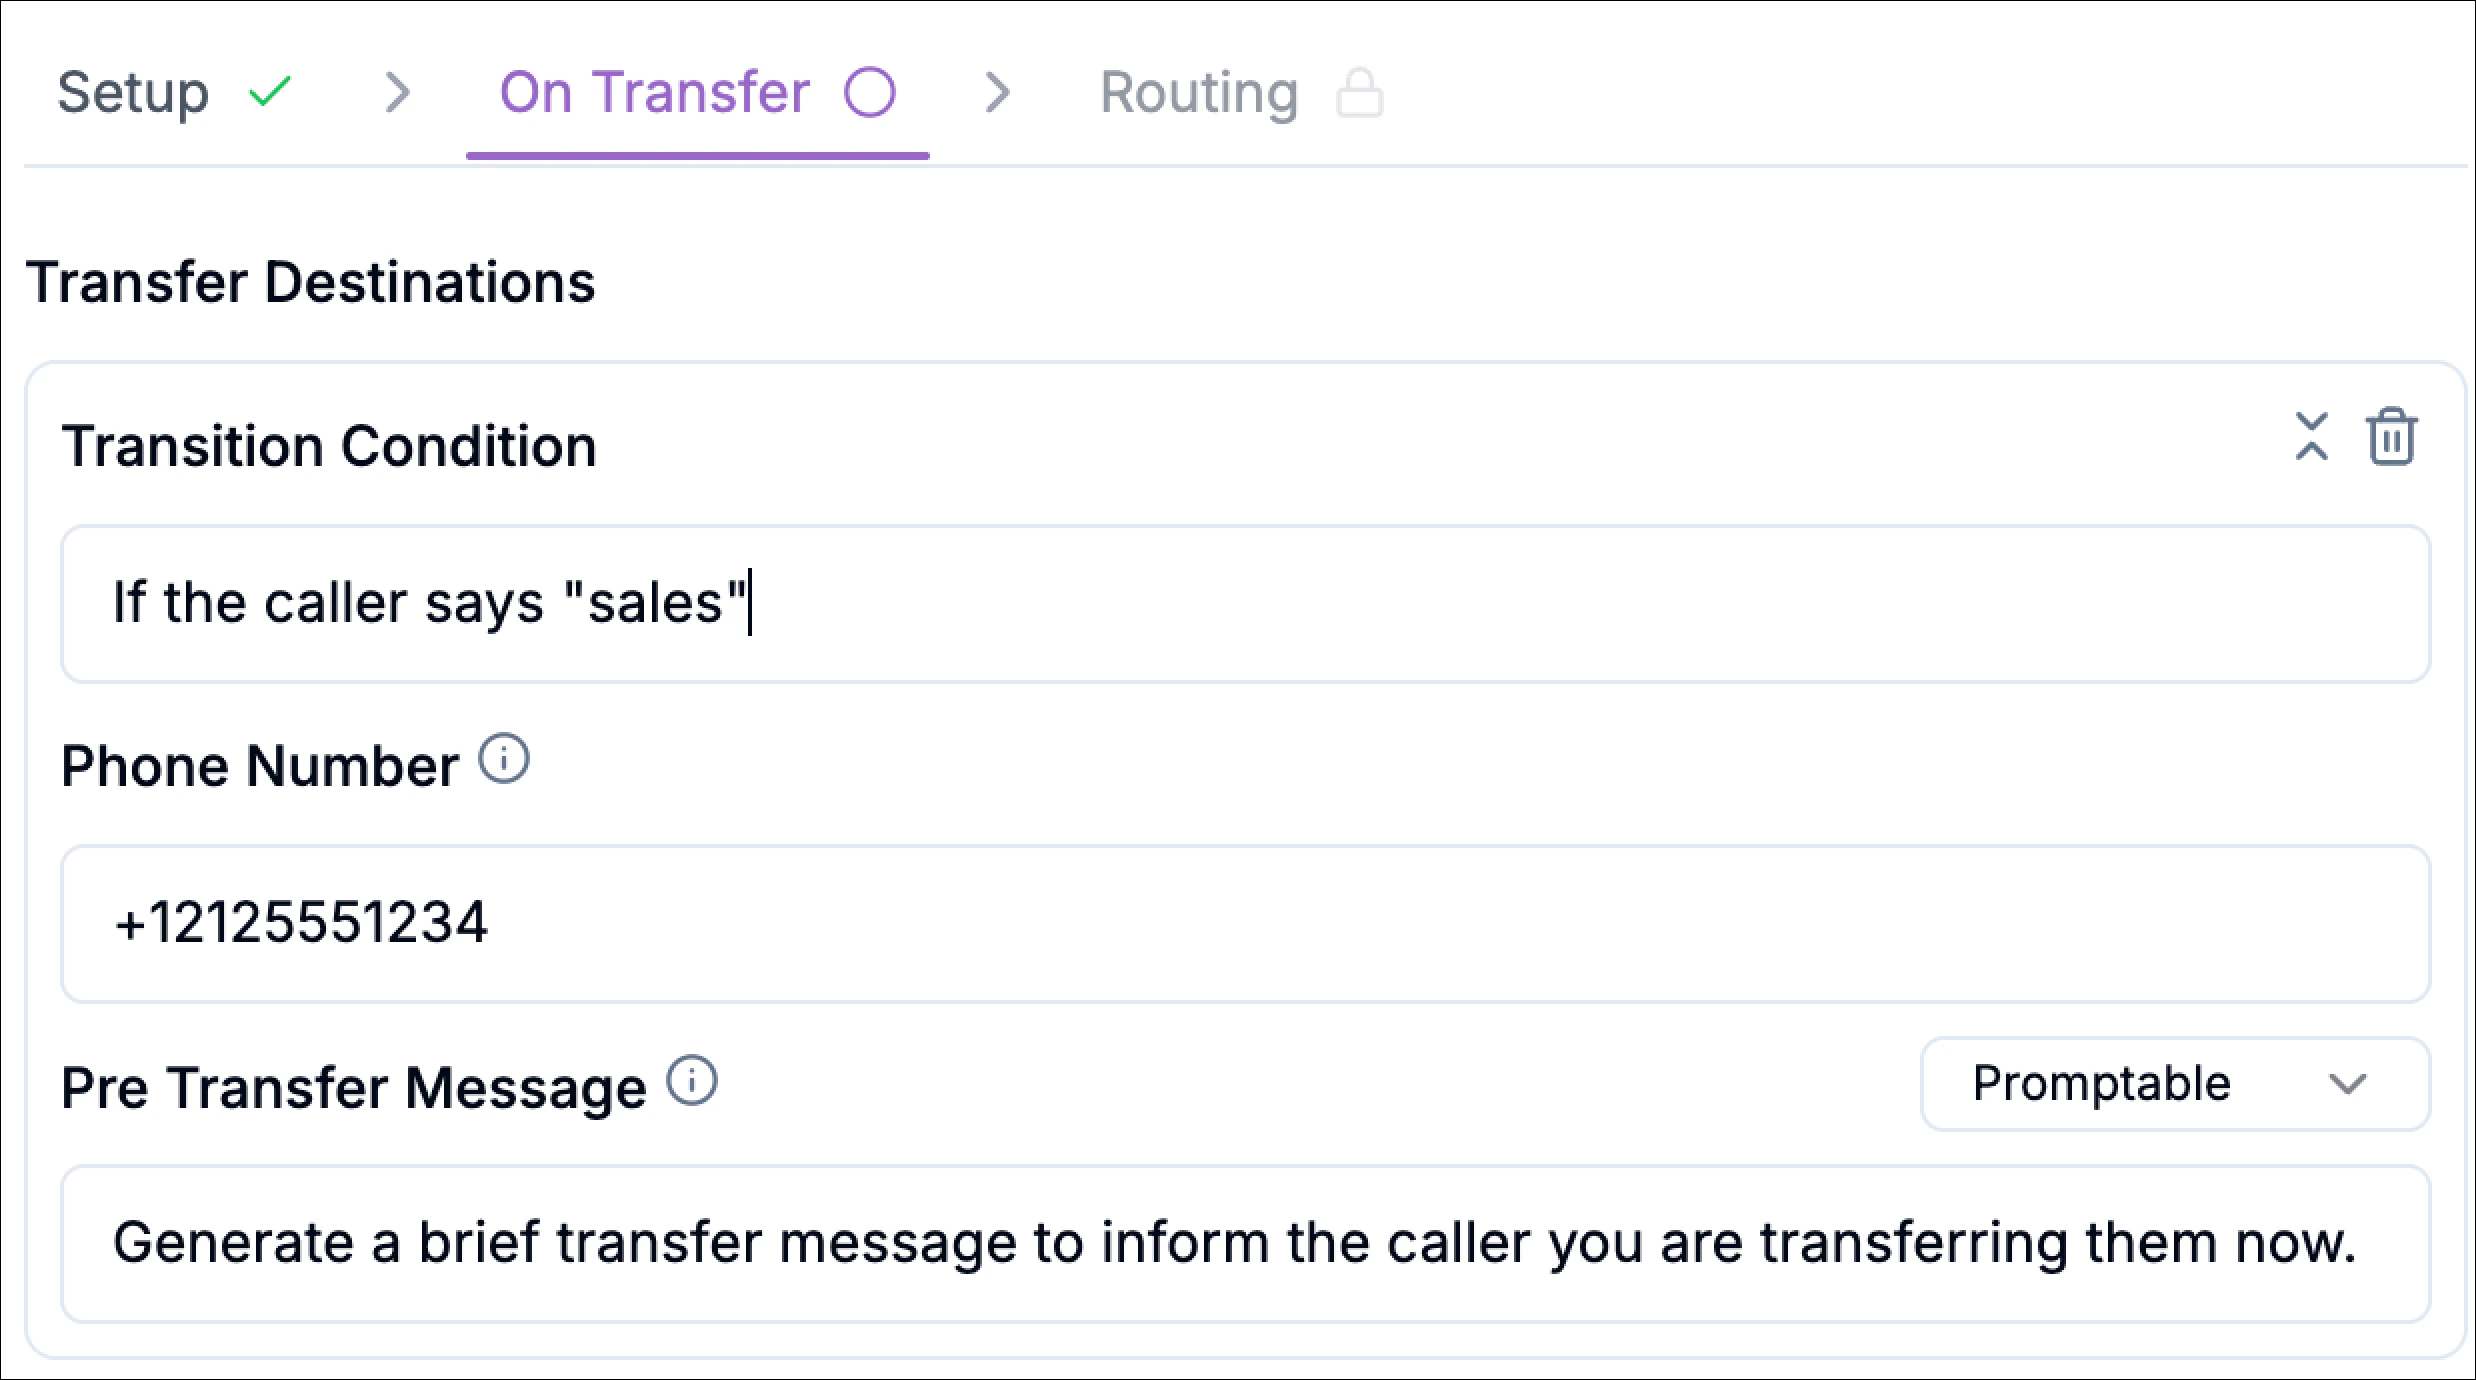
Transition Condition
This is the rule that decides when this destination should be used. It’s typically written as a natural phrase that maps to caller intent.Example conditions:- “If the caller says sales”
- “If the caller asks for support”
- “If the caller mentions billing”
Phone Number
Enter the destination number in E.164 format. Format:+[country code][phone number]Examples:- US:
+12125551234 - Australia:
+61412345678
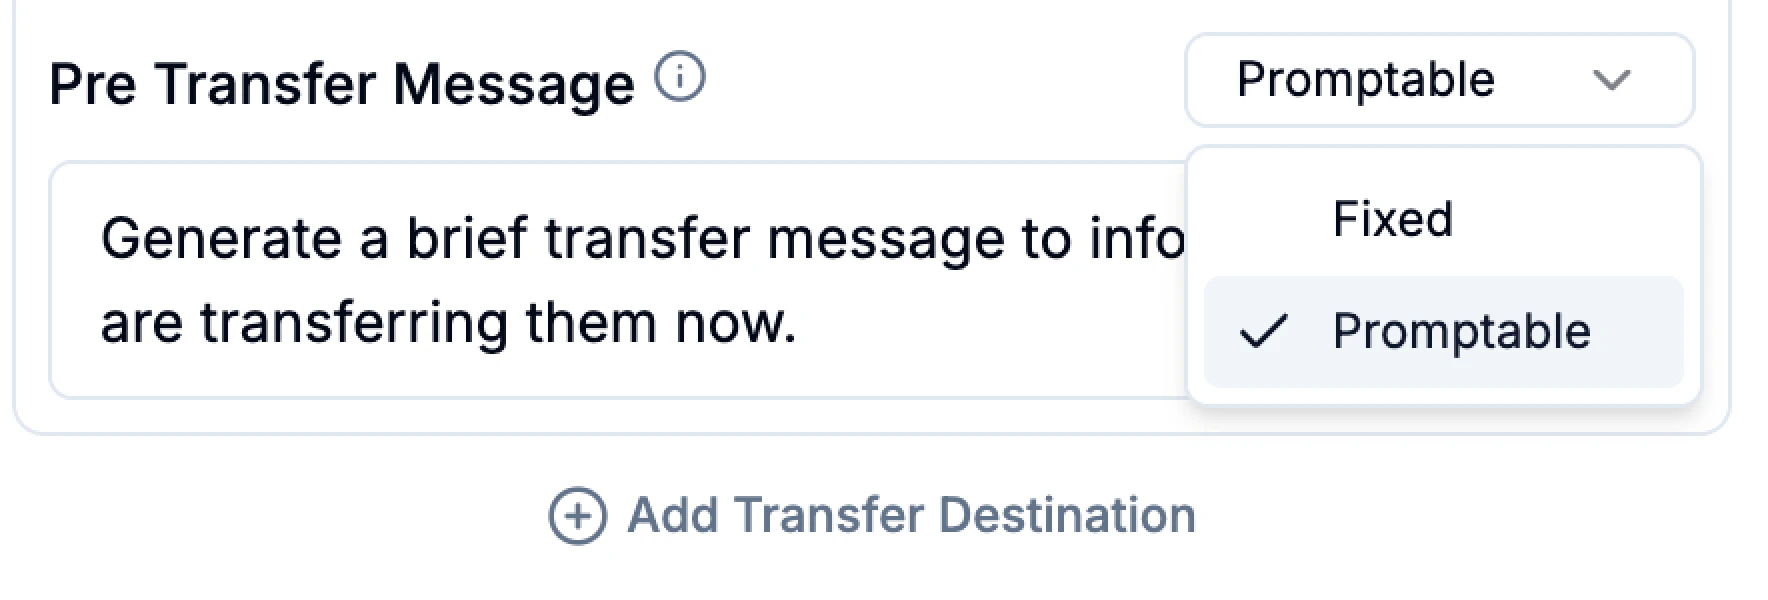
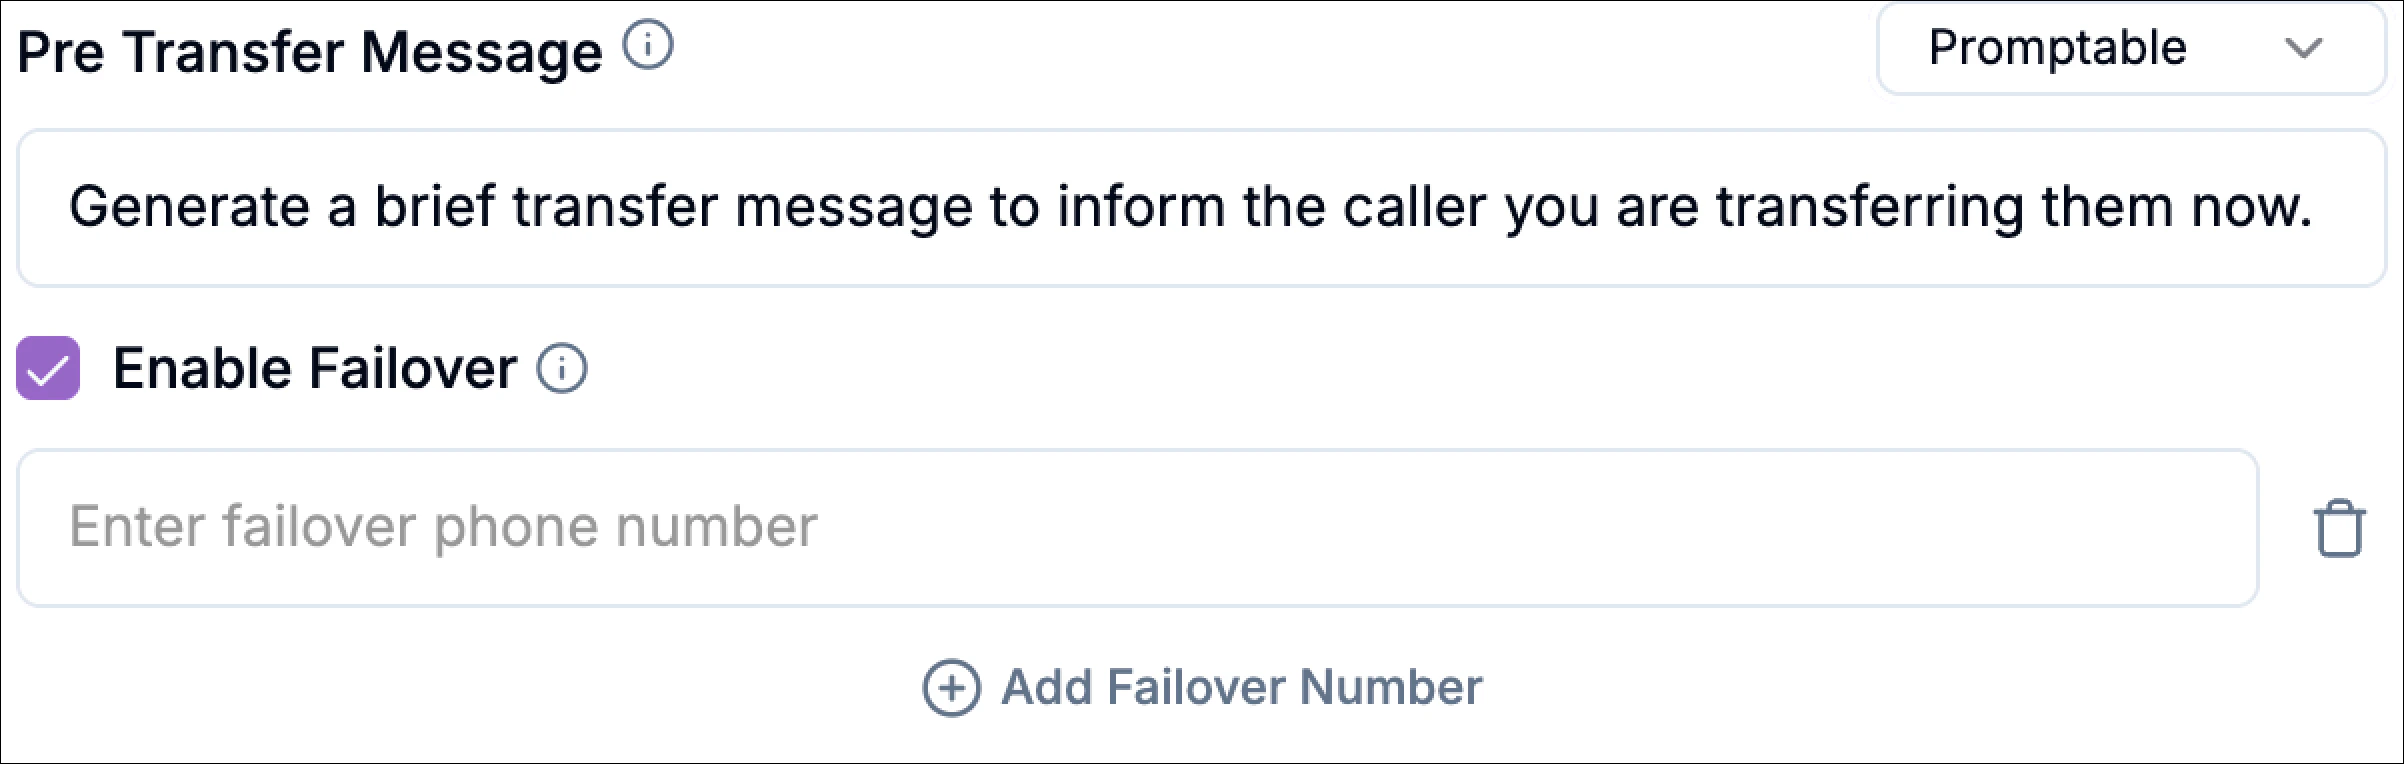
Pre Transfer Message
This is the short message the caller hears right before the transfer starts (for example, “Please hold while I connect you.”).You can configure it as:- Fixed: you write the exact message Phonely should say every time.
Example: “Please hold while I connect you to the right person.” - Promptable: you provide an instruction and Phonely generates a brief message.
Example prompt: “Generate a brief transfer message to inform the caller you are transferring them now.”
Add multiple destinations
Click Add Transfer Destination to include additional numbers. This lets you build practical routing like:- Sales line (if caller says “sales”)
- Support line (if caller says “support”)
- Billing line (if caller says “billing”)
Optional - Call Outcome Tagging
Use call outcome tagging to label the call when the transfer path is triggered. You can select an existing outcome or type a custom one.Examples:
cold_transfer_salescold_transfer_supportcold_transfer_billing
Warm Transfer
A warm transfer connects the caller to a human with context. Instead of transferring immediately, Phonely first reaches out to the recipient (the outbound leg), confirms the connection, and can deliver a short intro before bridging both parties together. This is ideal when the person receiving the call needs a quick handoff summary (for example: escalations, high-value leads, or complex support issues). Warm transfer is best for:- Support escalations where the agent should summarize the issue first
- Sales handoffs where the rep should know the caller’s intent before speaking
- VIP callers where you want a smoother, higher-touch experience
Choose Warm Transfer in Setup
Open the Transfer Call block.In the setup step, under Action, select warm transfer and click Continue.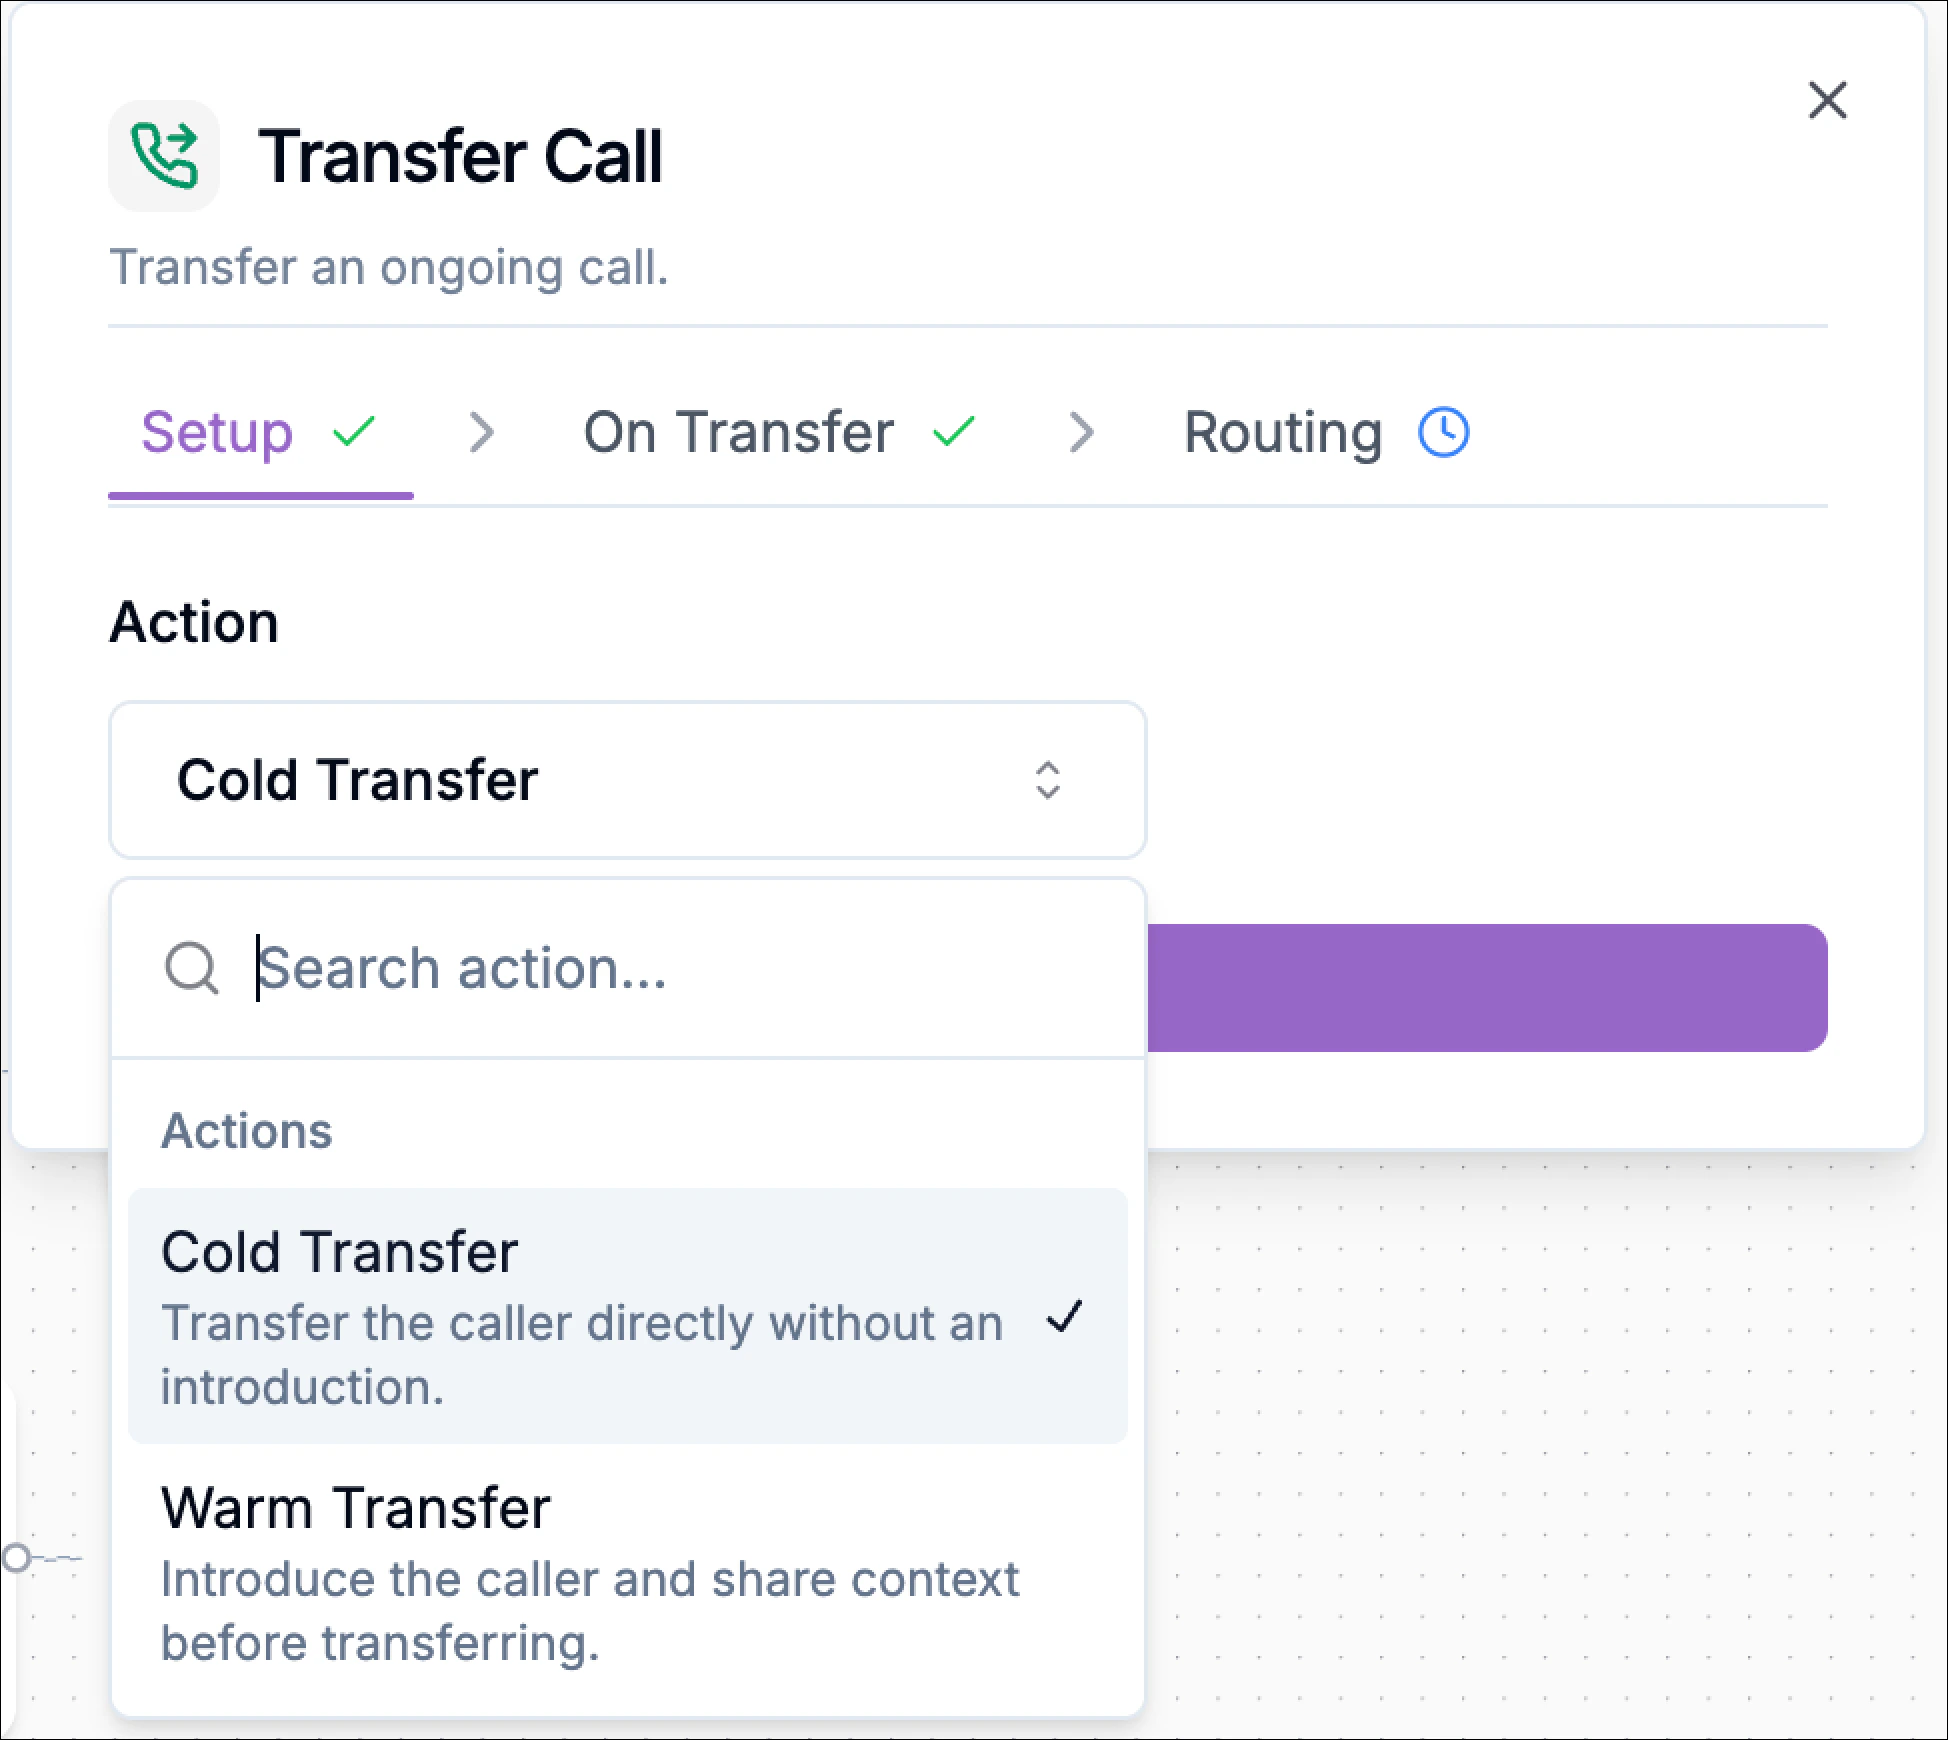
Configure destinations in On Transfer
In the on transfer step, you define who the call can be transferred to and how Phonely should introduce the transfer.Each Transfer Destination includes:Transition ConditionThis tells Phonely when to use this destination.Examples: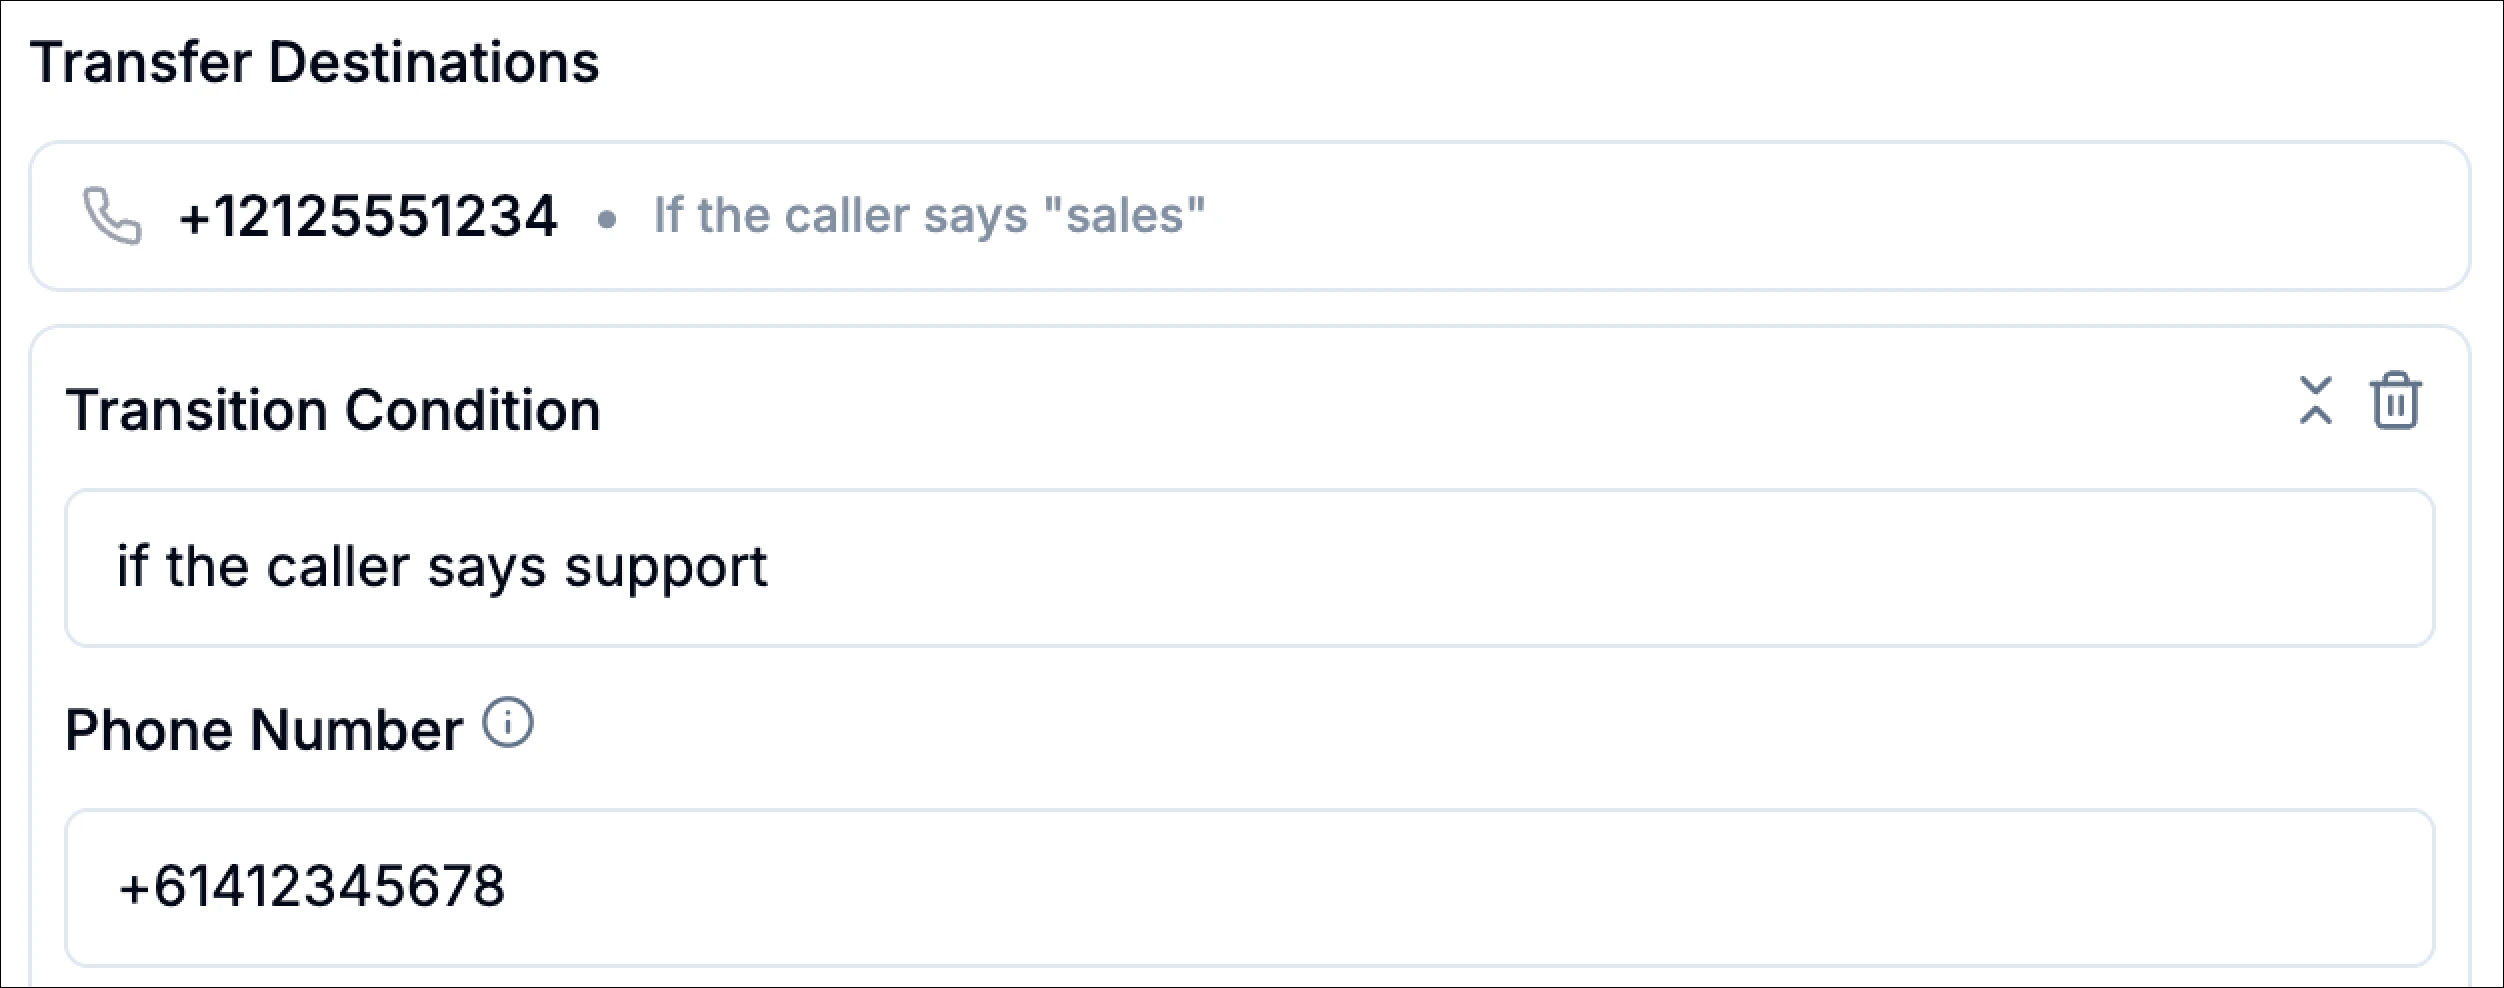
- “if the caller says sales”
- “if the caller says support”
- “if the caller asks for billing”
- Format:
+[country code][phone number] - Examples:
- US:
+12125551234 - Australia:
+61412345678
- US:
- Fixed (consistent wording every time)
Example: “Please hold while I connect you to support.” - Promptable (Phonely generates a brief message from your prompt)
Example prompt: “Generate a brief transfer message to inform the caller you are transferring them now.”
- If the first number doesn’t answer, the system will try the failover numbers in order until one succeeds.
Configure the caller’s hold experience (While Waiting for Connection)
Warm transfers often require a few seconds while Phonely connects to the recipient. The While Waiting for Connection section controls what the caller experiences during that wait.Under Customer Experience While on Hold, choose one option: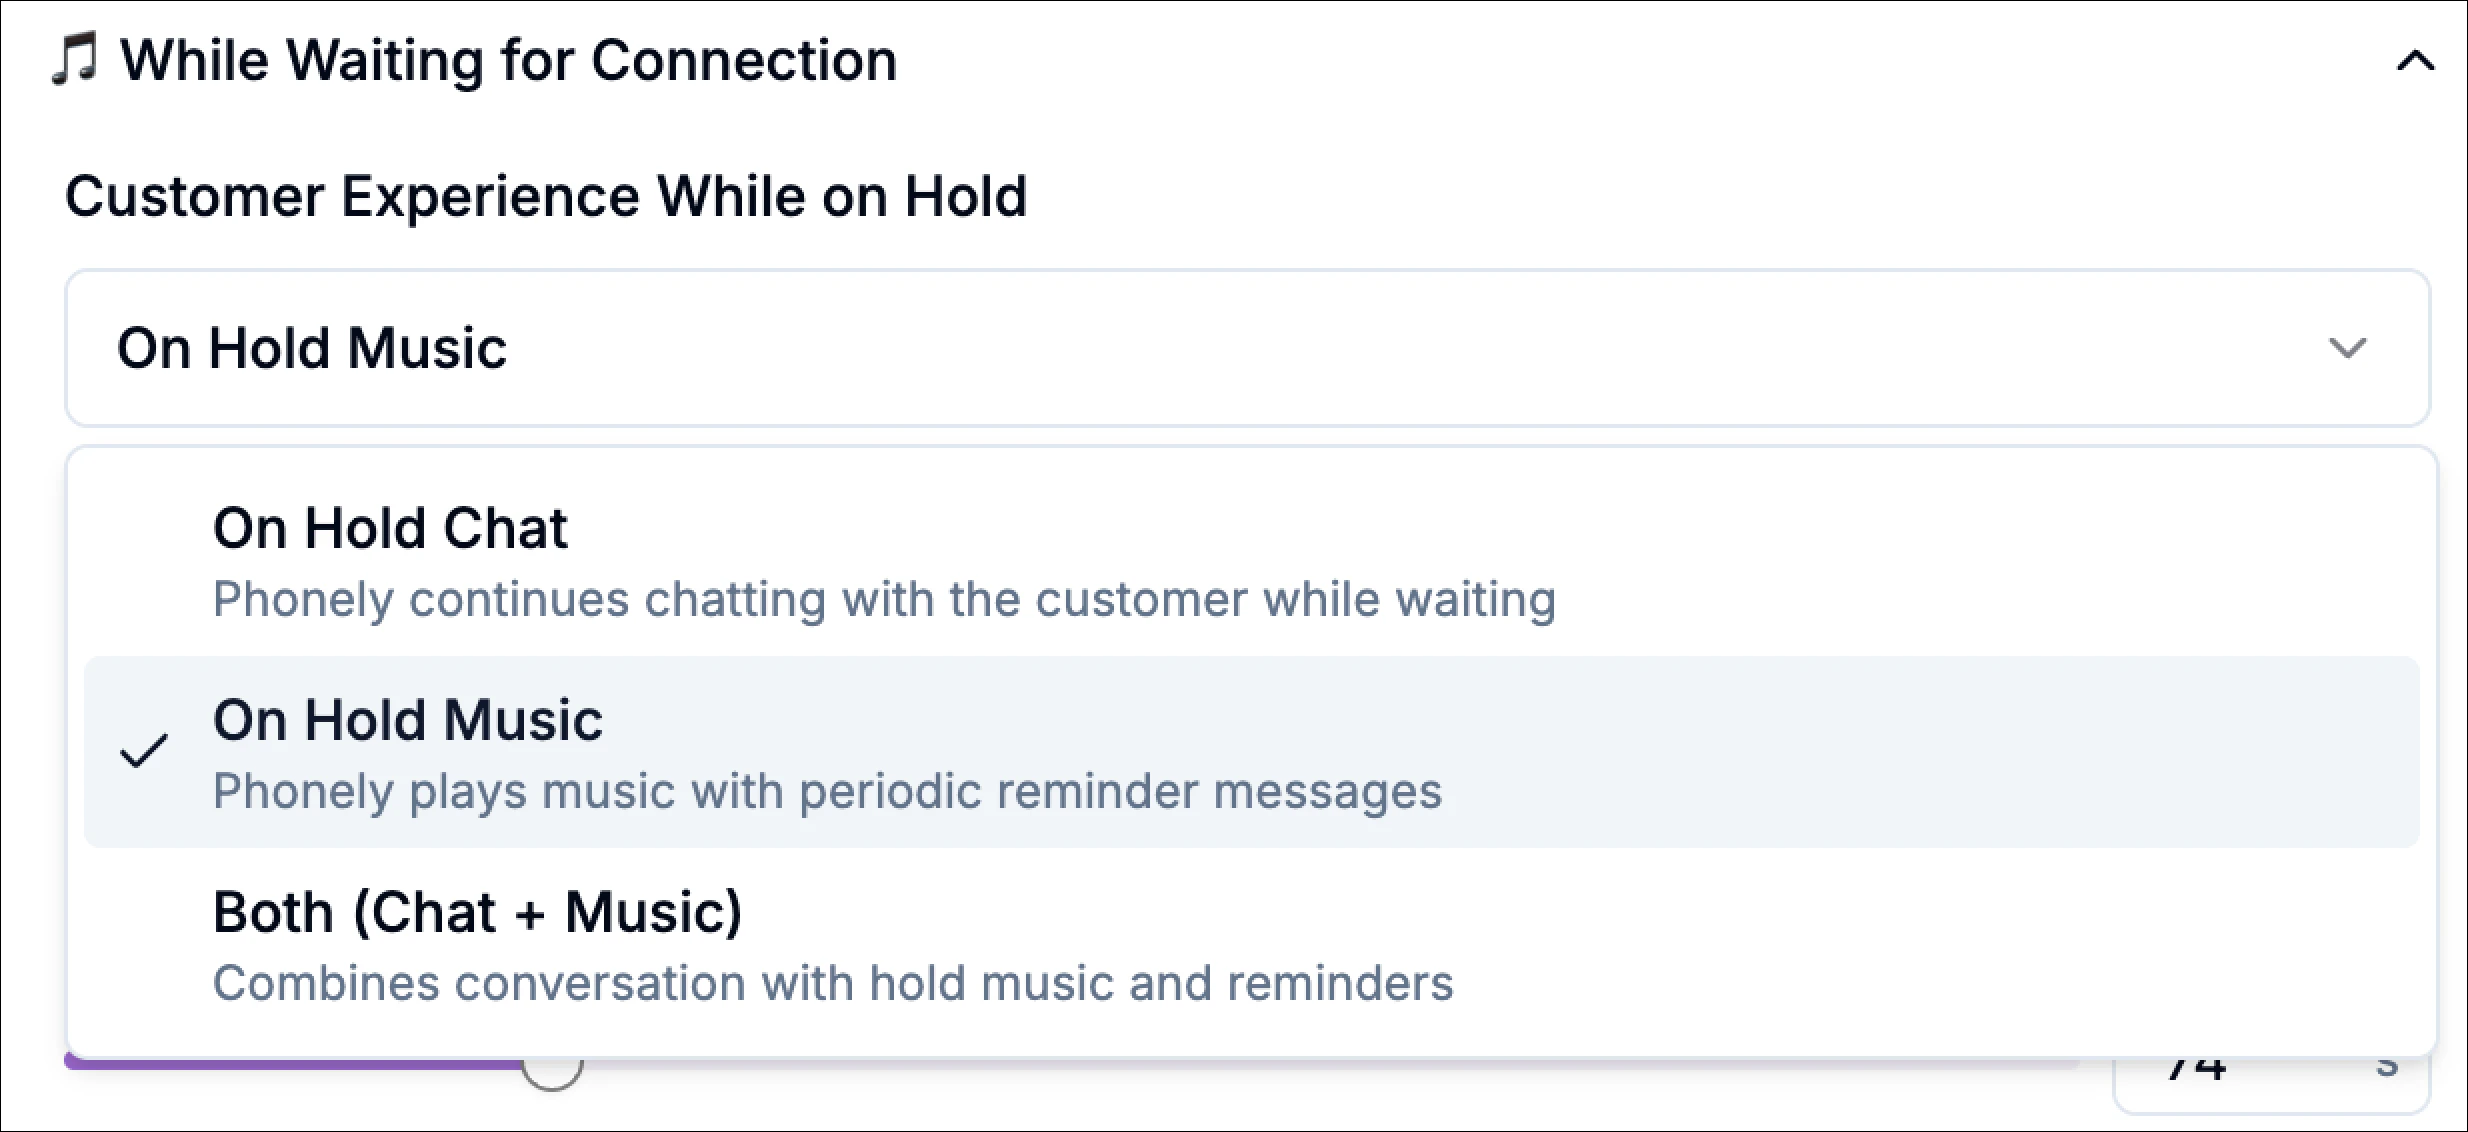
- On Hold Chat: Phonely continues chatting with the caller while waiting.
- On Hold Music: Phonely plays hold music with periodic reminder messages.
- Both (Chat + Music): Combines conversation with hold music and reminders.
Configure what happens when the recipient answers (When Connection is Established)
This section controls how Phonely behaves once the outbound destination picks up, this is the “warm” part of the warm transfer.
“Say yes if you can take this call now.”This is useful when you want to avoid dumping calls onto a busy rep.
Example: “Great, I’ve reached someone, connecting you now.”
Example: “I have a customer asking for support with their account. I’m connecting them now.”
Example: “You’re both connected now. I’ll drop off.”
Ask Outbound Leg for Permission (Optional)
Enable this if you want the recipient to explicitly accept the transfer before the caller is bridged in.When enabled, your outbound prompt should be a clear yes/no request, for example:“Say yes if you can take this call now.”This is useful when you want to avoid dumping calls onto a busy rep.
Detection Timeout
Controls how long Phonely waits to detect what answered on the outbound side (human, voicemail, or IVR). Lower values detect faster; higher values may be more reliable in noisy environments.Message to Caller (Inbound)
Message played to the caller once a human is detected (before the bridge happens).Example: “Great, I’ve reached someone, connecting you now.”
Message to Recipient (Outbound)
Message played to the recipient after a human is detected, typically a short handoff summary.Example: “I have a customer asking for support with their account. I’m connecting them now.”
Post Transfer Message
Message played to both parties right after the bridge (before Phonely disconnects).Example: “You’re both connected now. I’ll drop off.”
Advanced Settings (Warm Transfer)
Warm Transfer Attempt Duration
This controls the maximum time (in seconds) Phonely will attempt to complete the warm transfer before it times out.Use a shorter duration when you want fast routing; use a longer duration when your recipients often take time to answer.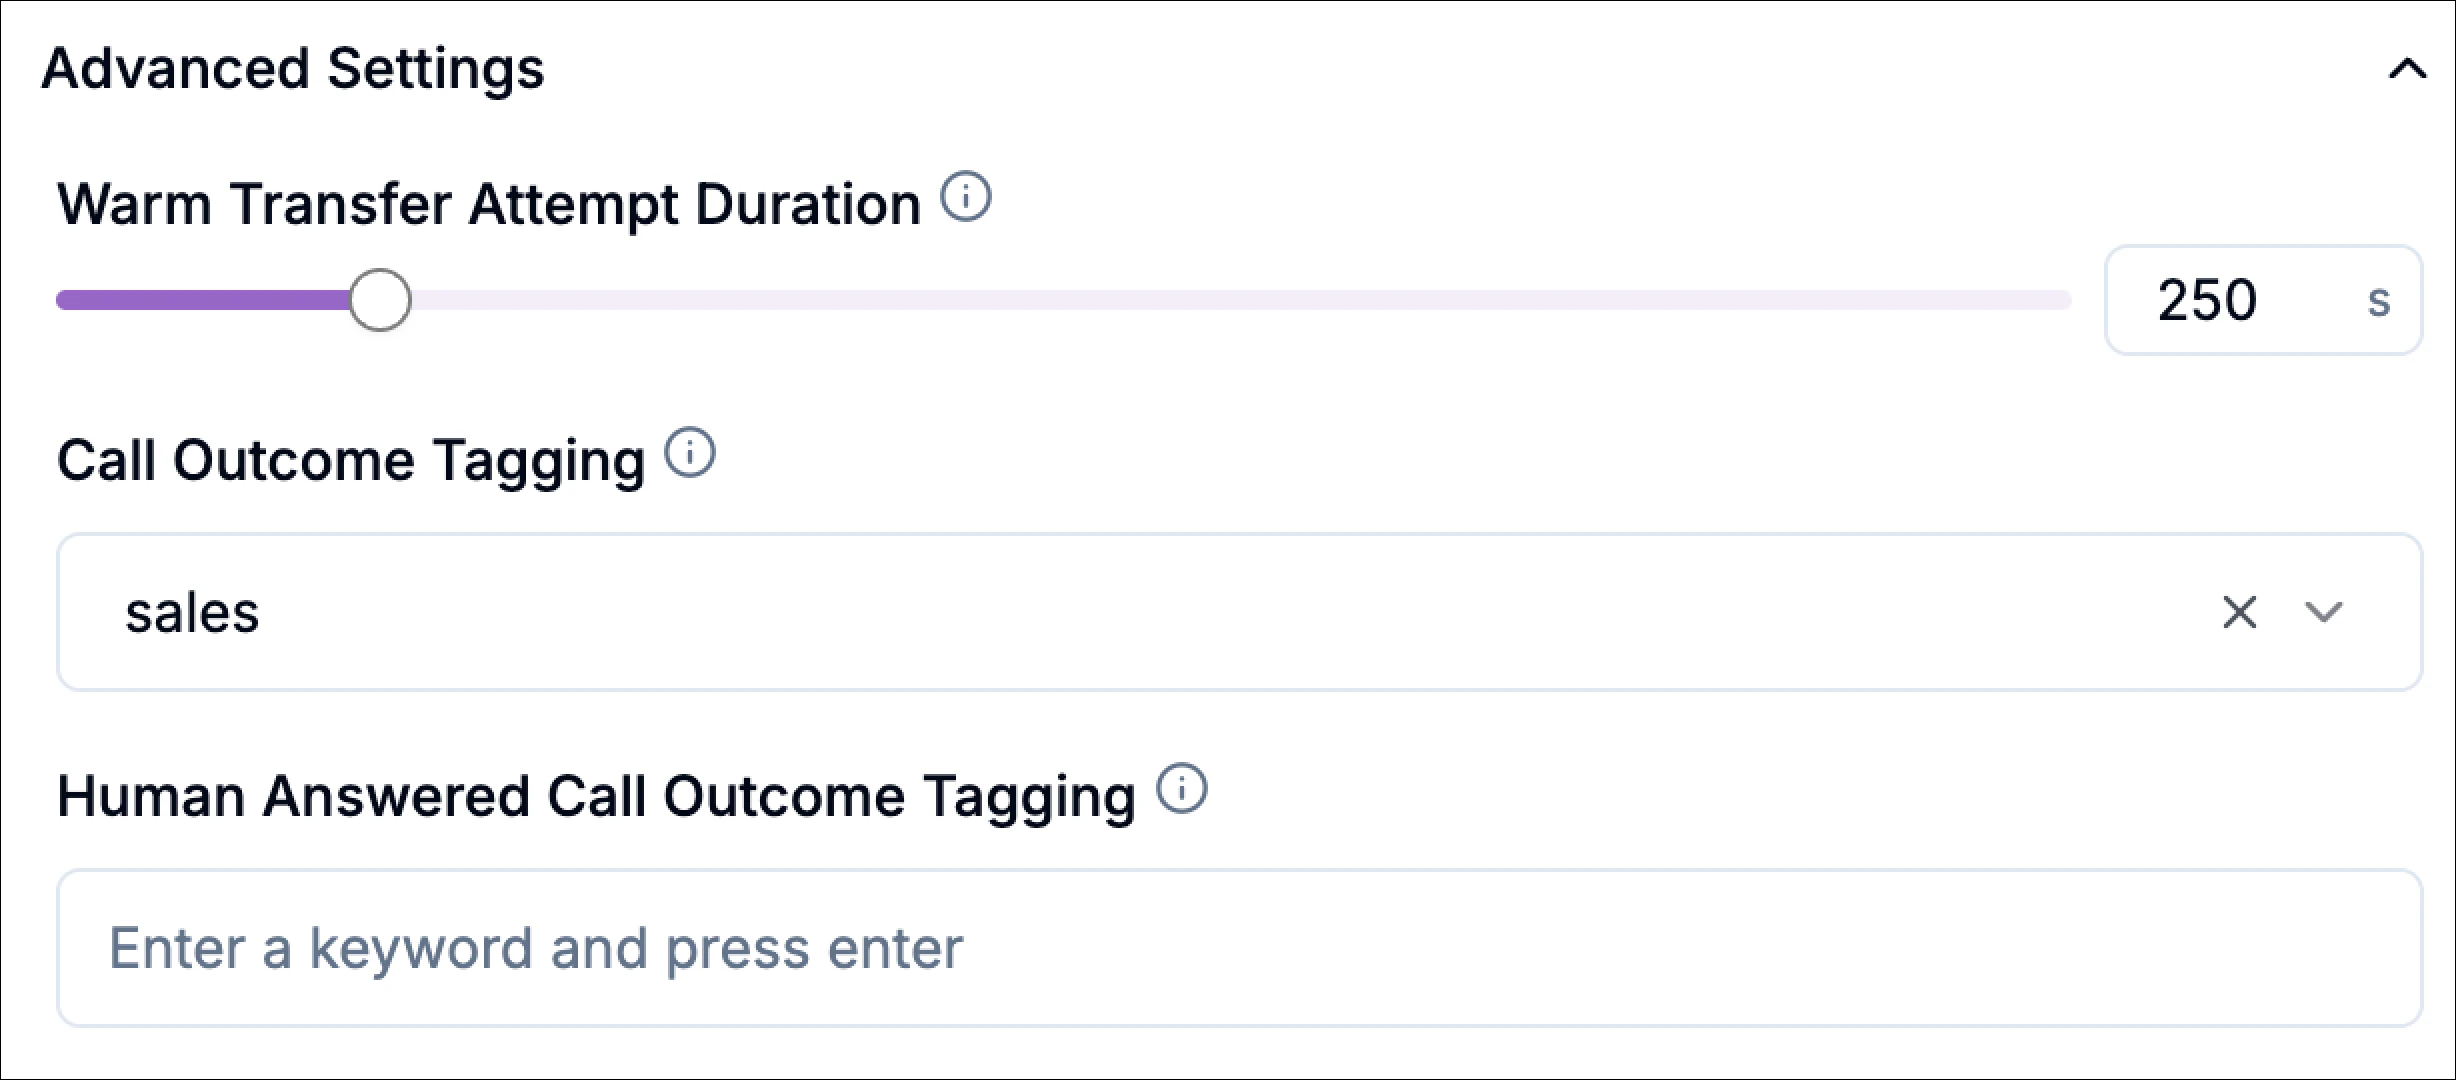
Call Outcome Tagging
Select an existing outcome or type a custom one to categorize the transfer for analytics.Examples:warm_transfer_supportwarm_transfer_saleswarm_transfer_escalation
Human Answered Call Outcome Tagging
Add tags specifically when a human answers.human_answered_supporthuman_answered_saleshandoff_success
Routing
After you finish setup and on transfer, the final step is routing.This section controls what Phonely should do when the outbound number does not connect cleanly to a human, especially when the destination is an IVR menu or voicemail.In short, routing defines how Phonely behaves when it reaches the destination phone system.In the Routing tab for warm transfer, you can configure: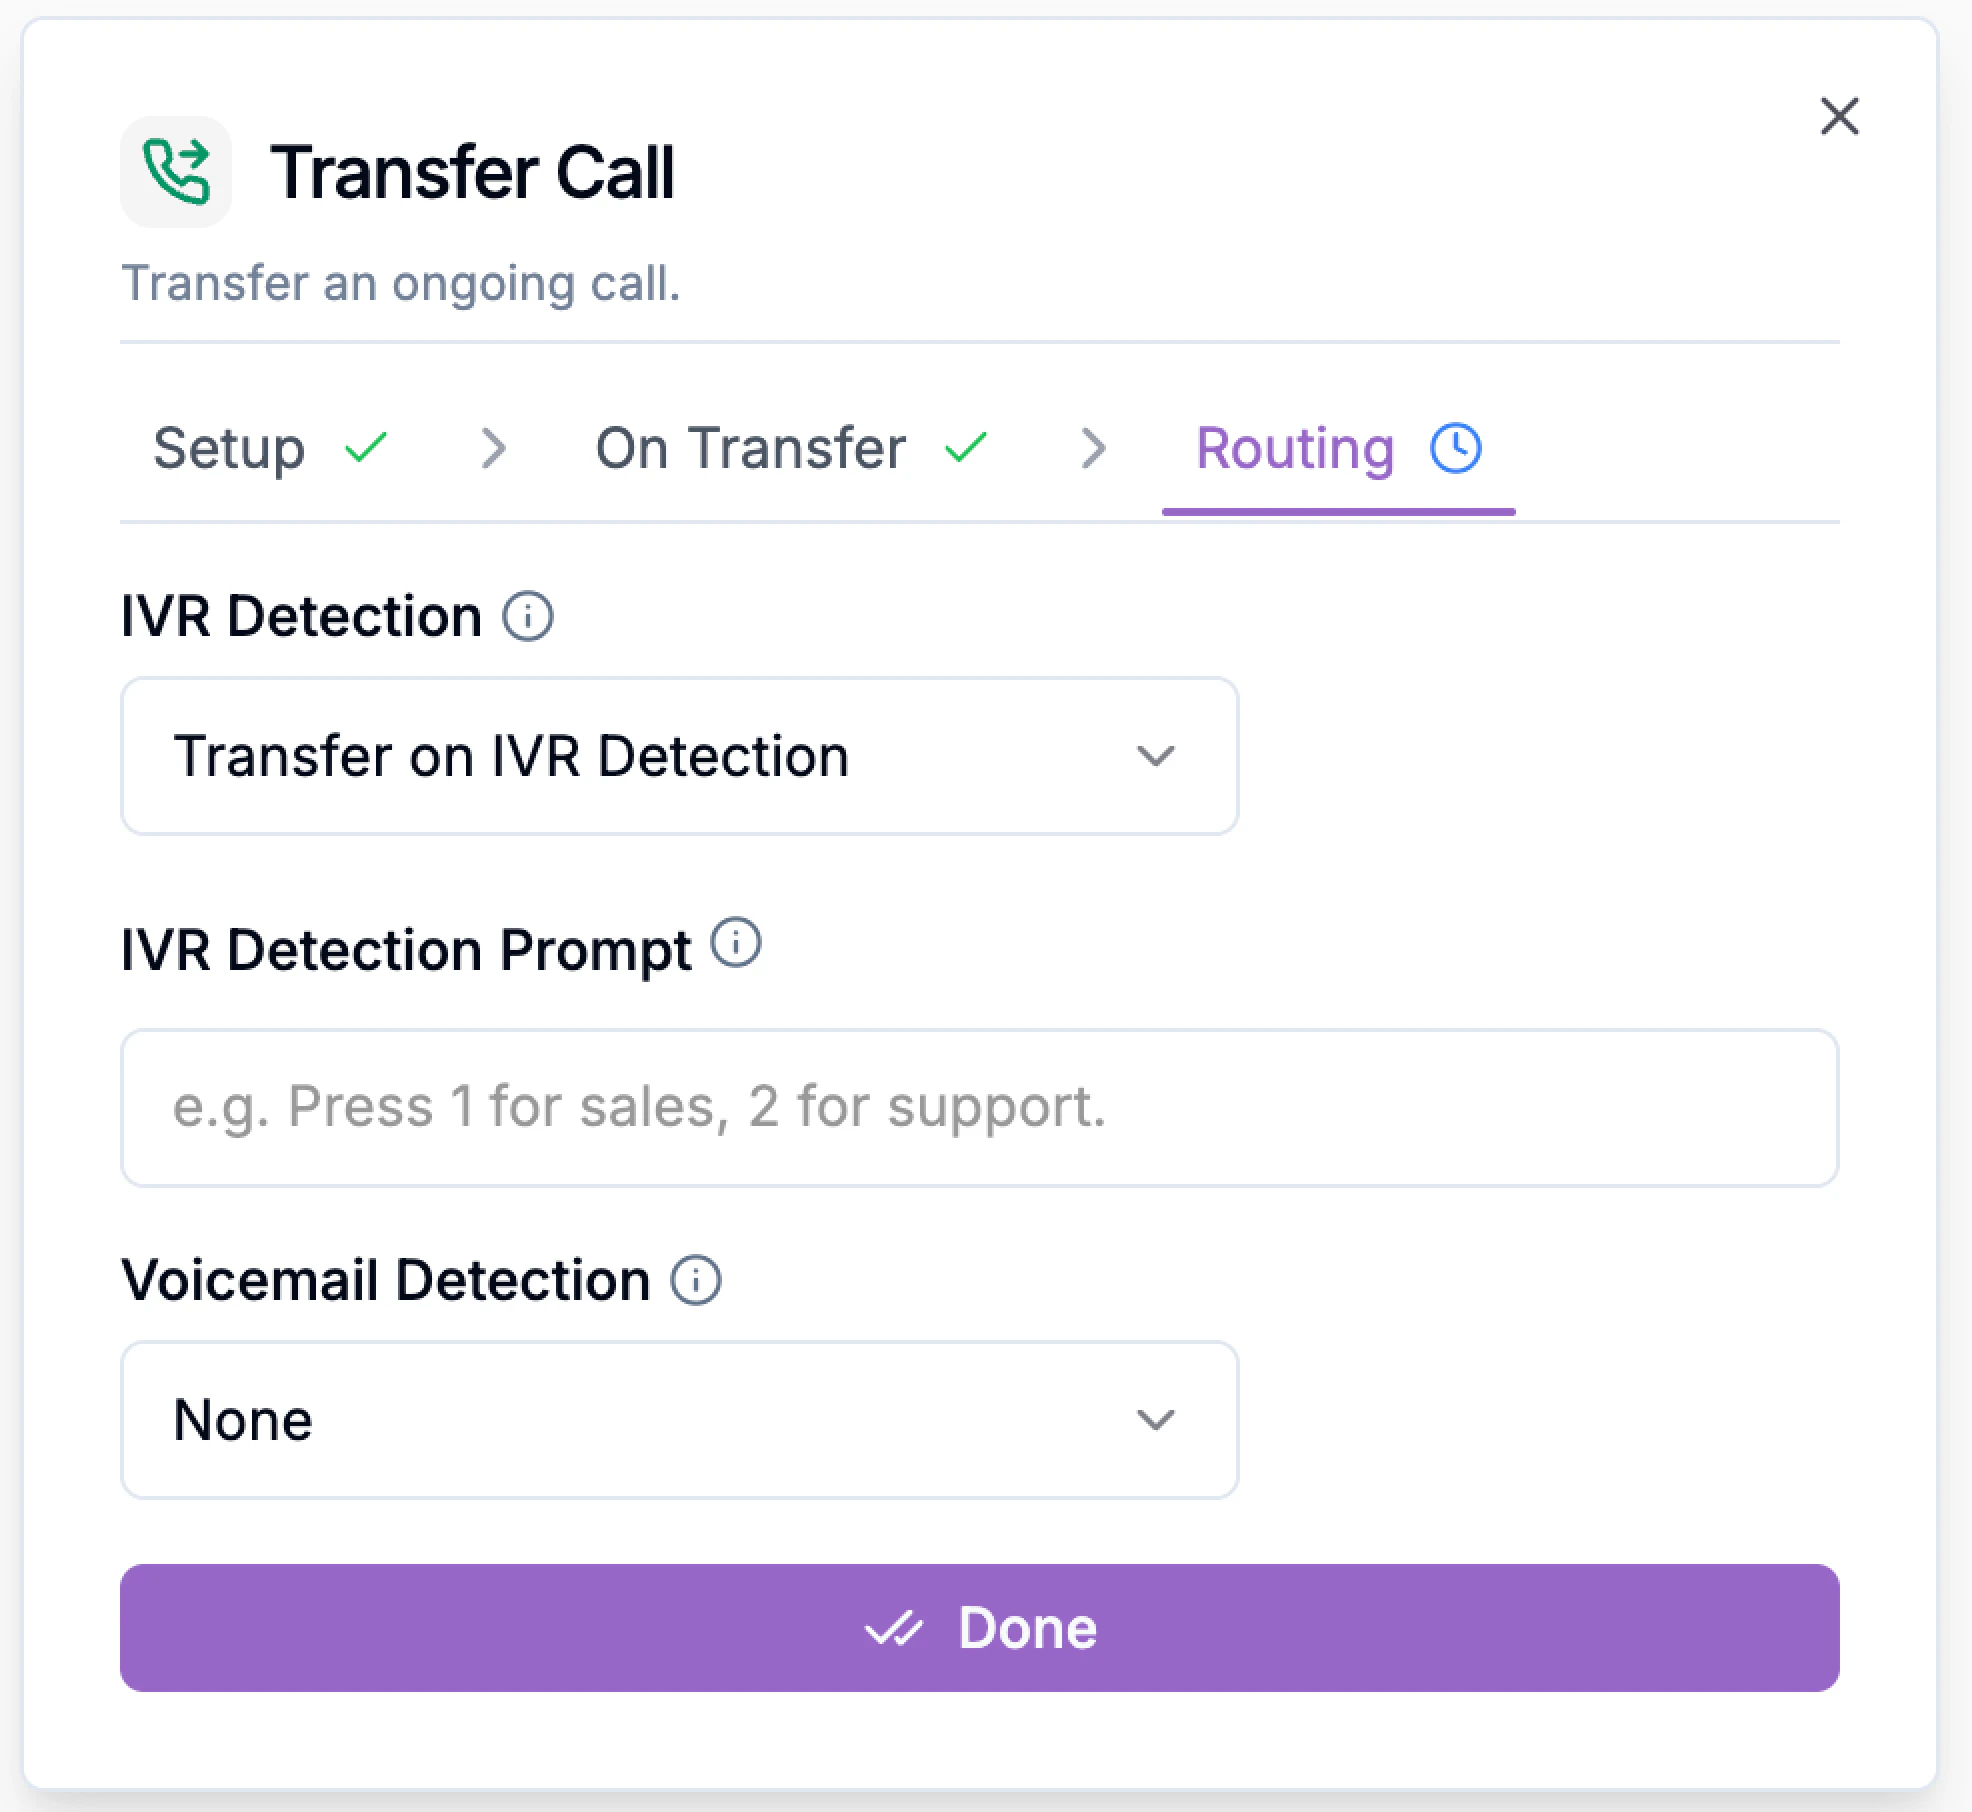

You are routing VIP calls to an account manager’s direct line. If that line forwards to a company IVR after hours, you may not want the caller trapped in a phone tree.
Set Exit on IVR Detection so the flow can return and handle the caller with a fallback message.
For urgent support calls, you may want:
- IVR Detection
- IVR Detection Prompt
- Voicemail Detection
1) IVR Detection
IVR Detection tells Phonely what to do if the transfer destination answers with an automated phone menu (Interactive Voice Response), such as:- “Press 1 for Sales”
- None
- Transfer on IVR Detection
- Exit on IVR Detection
- you expect a direct human answer,
- or the destination line is a direct extension/cell phone.
- the destination number is a company line with a menu,
- and you want Phonely to handle that menu instead of failing the transfer.
- IVR Detection: Transfer on IVR Detection
- IVR Detection Prompt:
Press 2 for technical support
- you are transferring to a shared business line,
- the menu is predictable,
- and you want the warm transfer to still reach the intended team.
- you only want to transfer to a live person directly,
- and automated menus are considered a failed transfer path.
You are routing VIP calls to an account manager’s direct line. If that line forwards to a company IVR after hours, you may not want the caller trapped in a phone tree.
Set Exit on IVR Detection so the flow can return and handle the caller with a fallback message.
2) Voicemail Detection
Voicemail Detection tells Phonely what to do if the destination line reaches voicemail instead of a person.Options include:- None
- Exit on Voicemail Detection
For urgent support calls, you may want:
- Voicemail Detection: Exit on Voicemail Detection
So the caller is not dropped into a mailbox. Instead, Phonely can continue with a fallback path like:
“No one is available right now. I can schedule a callback or take a message.”