From here, you can update your profile, invite team members, adjust how often you receive email notifications, and control your organization’s shared settings.
Accessing Your Account Settings
- Click your profile icon (bottom-left corner of the dashboard).
- From the dropdown menu, select Settings.
- You’ll be directed to the Account Settings page, where you’ll find sections for:
- Personal details (name, email, phone number, API key, UID)
- Password reset
- Email preferences
- Organization settings (members, organization name, billing, and permissions)
1. Changing Your Password
If you ever need to update your password or recover access, Phonely allows you to reset it securely via email.- Navigate to Settings > Change your password section.
- Click Set a new password.
- A reset email will be sent to your registered address.
- Open the email from phonely and click Change Password.
- Follow the link to create and confirm your new password.
2. Inviting Team Members.
Invite team members to collaborate within your Phonely organization. Each member can access shared agents, call flows, analytics, and configurations.- In Settings, scroll to the Organization Settings section.
- Under Members, locate the input field labeled Invite a new member to your team by email.
- Enter the teammate’s email address.
- Click Invite.
- Once invited, the member will receive an email invitation to join your organization.
Tip:
You can also share a join link by clicking Share Link beside the Invite button.
Organization owners can assign roles (Owner, Admin, Member) to control permissions.
3. Updating Email Preferences
Phonely lets you control how often you receive email notifications about activity, reports, and system updates.- Go to the Email Preferences section on your Settings page.
- Open the dropdown menu labeled Select an option.
- Choose your preferred notification frequency:
- Daily — Receive a summary of activity every day.
- Weekly — Get one email with key metrics each week.
- Monthly — Receive a high-level monthly performance report.
Creating a New Organization
If you manage multiple teams or projects, you can create separate organizations within your Phonely account.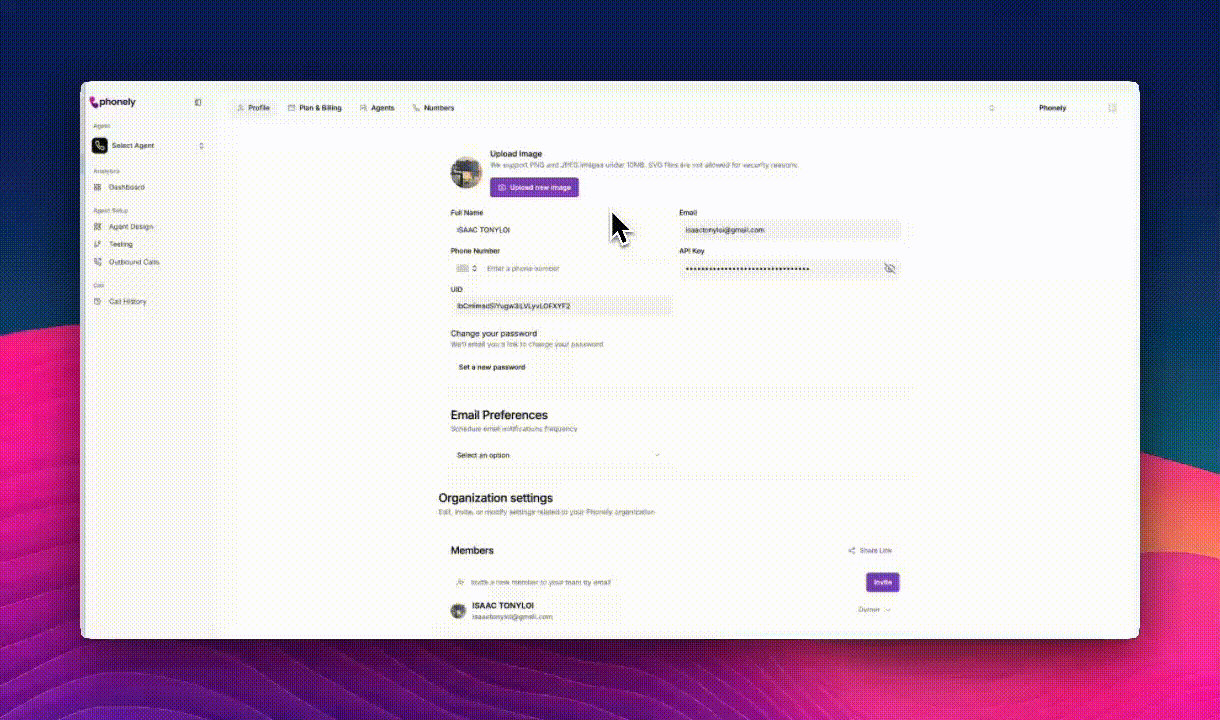
- In the top-right corner, open the Organization Switcher button it displays your current organization name.
- Click the dropdown arrow to expand the list.
- Select Create Organization.
- In the Create Organization dialog box, enter the desired organization name (for example, TestOrg).
- Click Create to confirm.
Managing Organization Information
After creating or selecting an organization, you can view and update its settings under the Organization Information section. From here, you can:- Update your Organization Name: Modify the display name to match your team, brand, or client project.
- Verify or Change your Billing Account: Ensure your plan and payment details align with the correct organization.
- Enable or Disable Public Recordings: Control whether call recordings are publicly accessible for transparency or audit purposes.