> ## Documentation Index
> Fetch the complete documentation index at: https://docs.phonely.ai/llms.txt
> Use this file to discover all available pages before exploring further.
# Filter
The Pre-Call Filter action determines how a call should be routed before the conversation begins.
Instead of sending every caller into the same Start Flow, the Filter allows you to branch the call into different paths based on predefined conditions.
These conditions evaluate information such as:
* caller metadata (phone number, country, etc.)
* variables returned by other Pre-Call actions (API Request, Code, etc.)
* system variables or previously defined values
The goal is simple: decide the correct path for the call before the AI agent begins speaking.
This allows your workflows to start with the correct logic already in place.
## How Pre-Call Filtering Works
A Filter does not evaluate a single yes/no rule
Instead, it evaluates **cases**. Each case represents a possible routing path. Inside each case, you define **conditions** that determine when that case should be used.
In simple terms:
| Component | Purpose |
| :------------- | :----------------------------------------- |
| **Cases** | Define where the call can go |
| **Conditions** | Define when the call should take that path |
When the filter runs:
1. Phonely checks case 1
2. If its conditions match, the call follows case 1
3. If not, Phonely checks case 2
4. The process continues until a case matches
5. If none match, the call follows the else path
Because of this behavior, case order matters.
You should structure your cases from most specific to most general, and treat Else as the fallback route. This makes the filter useful for preparing the correct path before the AI agent starts speaking.
### Set Up a Pre-Call Filter Block
Pre-Call actions must be added **above the Start Flow**.
Open your **Flow Editor** and select the block that should run when a call begins. In the configuration panel on the right, enable **Set as First Flow**.
When this option is checked, Phonely will always start the workflow with this block whenever a call is received. Once it is set, the system enables the **Pre-Call Actions** area above the Start Flow.
Select **Filter** from the list of available Pre-Call Actions. The Filter configuration panel opens on the right.
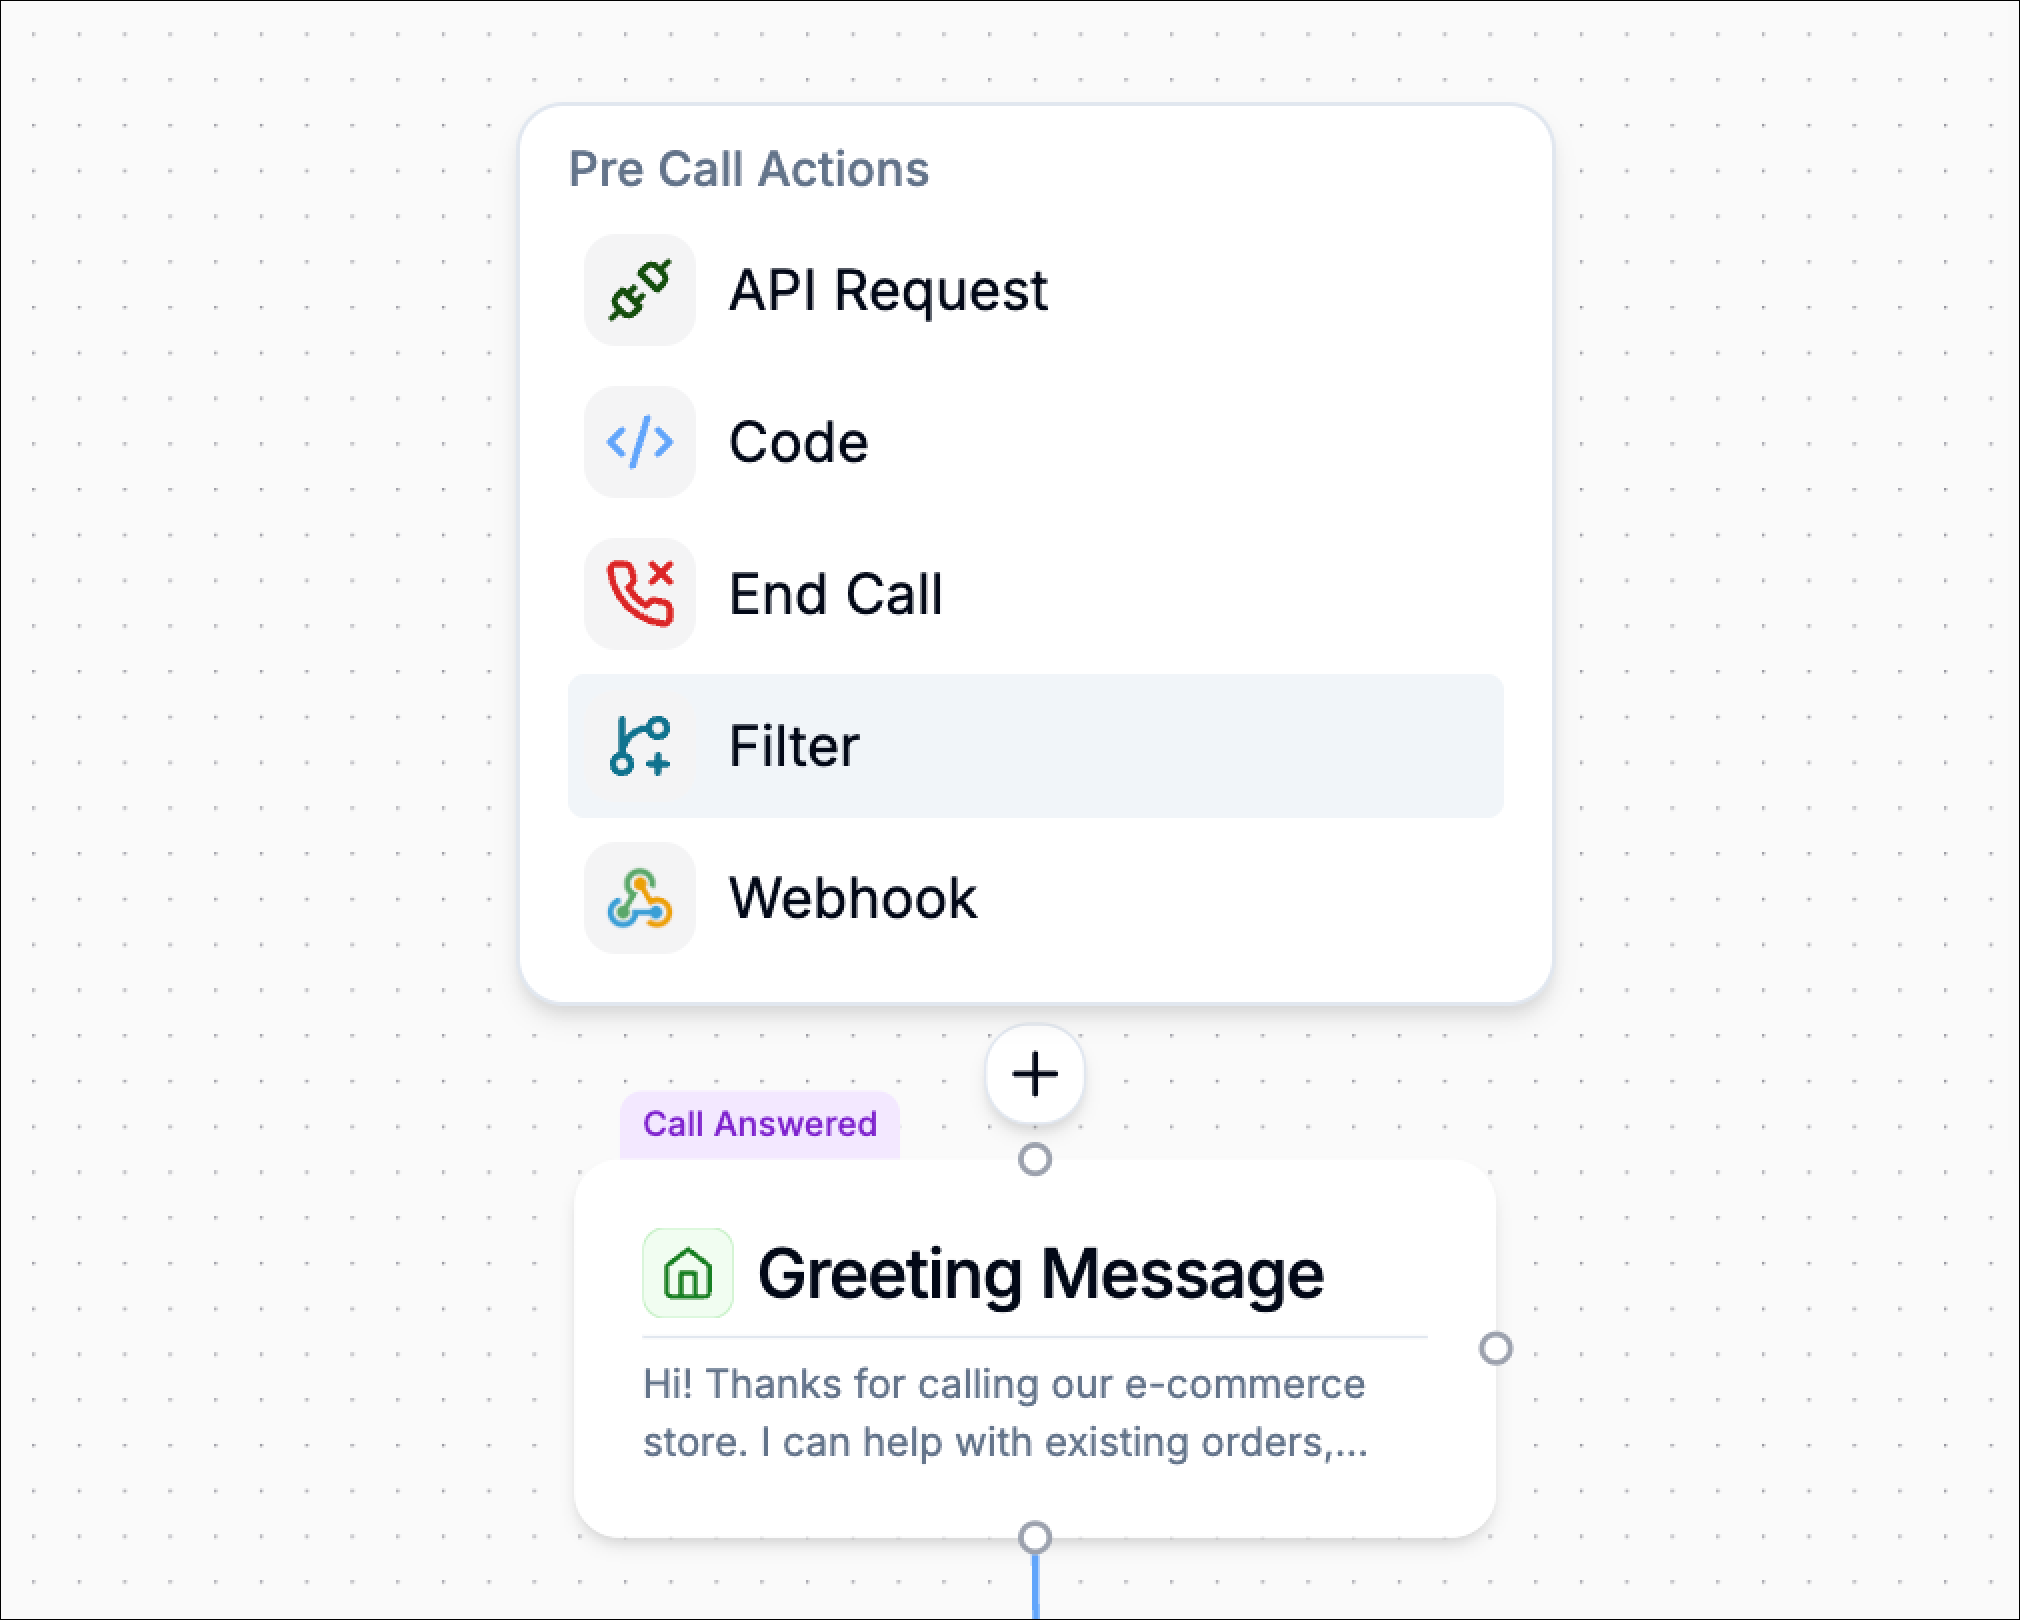 When added, the Filter block appears on the canvas with outputs for each case plus an **Else** output.
### Create a Case (the routing path)
Click the **Filter block** to open the Filter configuration panel. Under **Cases**, you will see **Case 1** by default.
When added, the Filter block appears on the canvas with outputs for each case plus an **Else** output.
### Create a Case (the routing path)
Click the **Filter block** to open the Filter configuration panel. Under **Cases**, you will see **Case 1** by default.
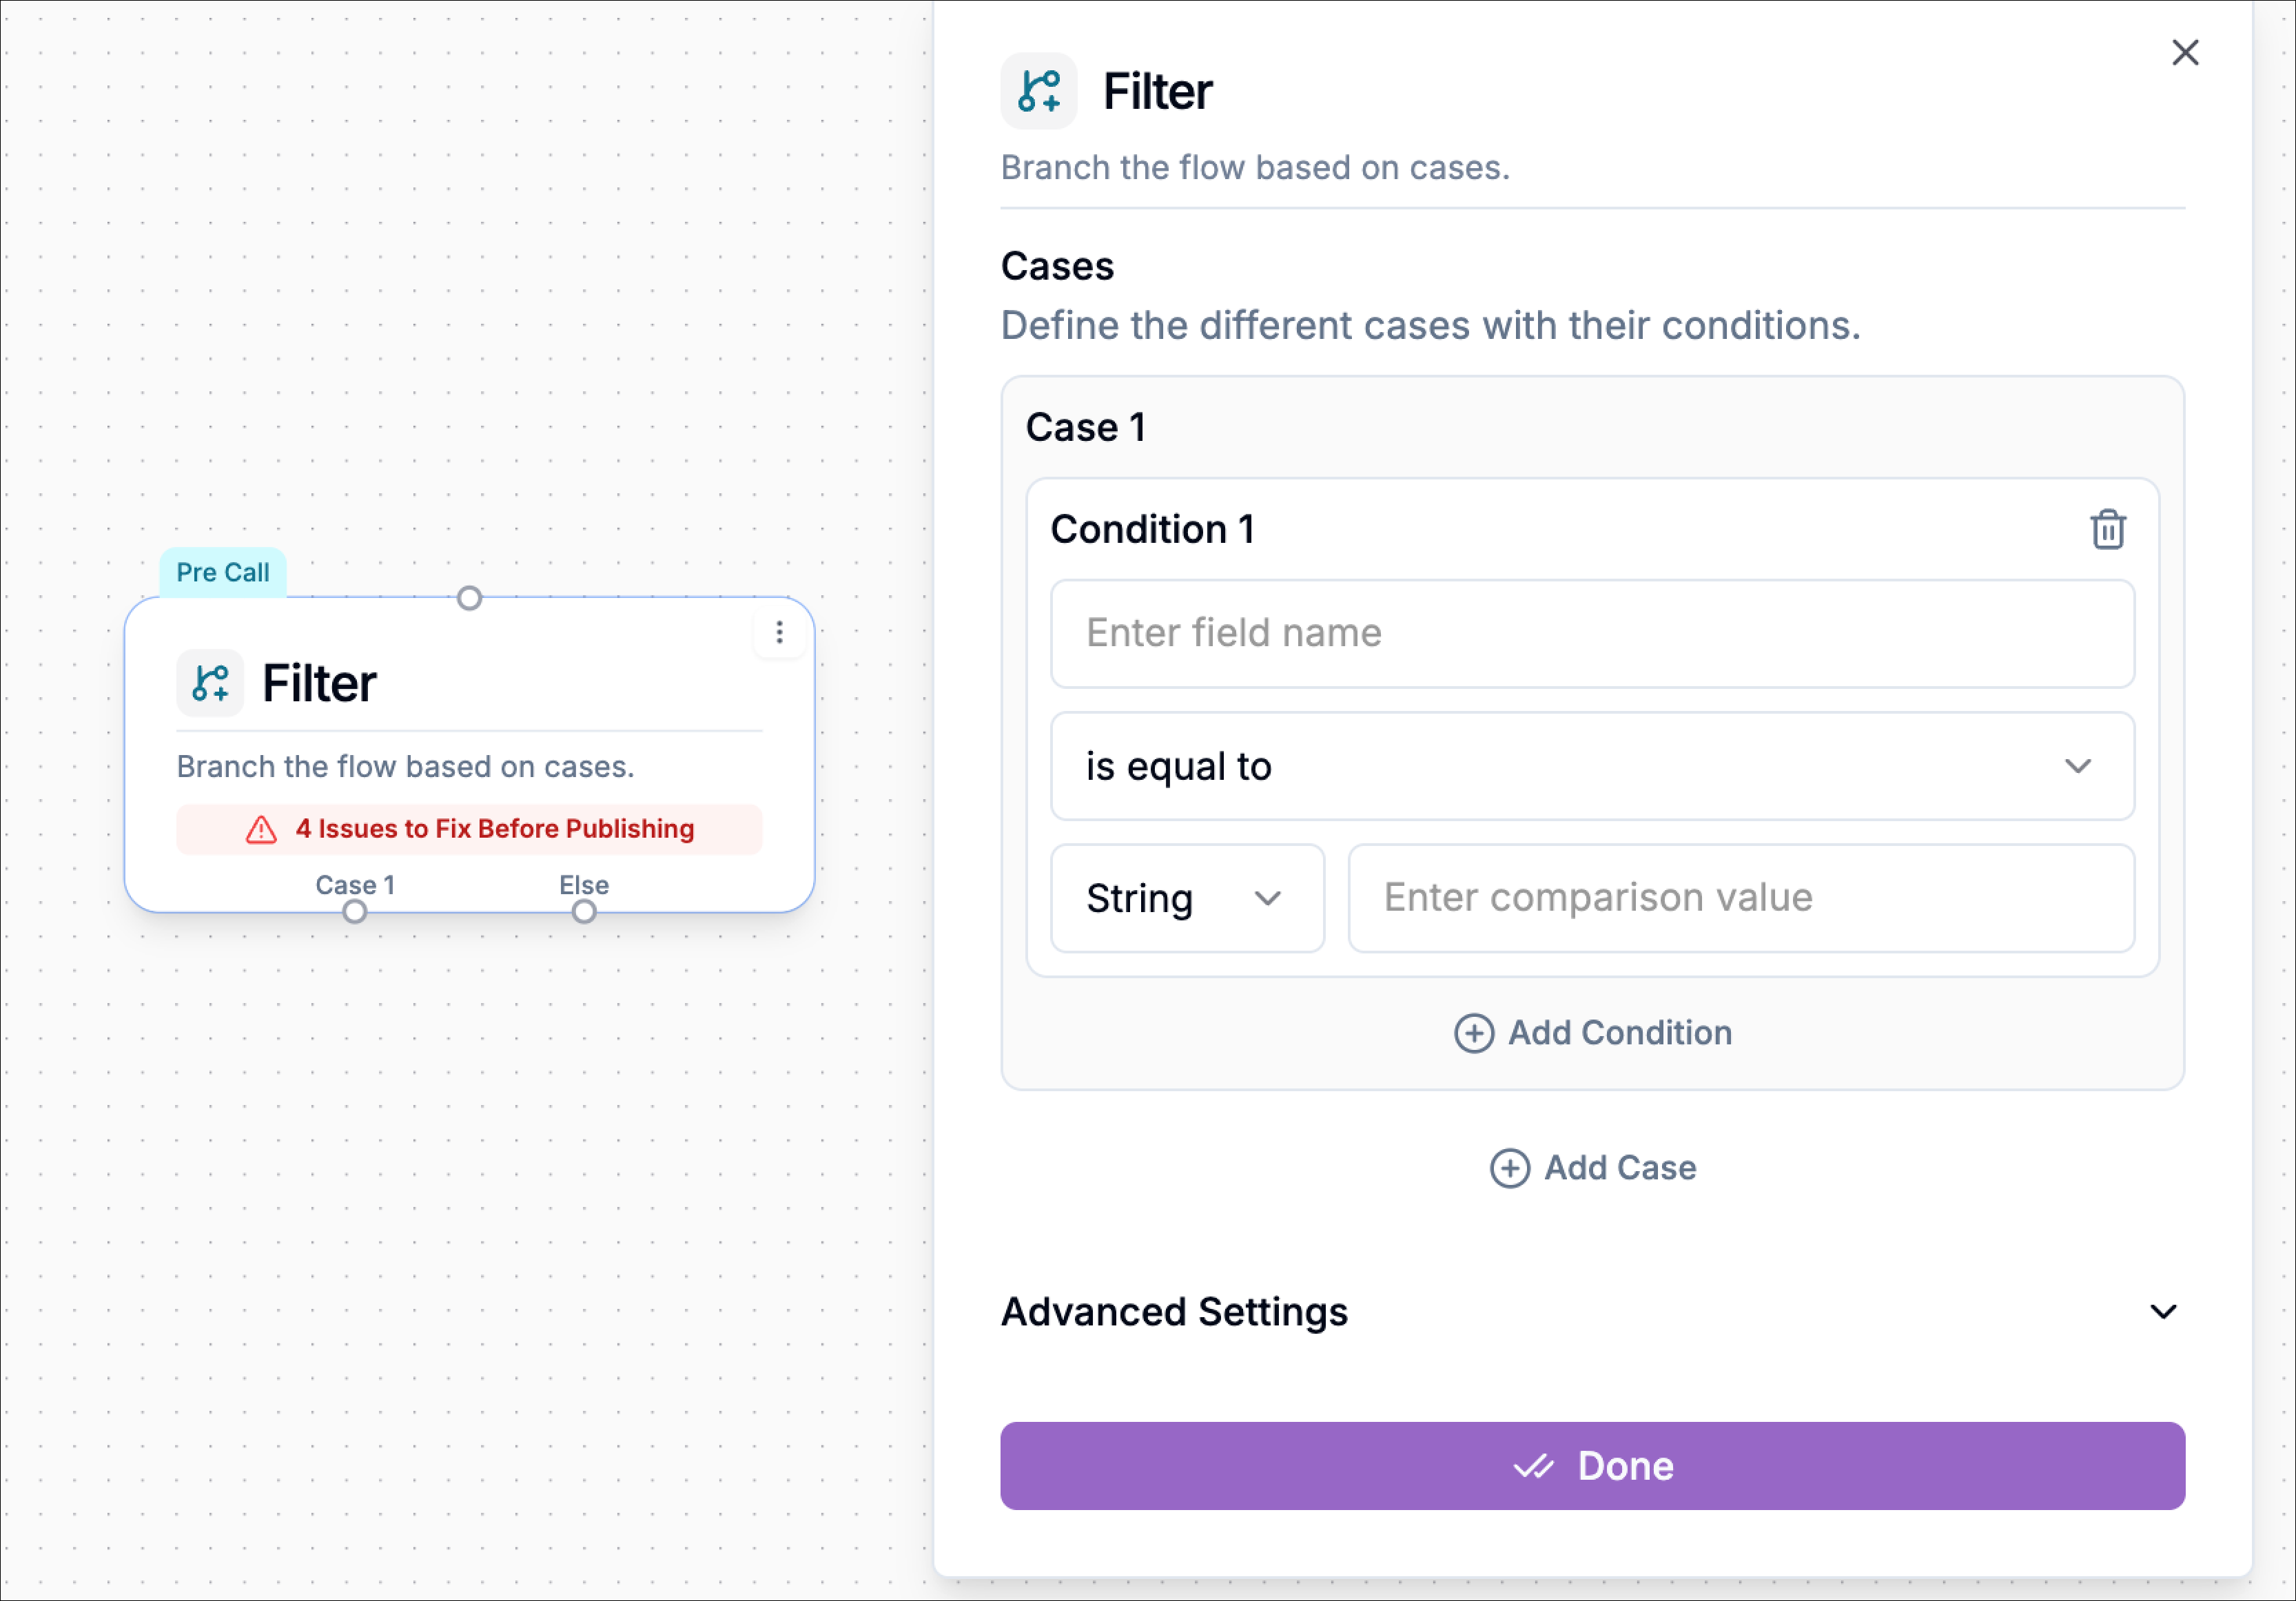 A case represents the routing path the call will take if its conditions are met.
Think of a case as:
> “If this case matches, send the call down this path before the Start Flow begins.”
To add another routing option, click **Add Case**. This creates a new output path on the canvas (for example **Case 3**) that you can connect to a different workflow branch.
### Define Your Conditions Inside a Case
Each condition is a rule that tells Phonely what to evaluate before deciding which case the call should follow.
Click the filter block to open its configuration panel. Under **Cases**, locate **Condition 1** inside a case. You will see three main fields:
| Field | Description |
| :-------------------------------- | :-------------------------------------------------------------------------------------------------------------------------------------------------------------------------------------------------------------------------------- |
| **Define Field** | The variable or data point you want to evaluate (e.g., `caller_phone`, `customer_name`, `plan_type`). |
| **Comparison Operator** | Defines how the field is compared. Options include:
A case represents the routing path the call will take if its conditions are met.
Think of a case as:
> “If this case matches, send the call down this path before the Start Flow begins.”
To add another routing option, click **Add Case**. This creates a new output path on the canvas (for example **Case 3**) that you can connect to a different workflow branch.
### Define Your Conditions Inside a Case
Each condition is a rule that tells Phonely what to evaluate before deciding which case the call should follow.
Click the filter block to open its configuration panel. Under **Cases**, locate **Condition 1** inside a case. You will see three main fields:
| Field | Description |
| :-------------------------------- | :-------------------------------------------------------------------------------------------------------------------------------------------------------------------------------------------------------------------------------- |
| **Define Field** | The variable or data point you want to evaluate (e.g., `caller_phone`, `customer_name`, `plan_type`). |
| **Comparison Operator** | Defines how the field is compared. Options include:
• exists
• doesn’t exist
• is equal to
• is not equal to
• is an array containing
• matches condition (AI)
• does not match condition (AI) |
| **Value Type & Comparison Value** | Select the data type (**String**, **Number**, or **Boolean**) and specify the value to compare against. AI-based operators do not require a value type because they evaluate natural-language conditions. |
### Select the Comparison Operator
Click the dropdown that shows **“is equal to”** to see other comparison options.
Checks whether the variable has any value. Useful for verifying that a variable was successfully populated before the call begins.
Example: Confirm a customer record was retrieved before continuing.
Condition:
```text theme={null}
Define Field: customer_id
Comparison: exists
```
True path: continue with the workflow\
False path: send caller to fallback or verification flow
Use this when you want a fallback path if a value is missing.\
This condition is true when the variable is empty, null, or was never set.
Example: Customer profile was not found during a Pre-Call lookup.
Condition:
```text theme={null}
Define Field: customer_id
Comparison: doesn’t exist
```
True path: send caller to account verification flow\
False path: continue normally
This helps prevent workflows from continuing when required data is missing.
Use this when you want exact matching. This is best for categories, flags, status fields, or known inputs.
Allow verified customers to continue.\
`verification_status is equal to verified`
True path: route to priority support Start Flow\
False path: route to standard support Start Flow
Use this when one value should be handled differently while all other values follow another path.
> Prevent unverified callers from entering the workflow.
Example:
* **Define Field:** `verification_status`
* **Comparison:** `is not equal to`
* **Value:** `verified`
Paths:
* **True path:** send caller to verification or fallback path
* **False path:** continue to the Start Flow
Why it’s useful: It protects human agent time while still allowing VIP customers priority handling.
Used when the variable is a list or array and you need to check whether it includes a specific value.
> Block callers with a known risk tag.
Example:
* **Define Field:** `risk_tags`
* **Comparison:** `is an array containing`
* **Value:** `blocked_caller`
Paths:
* **True path:** route to block or end call path
* **False path:** continue normally
Uses AI to determine whether a variable semantically matches a natural-language condition.
Examples:
```text theme={null}
caller is attempting to access a restricted service
caller is requesting account access without verification
caller appears suspicious or fraudulent
```
This allows routing decisions to be based on meaning rather than exact wording.
The inverse of the previous operator. This condition is true when the caller’s request does not match the defined intent.
Examples:
```text theme={null}
caller is not verified
caller is not eligible for this service
```
These AI-based conditions are useful when routing depends on intent rather than exact values.
### Enter the Comparison Value
Under the comparison dropdown, select the correct data type for the value you want to compare.
| Data Type | When to Use |
| :---------- | :------------------------------------------------------ |
| **String** | For text values such as names, statuses, or categories |
| **Number** | For numeric comparisons such as amounts or counts |
| **Boolean** | For true/false logic (for example `is_verified = true`) |
After selecting the type, enter the comparison value.
### Add Multiple Conditions Inside the Same Case (AND vs OR)
A case can contain more than one condition. When you add multiple conditions, you must define how they are evaluated together.
| Logic Option | Description | |
| :----------- | :-------------------------------------------------------- | - |
| **AND** | All conditions must be true for the case to match | |
| **OR** | Only one condition needs to be true for the case to match | |
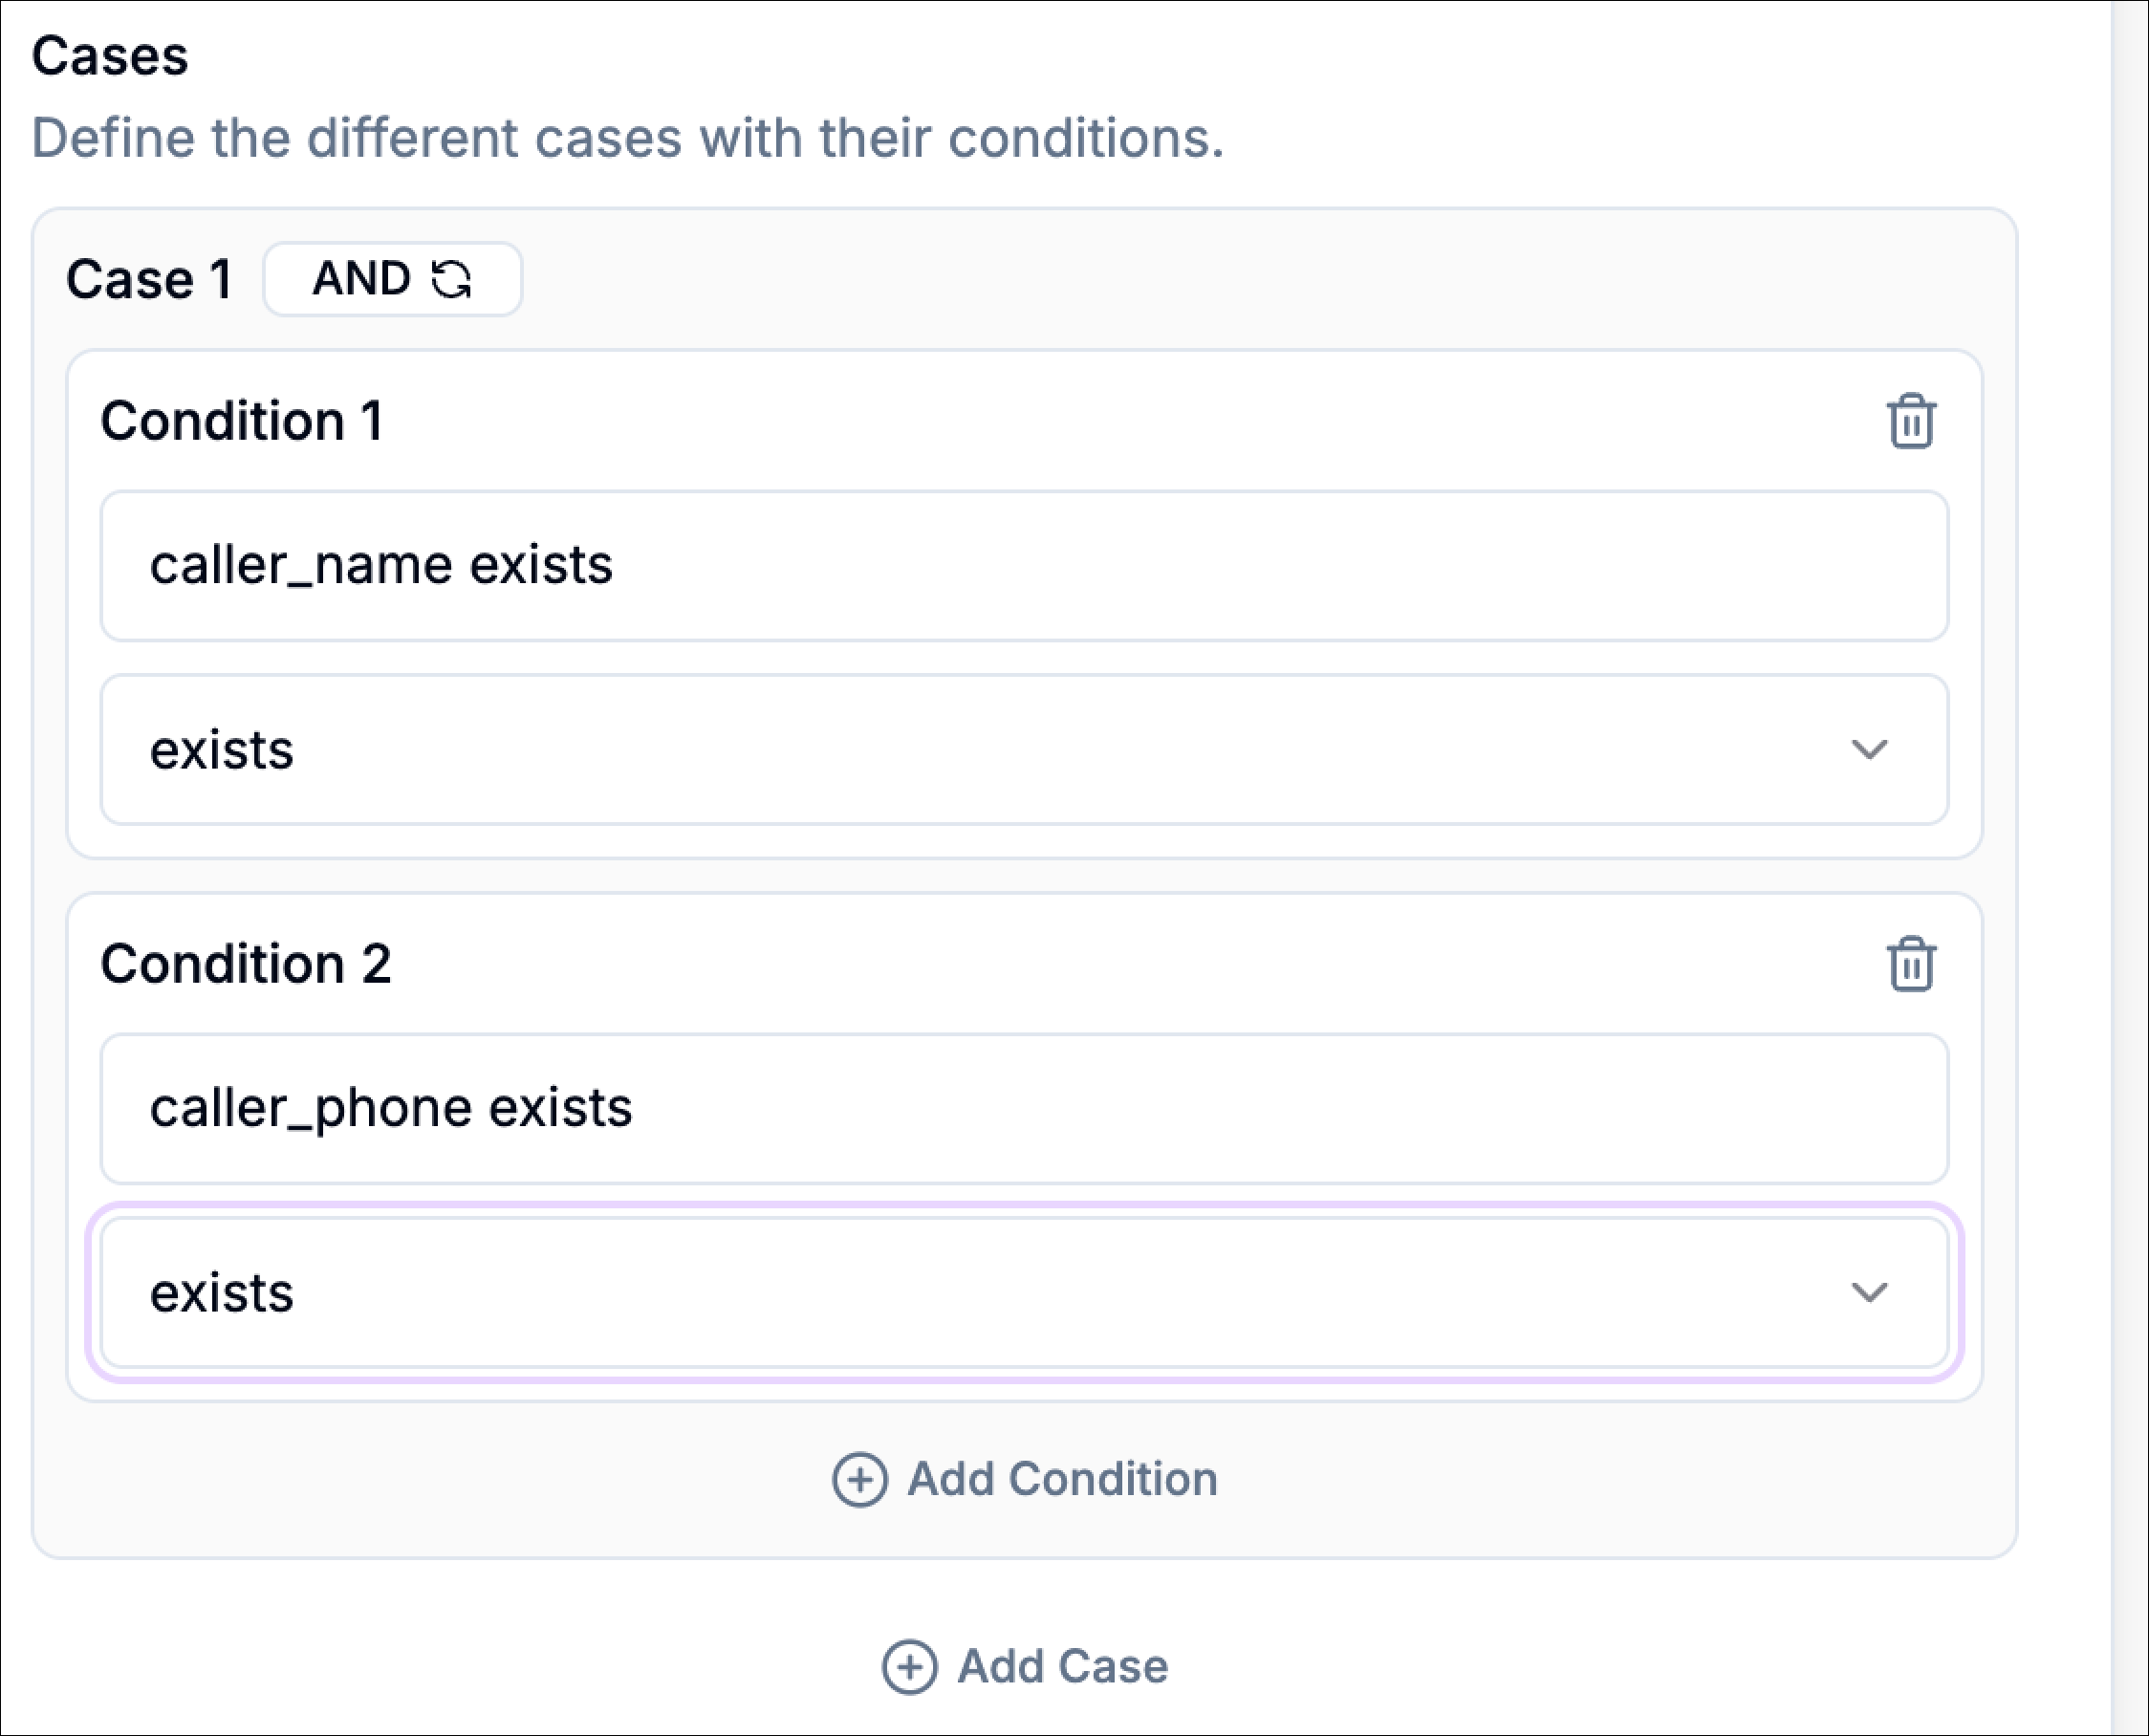 Example (**AND**) - verify caller eligibility before continuing
`customer_id exists`\
`verification_status is equal to verified`
Example (**OR**) - screen risky callers
`risk_flag is equal to true`\
`caller_reputation is equal to blocked`
These logical combinations allow you to build more precise routing rules inside a single case.
## Configure Advanced Settings
Advanced settings allow you to control what the caller hears while the Pre-Call Filter evaluates its cases, and optionally tag the call outcome for reporting and analytics.
Scroll down to the **Advanced Settings** section in the filter configuration panel and click to expand it.
### Interim Message
Enable **Interim Message** to play a short message to the caller while Phonely evaluates the Pre-Call Filter logic (for example, checking conditions or determining which case should be selected).
Because the pre-call filter runs before the start flow begins, this message helps prevent silence while the system determines the correct routing path.
Example (**AND**) - verify caller eligibility before continuing
`customer_id exists`\
`verification_status is equal to verified`
Example (**OR**) - screen risky callers
`risk_flag is equal to true`\
`caller_reputation is equal to blocked`
These logical combinations allow you to build more precise routing rules inside a single case.
## Configure Advanced Settings
Advanced settings allow you to control what the caller hears while the Pre-Call Filter evaluates its cases, and optionally tag the call outcome for reporting and analytics.
Scroll down to the **Advanced Settings** section in the filter configuration panel and click to expand it.
### Interim Message
Enable **Interim Message** to play a short message to the caller while Phonely evaluates the Pre-Call Filter logic (for example, checking conditions or determining which case should be selected).
Because the pre-call filter runs before the start flow begins, this message helps prevent silence while the system determines the correct routing path.
 You can choose how the interim message is generated:
**Fixed**\
You write the exact message Phonely should say each time.
> Example: “One moment while I check that.”
**Promptable**\
You provide a prompt and Phonely generates a short interim message automatically based on that instruction.
Example prompt:
> “Generate a friendly 3–7 word interim message to inform the caller that you are working on their request.”
This approach keeps the experience natural while the system determines the correct case path.
### Post Interim Message Delay
Enable **Post Interim Message Delay** if you want to add a short pause after the interim message is spoken, before the workflow continues to the selected case path.
You can adjust the delay duration using the delay slider.
This is useful when you want the interim message to feel intentional and natural instead of transitioning immediately into the next block.
### Call Outcome Tagging
Use **Call Outcome Tagging** to assign an outcome label to the call at the point where the Pre-Call Filter runs.
You can either select an existing outcome or type a custom one.
This is helpful for analytics because it allows you to track how often certain routing decisions occur. Later, you can filter or group calls in reporting dashboards using these outcome tags.
Example outcome tags:
* `eligible_caller`
* `verification_required`
* `risk_flagged`
* `blocked_caller`
These tags provide visibility into how calls are being routed before the conversation begins.
### Save the Filter
Click **Done** to confirm your configuration and close the Filter panel.
Once saved:
* The pre-call filter block will display its routing outputs on the canvas.
* Each case output represents a possible routing path.
* The **Else** output acts as the fallback route if no cases match.
You can then connect each output to the appropriate workflow path before the Start Flow.
### Example: Using Variables in Pre-Call Filter Logic
Suppose a pre-call API request retrieved the caller’s location data and returned the following variables:
* `customer_id`
* `verification_status`
* `risk_score`
You can use a **Pre-Call Filter** to determine which store location the caller should be routed to before the conversation begins.
Example conditions:
```text theme={null}
Condition 1: customer_id exists
Condition 2: verification_status is equal to verified
```
Set the logic to **AND**.
If both conditions are true, the Pre-Call Filter routes the call through the matching case path.\
\
For example, the call could be routed to the Chicago downtown Store Start Flow or trigger a follow-up action such as retrieving store details.
If the conditions do not match, the call follows the **Else** path. For example, the workflow might play a message such as:
> “Sorry, we couldn’t find a nearby store based on your location. Please check your ZIP code and try again.”
Using Pre-Call Filters this way ensures callers are directed to the correct workflow before the AI agent begins the conversation.
## When to Use a Pre-Call Filter
Use a pre-call filter when the call should begin differently depending on available data. Use a pre-all filter when you need to evaluate the caller before the conversation starts and decide whether the call should continue.
The primary use cases for pre-call Filters are:
### Eligibility Checks
Use a pre-call filter to determine whether the caller meets the requirements to continue into the workflow.
Examples include:
* `is_verified = true` → continue to the Start Flow
* `subscription_status = active` → continue normally
* `customer_id exists` → continue
* Else → route to verification, fallback, or end call path
This is useful when your workflow depends on a caller already being recognized, verified, or approved before the conversation begins.
### Spam or Risk Screening
Use a pre-call filter to block, redirect, or flag suspicious calls before the AI agent begins speaking.
Examples include:
* `spam_score > 80` → block or end call
* `risk_flag = true` → send to verification path
* `caller_reputation is equal to blocked` → end call
* Else → continue normally
This is useful when you want to screen callers before allowing them into the main workflow\.Use values returned by a Pre-Call API Request.
***
You can choose how the interim message is generated:
**Fixed**\
You write the exact message Phonely should say each time.
> Example: “One moment while I check that.”
**Promptable**\
You provide a prompt and Phonely generates a short interim message automatically based on that instruction.
Example prompt:
> “Generate a friendly 3–7 word interim message to inform the caller that you are working on their request.”
This approach keeps the experience natural while the system determines the correct case path.
### Post Interim Message Delay
Enable **Post Interim Message Delay** if you want to add a short pause after the interim message is spoken, before the workflow continues to the selected case path.
You can adjust the delay duration using the delay slider.
This is useful when you want the interim message to feel intentional and natural instead of transitioning immediately into the next block.
### Call Outcome Tagging
Use **Call Outcome Tagging** to assign an outcome label to the call at the point where the Pre-Call Filter runs.
You can either select an existing outcome or type a custom one.
This is helpful for analytics because it allows you to track how often certain routing decisions occur. Later, you can filter or group calls in reporting dashboards using these outcome tags.
Example outcome tags:
* `eligible_caller`
* `verification_required`
* `risk_flagged`
* `blocked_caller`
These tags provide visibility into how calls are being routed before the conversation begins.
### Save the Filter
Click **Done** to confirm your configuration and close the Filter panel.
Once saved:
* The pre-call filter block will display its routing outputs on the canvas.
* Each case output represents a possible routing path.
* The **Else** output acts as the fallback route if no cases match.
You can then connect each output to the appropriate workflow path before the Start Flow.
### Example: Using Variables in Pre-Call Filter Logic
Suppose a pre-call API request retrieved the caller’s location data and returned the following variables:
* `customer_id`
* `verification_status`
* `risk_score`
You can use a **Pre-Call Filter** to determine which store location the caller should be routed to before the conversation begins.
Example conditions:
```text theme={null}
Condition 1: customer_id exists
Condition 2: verification_status is equal to verified
```
Set the logic to **AND**.
If both conditions are true, the Pre-Call Filter routes the call through the matching case path.\
\
For example, the call could be routed to the Chicago downtown Store Start Flow or trigger a follow-up action such as retrieving store details.
If the conditions do not match, the call follows the **Else** path. For example, the workflow might play a message such as:
> “Sorry, we couldn’t find a nearby store based on your location. Please check your ZIP code and try again.”
Using Pre-Call Filters this way ensures callers are directed to the correct workflow before the AI agent begins the conversation.
## When to Use a Pre-Call Filter
Use a pre-call filter when the call should begin differently depending on available data. Use a pre-all filter when you need to evaluate the caller before the conversation starts and decide whether the call should continue.
The primary use cases for pre-call Filters are:
### Eligibility Checks
Use a pre-call filter to determine whether the caller meets the requirements to continue into the workflow.
Examples include:
* `is_verified = true` → continue to the Start Flow
* `subscription_status = active` → continue normally
* `customer_id exists` → continue
* Else → route to verification, fallback, or end call path
This is useful when your workflow depends on a caller already being recognized, verified, or approved before the conversation begins.
### Spam or Risk Screening
Use a pre-call filter to block, redirect, or flag suspicious calls before the AI agent begins speaking.
Examples include:
* `spam_score > 80` → block or end call
* `risk_flag = true` → send to verification path
* `caller_reputation is equal to blocked` → end call
* Else → continue normally
This is useful when you want to screen callers before allowing them into the main workflow\.Use values returned by a Pre-Call API Request.
***