> ## Documentation Index
> Fetch the complete documentation index at: https://docs.phonely.ai/llms.txt
> Use this file to discover all available pages before exploring further.
# API Request
The API Request Pre-Call Action allows your Phonely agent to communicate with external systems before the conversation begins.
It sends or retrieves data from external APIs immediately when a call starts. This allows the system to prepare information, validate callers, or trigger external systems before the AI agent speaks to the caller.
Because it runs before the greeting message, this action is commonly used to load customer data, perform verification checks, or prepare variables that the conversation workflow will use.
Once the API request finishes, the call continues to the greeting message or the first workflow block.
## When This Action Runs
The Pre-Call API Request executes immediately after the call is answered, but before any conversation logic begins.
Typical execution order:
```text theme={null}
Incoming Call
↓
Pre-Call API Request
↓
Greeting Message
↓
Conversation Workflow
```
This ensures any retrieved data is available to the agent from the very first message.
## How to Add a Pre-Call API Request
Pre-Call Actions can only be added at the very beginning of a workflow, before the conversation flow starts. This starting point is the **Start Flow**.
The **Start Flow** is the block that runs first when a call is answered. Pre-Call Actions are added above the Start Flow, so this block must be configured first before the option to add Pre-Call Actions becomes available.
Open your **Flow Editor** and select the block that should run when a call begins.
In the configuration panel on the right, enable **Set as First Flow**.
When this option is checked, Phonely will always start the workflow with this block whenever a call is received. Once it is set, the system enables the **Pre-Call Actions** area above the Start Flow.
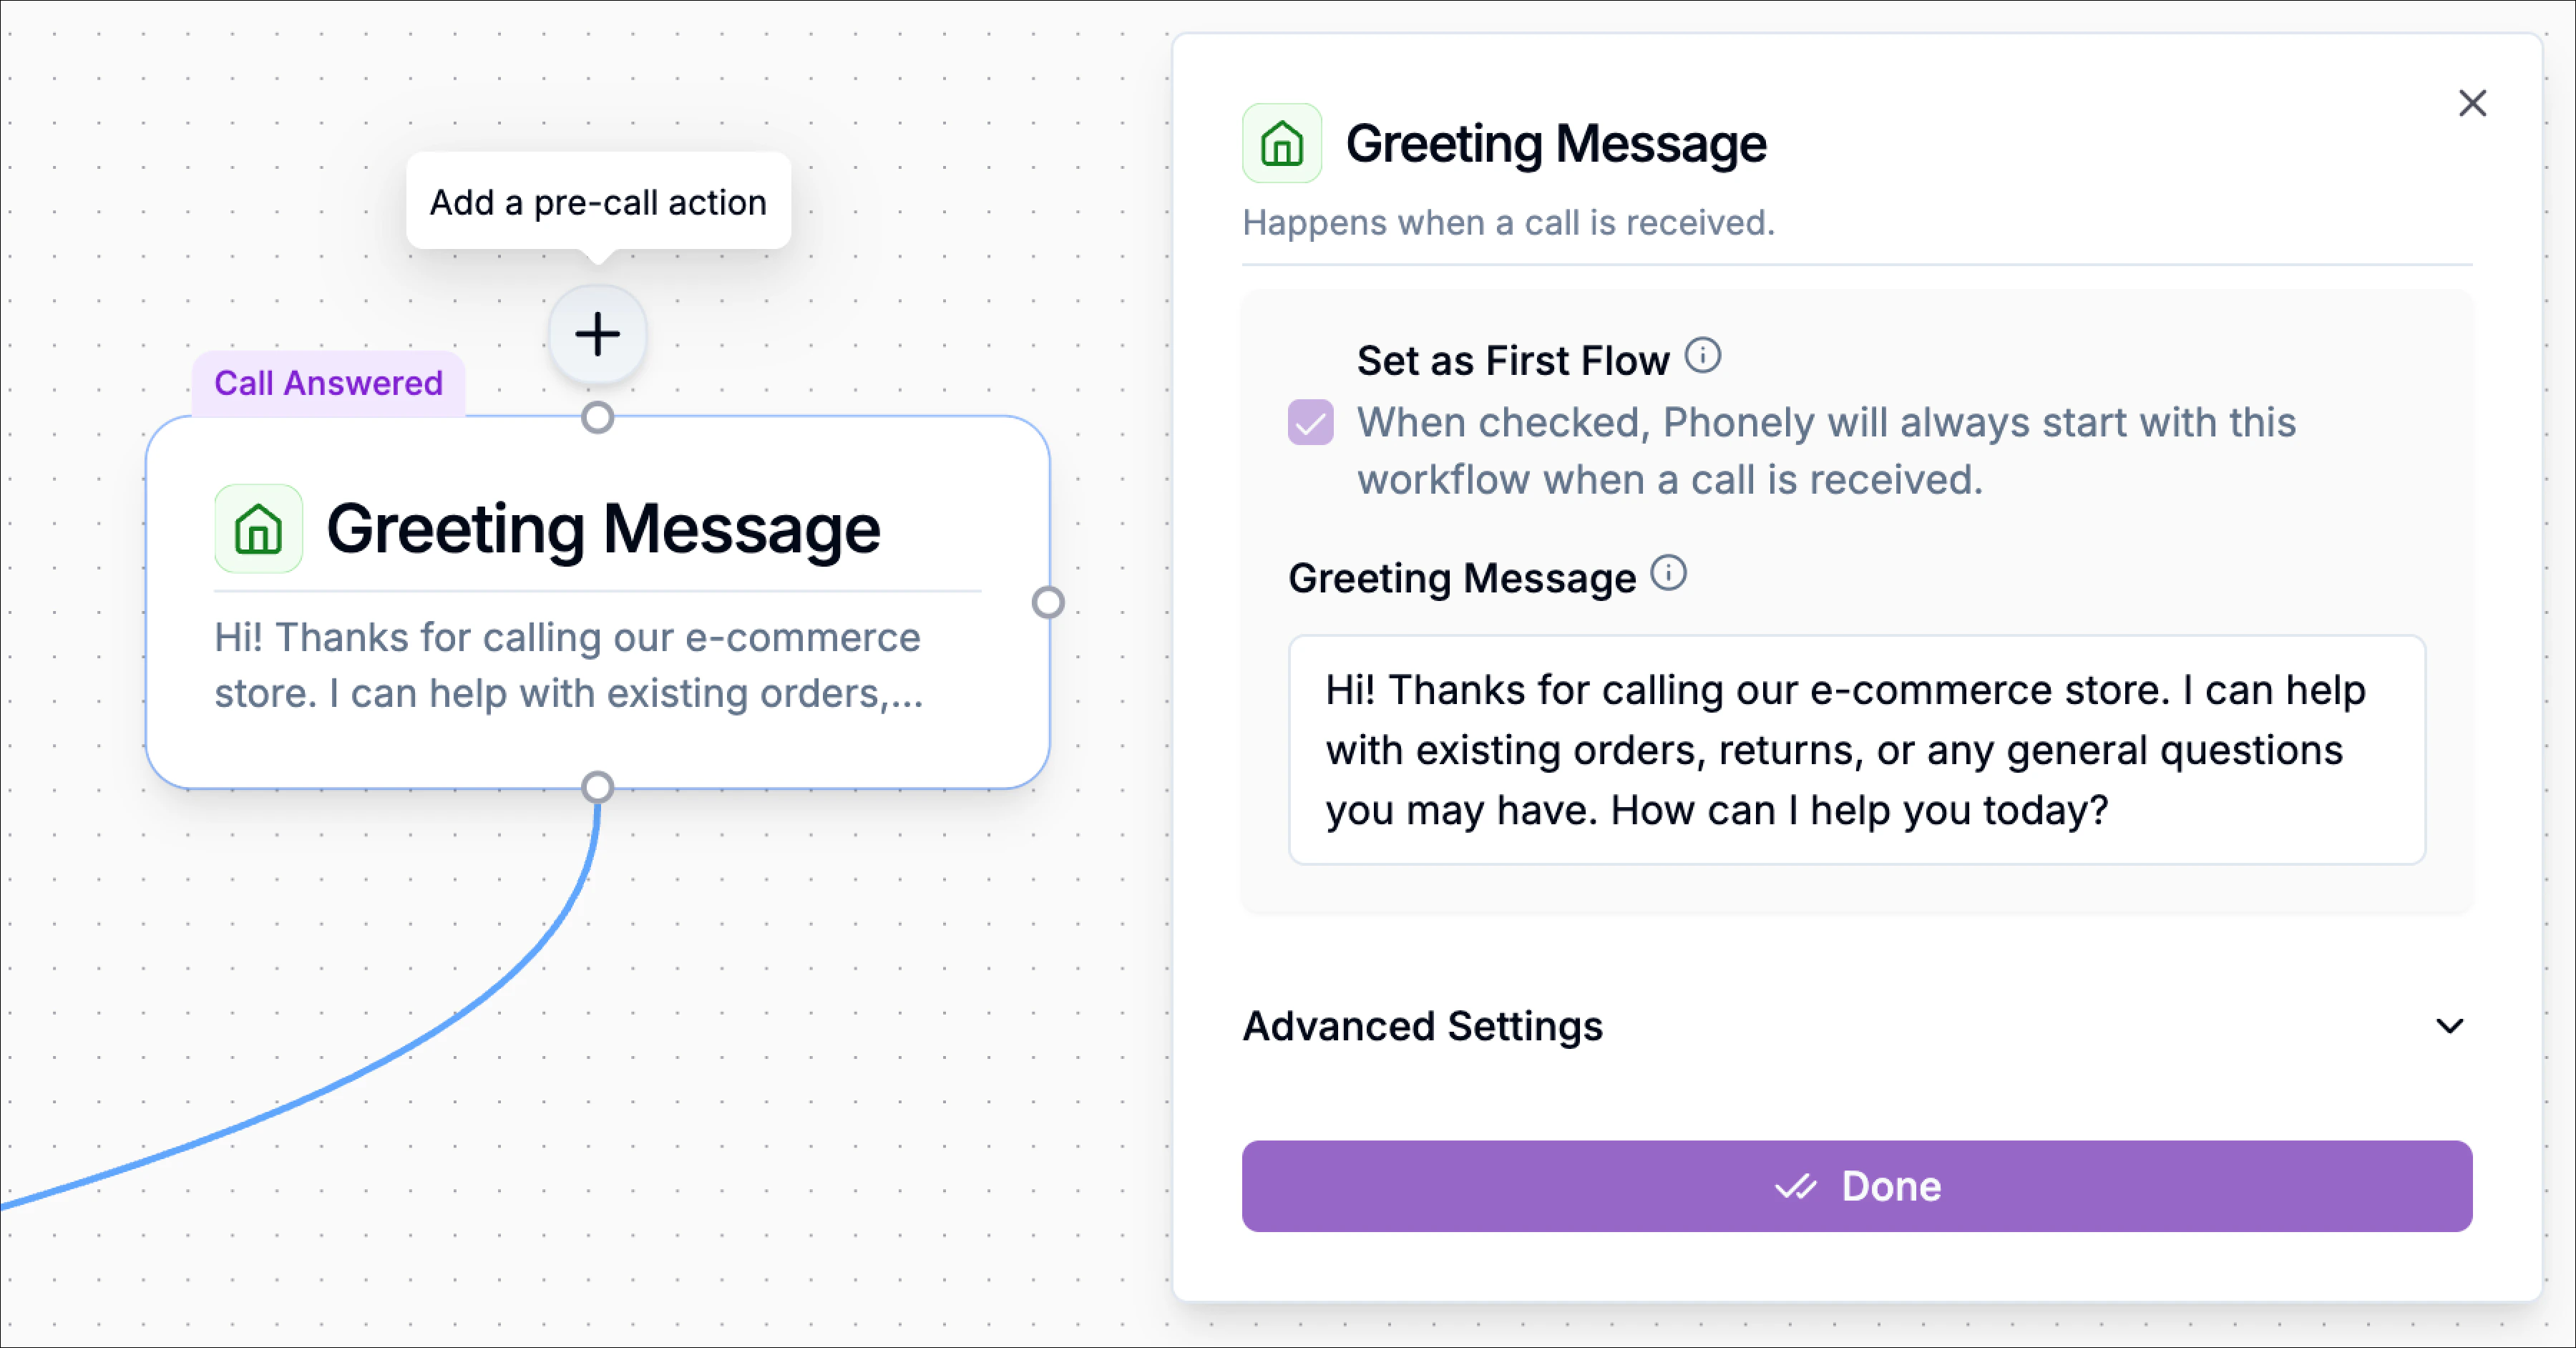 After the Start Flow is configured, a **➕ button** will appear above the beginning of the workflow labeled **Add a pre-call action**.
Click this **➕ button**.
From the list of available Pre-Call Actions, select **API Request.**
The API Request configuration panel will open, allowing you to configure how the external API should be called before the conversation begins.
After the Start Flow is configured, a **➕ button** will appear above the beginning of the workflow labeled **Add a pre-call action**.
Click this **➕ button**.
From the list of available Pre-Call Actions, select **API Request.**
The API Request configuration panel will open, allowing you to configure how the external API should be called before the conversation begins.
 ## Setup
In the **Setup** stage you define the request structure.
Phonely allows two ways to configure the API call:
### Option 1 — Import from cURL
If you already have a request from tools like Postman, API documentation, or terminal commands, you can paste it directly.
Paste the cURL command into the **cURL Command** field and click **Import from cURL**.
Example:
```json theme={null}
curl -X GET "https://api.example.com/customer?phone=123456789"
-H "Content-Type: application/json"
```
## Setup
In the **Setup** stage you define the request structure.
Phonely allows two ways to configure the API call:
### Option 1 — Import from cURL
If you already have a request from tools like Postman, API documentation, or terminal commands, you can paste it directly.
Paste the cURL command into the **cURL Command** field and click **Import from cURL**.
Example:
```json theme={null}
curl -X GET "https://api.example.com/customer?phone=123456789"
-H "Content-Type: application/json"
```
 Phonely automatically extracts:
* HTTP method
* API endpoint
* headers
* query parameters
* request body
These values are then populated in the **Configure** tab.
Phonely automatically extracts:
* HTTP method
* API endpoint
* headers
* query parameters
* request body
These values are then populated in the **Configure** tab.
 ### Option 2 — Build Manually
If you don’t have a cURL command, select **Build Manually**.
You will then configure the request step-by-step in the **Configure** section.
### Option 2 — Build Manually
If you don’t have a cURL command, select **Build Manually**.
You will then configure the request step-by-step in the **Configure** section.
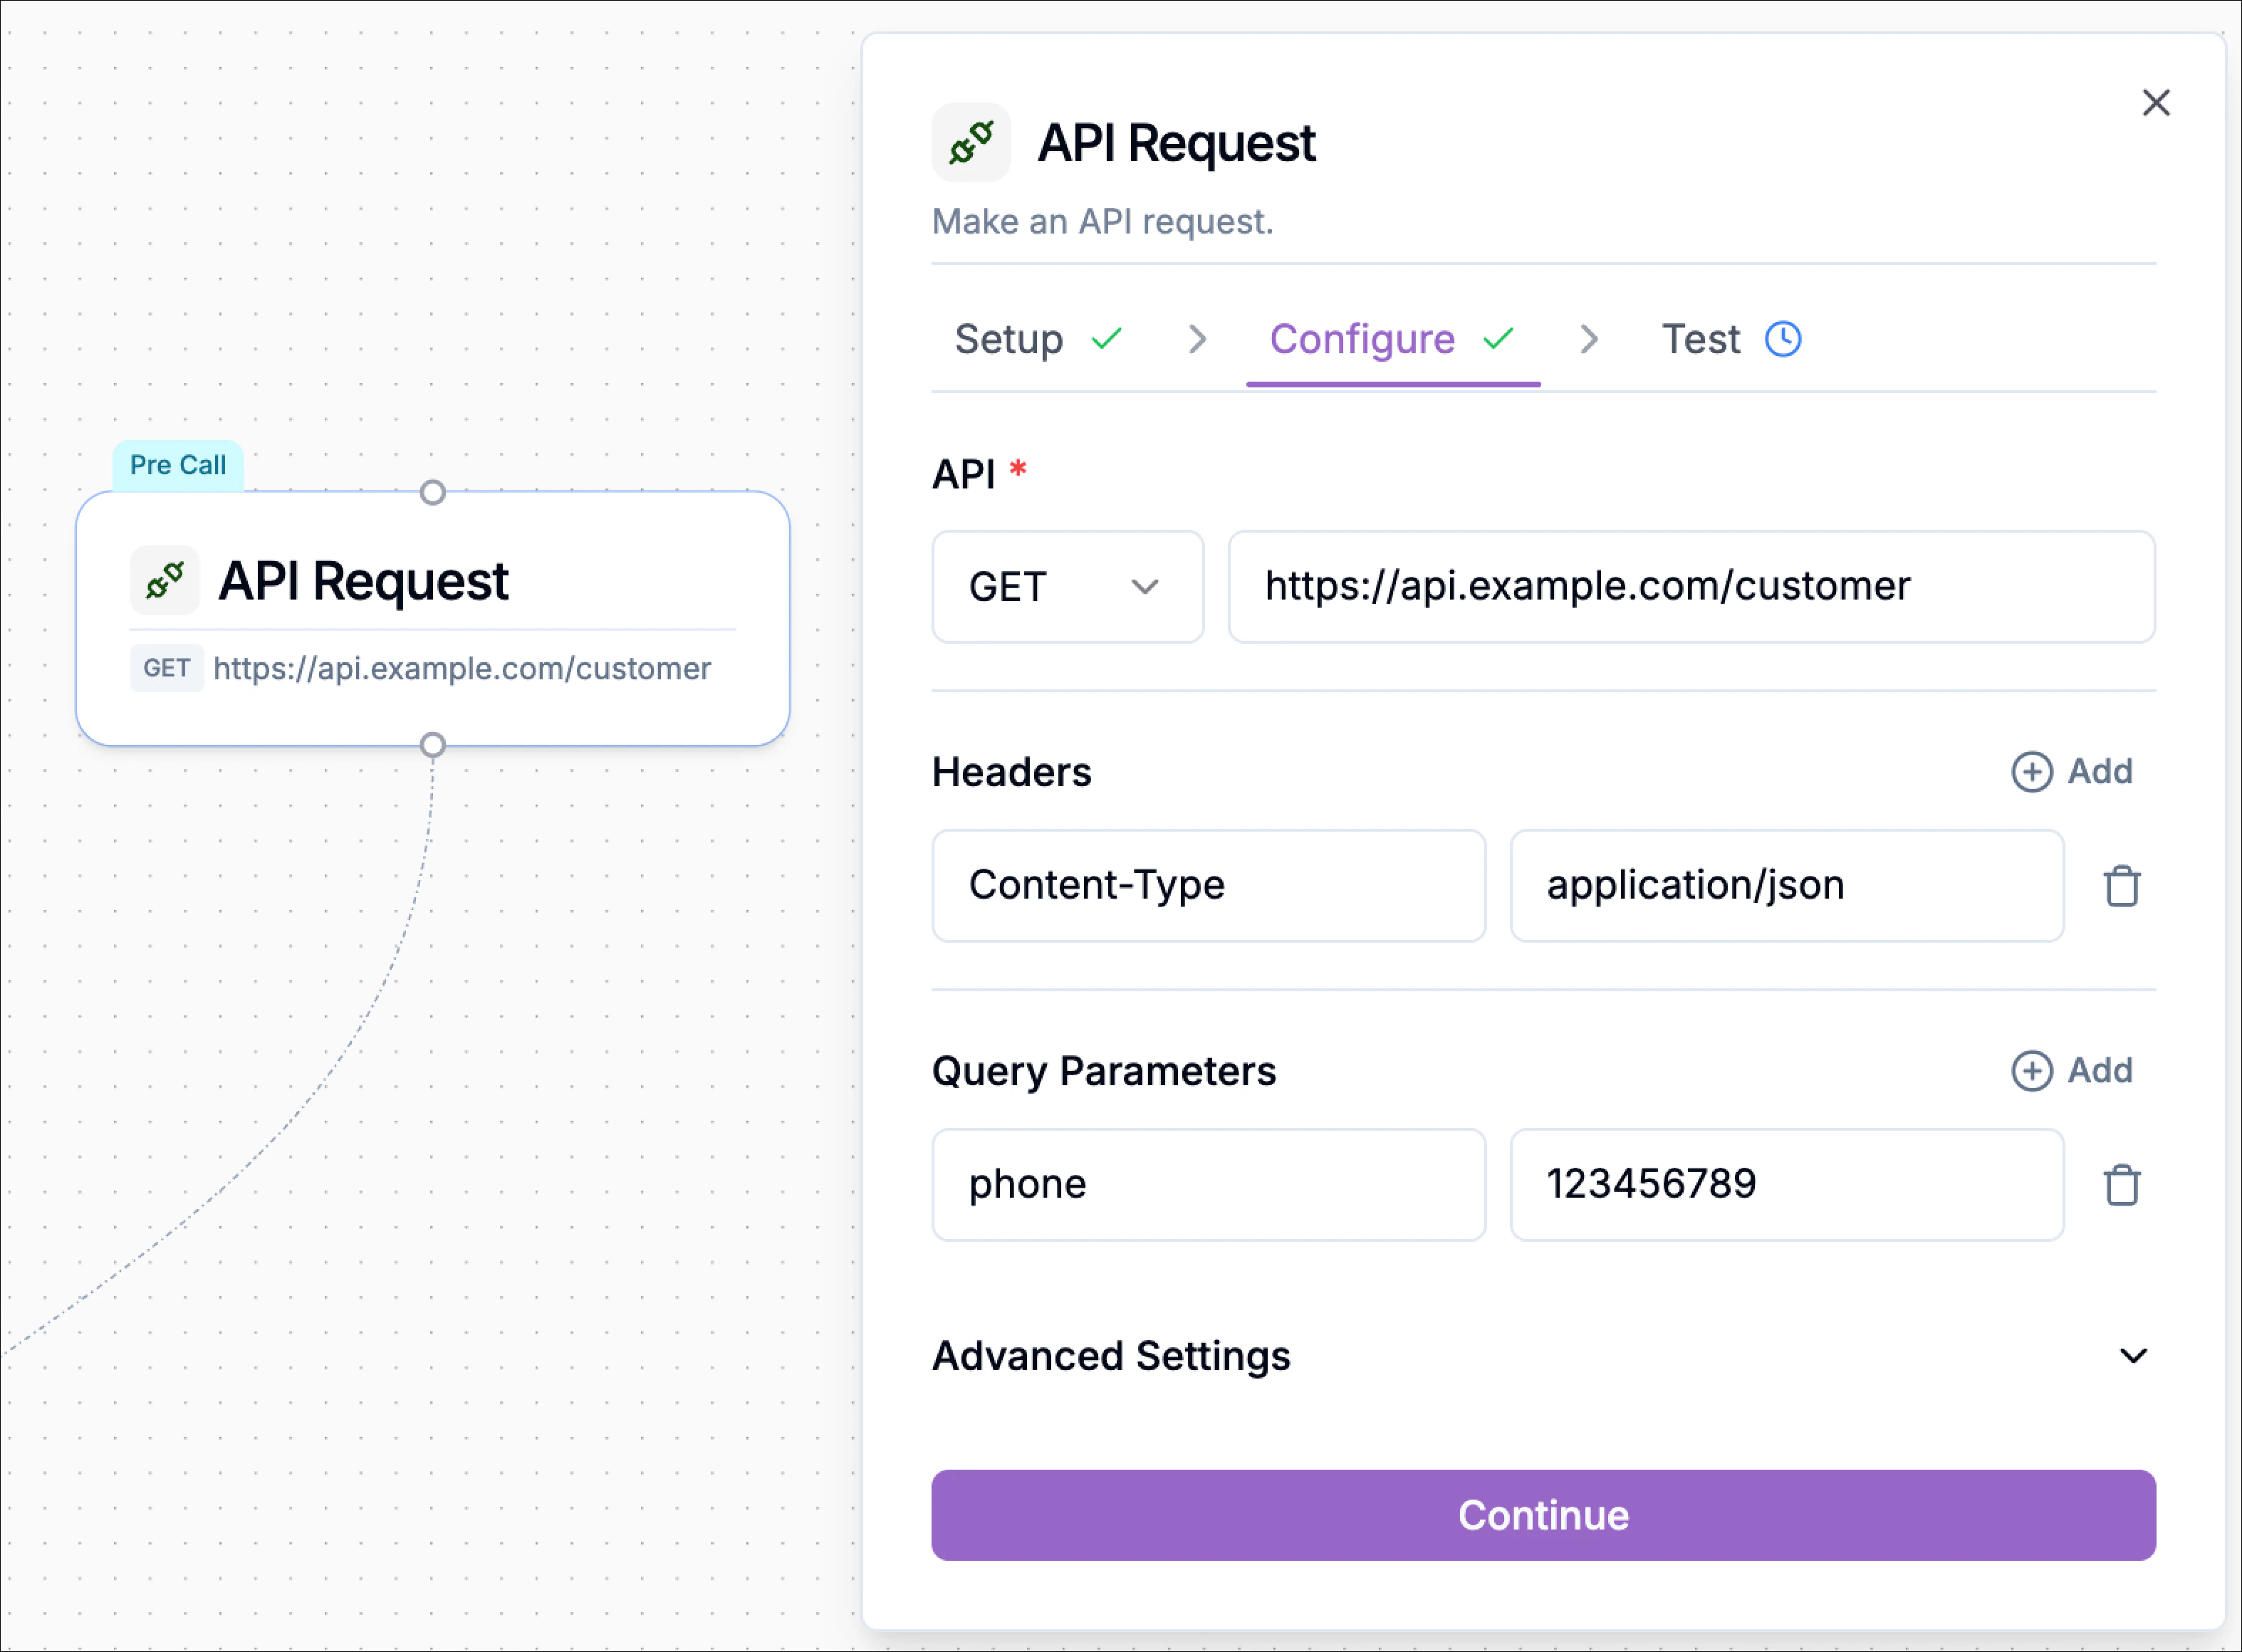
 ## Configure
The **Configure** tab defines how the API request should behave.
### API Method
Select the HTTP method used by the API.
Supported methods:
* **GET** – Retrieve information from a system
* **POST** – Send new data to an API
* **PUT** – Update an existing resource
* **PATCH** – Partially update a resource
* **DELETE** – Remove a resource
Example:
Use **GET** to retrieve a customer profile.
### API URL
Enter the API endpoint where the request will be sent.
Example:
```text theme={null}
https://api.example.com/customers
```
This URL represents the destination where your request is processed.
### Headers
Headers provide additional metadata required by the API. Click **Add** to create key-value pairs.
## Configure
The **Configure** tab defines how the API request should behave.
### API Method
Select the HTTP method used by the API.
Supported methods:
* **GET** – Retrieve information from a system
* **POST** – Send new data to an API
* **PUT** – Update an existing resource
* **PATCH** – Partially update a resource
* **DELETE** – Remove a resource
Example:
Use **GET** to retrieve a customer profile.
### API URL
Enter the API endpoint where the request will be sent.
Example:
```text theme={null}
https://api.example.com/customers
```
This URL represents the destination where your request is processed.
### Headers
Headers provide additional metadata required by the API. Click **Add** to create key-value pairs.
 Common header examples include:
| Header | Example Value |
| :------------ | :-------------------- |
| Content-Type | application/json |
| Authorization | Bearer YOUR\_API\_KEY |
Headers are often required for authentication and data formatting.
### Query Parameters
Query parameters allow you to send additional information through the URL.
Common header examples include:
| Header | Example Value |
| :------------ | :-------------------- |
| Content-Type | application/json |
| Authorization | Bearer YOUR\_API\_KEY |
Headers are often required for authentication and data formatting.
### Query Parameters
Query parameters allow you to send additional information through the URL.
 Example:
```text theme={null}
https://api.example.com/orders?customer_id=123
```
In the interface, these appear as key-value pairs:
| Key | Value |
| :----------- | :---- |
| customer\_id | 123 |
### Body (For POST, PUT, PATCH Requests)
For **POST**, **PUT**, or **PATCH** requests, you can define a request body. Phonely supports multiple body types, selectable directly in the UI. Enter the endpoint where the request should go. This is the destination for your data.
#### Supported Body Types
Use this when the request does not require a body. Headers define metadata or authentication details for your API call.
Use this when the API expects traditional form data. Each key-value pair is sent as form data, commonly required by legacy systems or OAuth flows.
Use this when sending structured data in JSON format (most modern APIs). You can switch the editor to **Code** mode to write raw JSON directly.
## Advanced Settings
The **Advanced Settings** section allows you to control how the API request behaves during execution.
Example:
```text theme={null}
https://api.example.com/orders?customer_id=123
```
In the interface, these appear as key-value pairs:
| Key | Value |
| :----------- | :---- |
| customer\_id | 123 |
### Body (For POST, PUT, PATCH Requests)
For **POST**, **PUT**, or **PATCH** requests, you can define a request body. Phonely supports multiple body types, selectable directly in the UI. Enter the endpoint where the request should go. This is the destination for your data.
#### Supported Body Types
Use this when the request does not require a body. Headers define metadata or authentication details for your API call.
Use this when the API expects traditional form data. Each key-value pair is sent as form data, commonly required by legacy systems or OAuth flows.
Use this when sending structured data in JSON format (most modern APIs). You can switch the editor to **Code** mode to write raw JSON directly.
## Advanced Settings
The **Advanced Settings** section allows you to control how the API request behaves during execution.
 ### Enable Error Handling
When enabled, the system can detect failed requests and handle them gracefully.
Example scenarios:
* API unavailable
* Authentication error
* Invalid request
Instead of breaking the flow, you can define fallback logic.
### Retry on Failure
If the API request fails due to temporary issues, Phonely will automatically retry the request. This helps prevent interruptions caused by short network or server delays.
### Timeout Duration
Defines how long Phonely waits for the API response before considering the request failed.
Example:
```text theme={null}
5 seconds
```
If the server does not respond within the configured time, the request will timeout.
### Interim Message
If the API request takes time, Phonely can send a short message to the caller to indicate progress.
Example:
> “One moment while I retrieve your information.”
This prevents silence during longer API requests.
### Interim Message Prompt Type
Two options are available:
The message is predefined and always the same.
Phonely dynamically generates a short message using AI based on the configured prompt.
Example prompt:
> Generate a friendly 3–7 word interim message telling the caller you are working on their request.
### Post Interim Message Delay
Adds a small delay after the interim message before the API request continues. This makes the interaction feel more natural.
### Call Outcome Tagging
You can assign outcome tags for reporting and analytics.
Example tags:
* `customer_lookup_success`
* `account_verified`
* `api_timeout`
These tags help categorize calls in dashboards and reports.
## Test Stage
After configuration, use the **Test** step to validate the request.
Click **Test** to send the request exactly as configured. Phonely will display the API response immediately. If successful, you may see a response like:
```text theme={null}
Status: 200 OK
```
### Enable Error Handling
When enabled, the system can detect failed requests and handle them gracefully.
Example scenarios:
* API unavailable
* Authentication error
* Invalid request
Instead of breaking the flow, you can define fallback logic.
### Retry on Failure
If the API request fails due to temporary issues, Phonely will automatically retry the request. This helps prevent interruptions caused by short network or server delays.
### Timeout Duration
Defines how long Phonely waits for the API response before considering the request failed.
Example:
```text theme={null}
5 seconds
```
If the server does not respond within the configured time, the request will timeout.
### Interim Message
If the API request takes time, Phonely can send a short message to the caller to indicate progress.
Example:
> “One moment while I retrieve your information.”
This prevents silence during longer API requests.
### Interim Message Prompt Type
Two options are available:
The message is predefined and always the same.
Phonely dynamically generates a short message using AI based on the configured prompt.
Example prompt:
> Generate a friendly 3–7 word interim message telling the caller you are working on their request.
### Post Interim Message Delay
Adds a small delay after the interim message before the API request continues. This makes the interaction feel more natural.
### Call Outcome Tagging
You can assign outcome tags for reporting and analytics.
Example tags:
* `customer_lookup_success`
* `account_verified`
* `api_timeout`
These tags help categorize calls in dashboards and reports.
## Test Stage
After configuration, use the **Test** step to validate the request.
Click **Test** to send the request exactly as configured. Phonely will display the API response immediately. If successful, you may see a response like:
```text theme={null}
Status: 200 OK
```
 If the request fails, the system displays the error message to help troubleshoot issues such as:
* Incorrect endpoint
* Missing authentication
* Invalid parameters
* Server errors
Testing ensures the request works correctly before publishing the workflow.
## UseCases
The Pre-Call API Request allows your system to interact with external services such as:
* CRM systems
* Customer databases
* Order management platforms
* Fraud detection services
* Authentication systems
* Analytics platforms
It can be used to:
* Retrieve customer information using the caller’s phone number
* Verify account status
* Load order or subscription data
* Trigger CRM events
* Send call start notifications to other systems
The returned data can then be stored in variables and used throughout the call.
If the request fails, the system displays the error message to help troubleshoot issues such as:
* Incorrect endpoint
* Missing authentication
* Invalid parameters
* Server errors
Testing ensures the request works correctly before publishing the workflow.
## UseCases
The Pre-Call API Request allows your system to interact with external services such as:
* CRM systems
* Customer databases
* Order management platforms
* Fraud detection services
* Authentication systems
* Analytics platforms
It can be used to:
* Retrieve customer information using the caller’s phone number
* Verify account status
* Load order or subscription data
* Trigger CRM events
* Send call start notifications to other systems
The returned data can then be stored in variables and used throughout the call.