> ## Documentation Index
> Fetch the complete documentation index at: https://docs.phonely.ai/llms.txt
> Use this file to discover all available pages before exploring further.
# Call Paths
> Guide to the call-path visualization used to inspect branch frequency and workflow traversal.
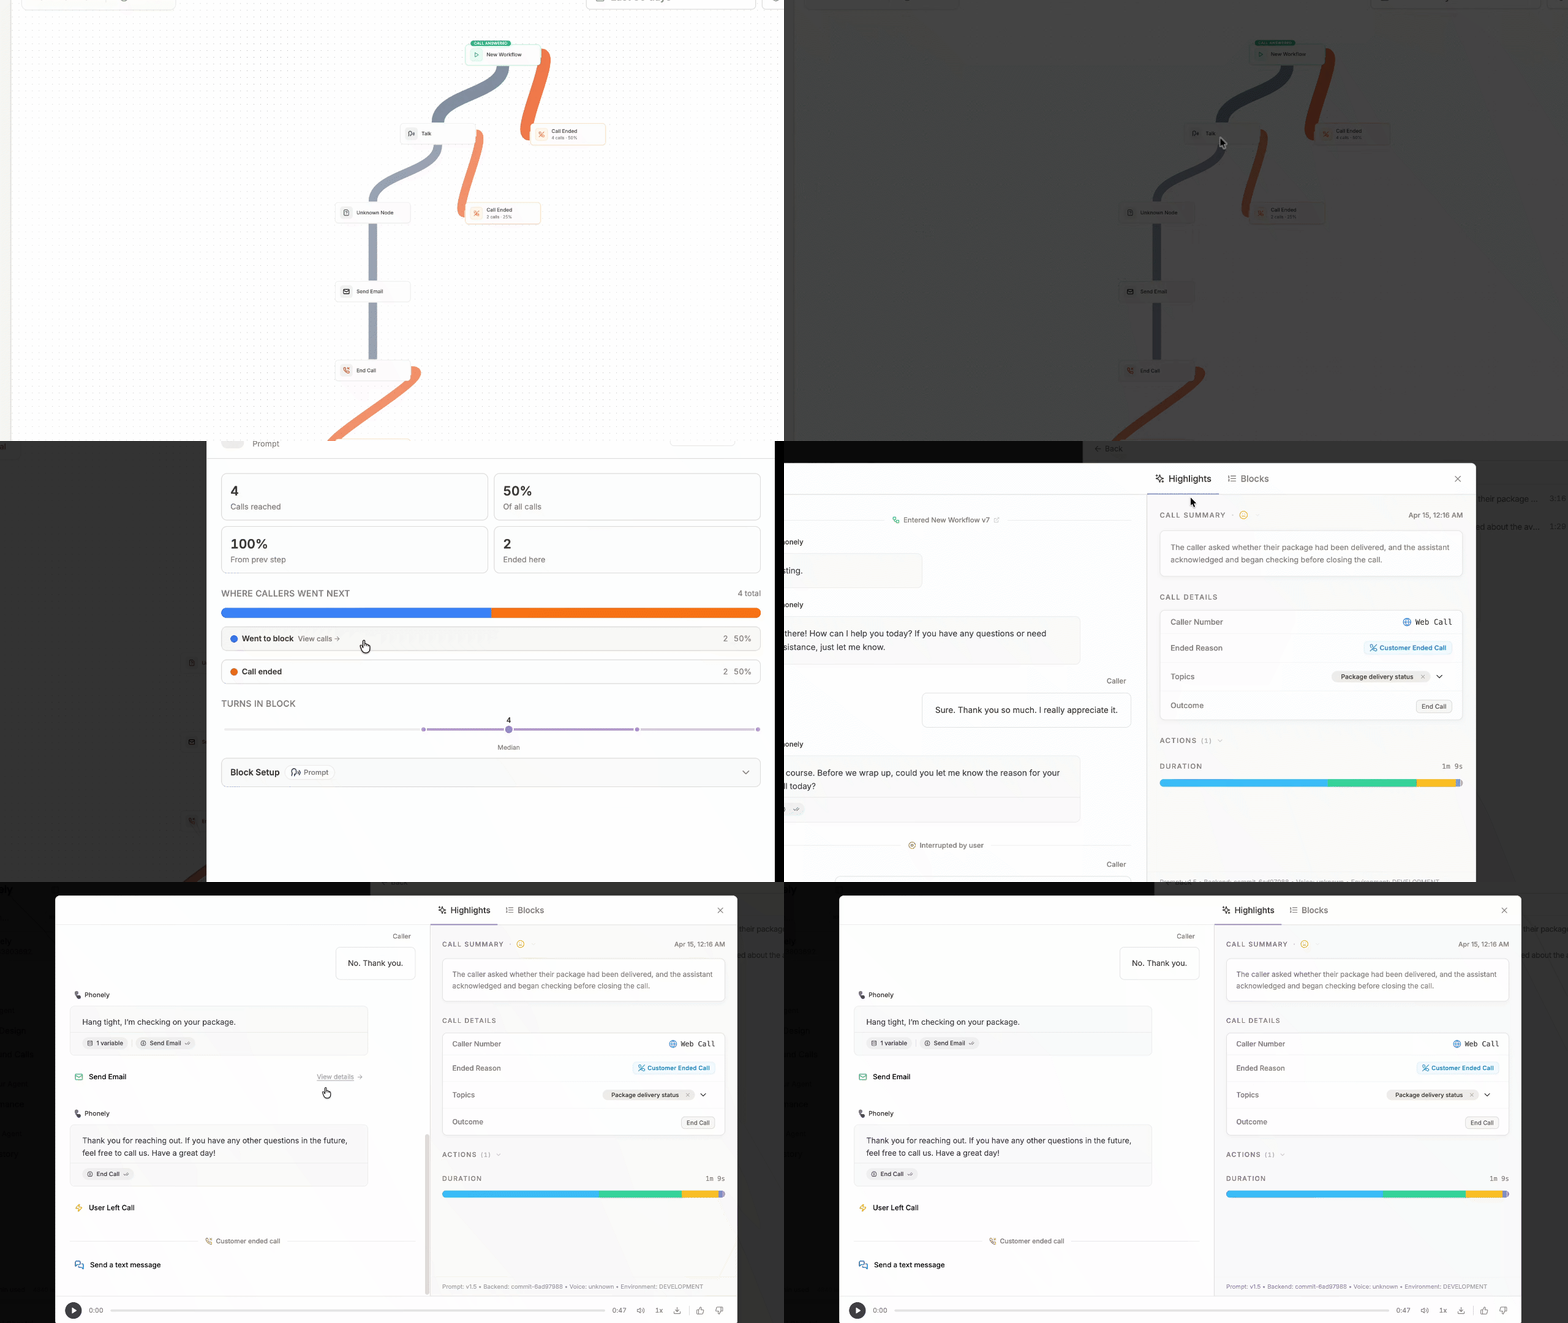 The call path page helps you understand how callers actually moved through your agent’s workflows step by step from entry to exit. Instead of focusing on charts and totals, Call Path gives you a visual “map” of the routes callers took, where they dropped off, and which parts of the flow are doing the heavy lifting.
It’s the view you open when you’re asking questions like:
* Where do callers most commonly exit?
* Which block causes people to hang up?
* Did my latest workflow change improve the route people take?
* How does behavior differ between workflow versions?
* Top controls (date range, flow version filter, and call filters)
* The flow canvas (the visual path calls took)
* A flow selector along the bottom (switch between workflows)
* A details panel that opens when you click nodes (with Details and Metrics tabs)
The call path page helps you understand how callers actually moved through your agent’s workflows step by step from entry to exit. Instead of focusing on charts and totals, Call Path gives you a visual “map” of the routes callers took, where they dropped off, and which parts of the flow are doing the heavy lifting.
It’s the view you open when you’re asking questions like:
* Where do callers most commonly exit?
* Which block causes people to hang up?
* Did my latest workflow change improve the route people take?
* How does behavior differ between workflow versions?
* Top controls (date range, flow version filter, and call filters)
* The flow canvas (the visual path calls took)
* A flow selector along the bottom (switch between workflows)
* A details panel that opens when you click nodes (with Details and Metrics tabs)
 ## Top controls
### Date range
Use the date range dropdown to choose the window used to calculate volumes and percentages in the diagram. Common presets include last 24 hours, last 7 days, last 30 days, and last 90 days.
## Top controls
### Date range
Use the date range dropdown to choose the window used to calculate volumes and percentages in the diagram. Common presets include last 24 hours, last 7 days, last 30 days, and last 90 days.
 Changing the date range recalculates the call path volumes across the entire canvas.
### Flow version filter
The flow version filter lets you isolate calls that ran on specific versions of a workflow.
How it works:
Changing the date range recalculates the call path volumes across the entire canvas.
### Flow version filter
The flow version filter lets you isolate calls that ran on specific versions of a workflow.
How it works:
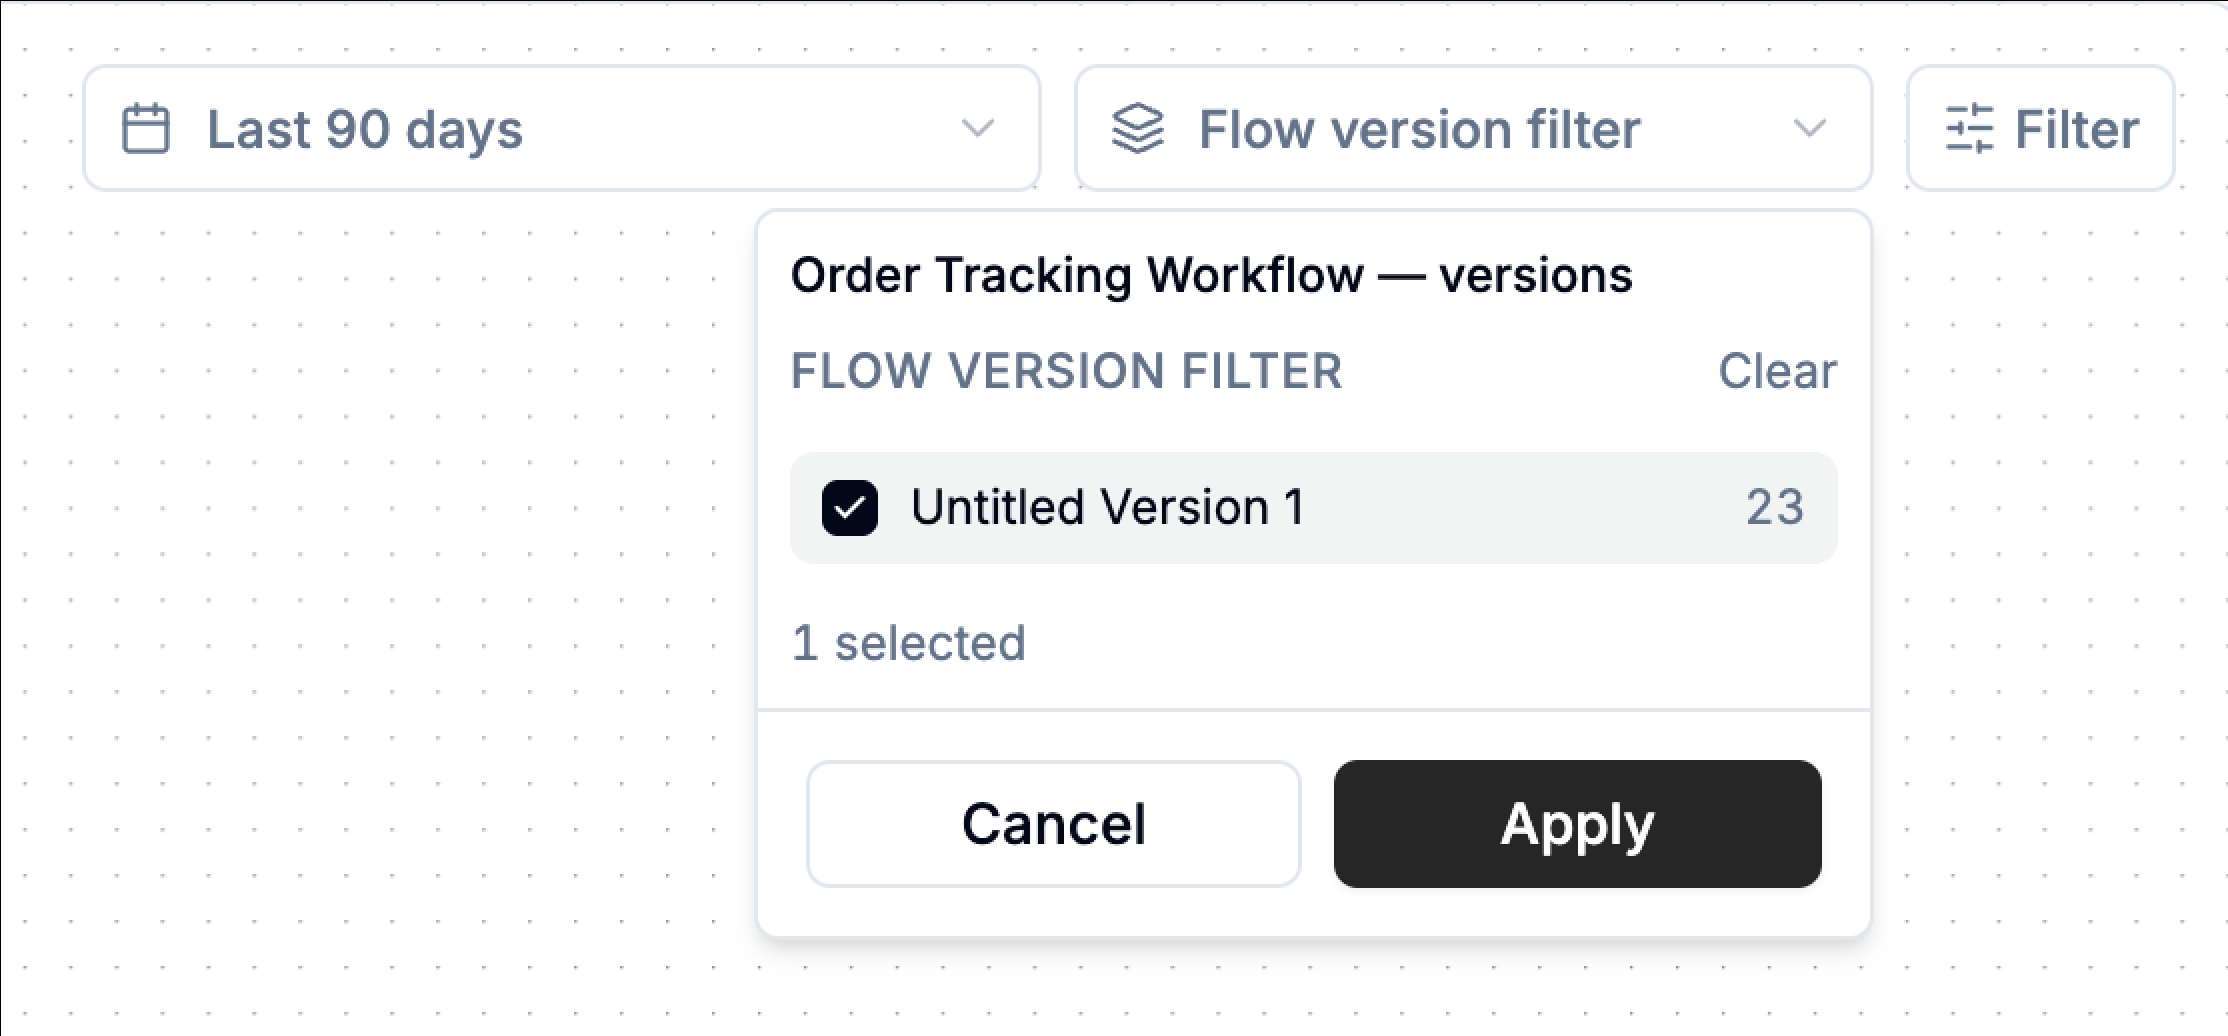 This is especially useful right after publishing changes, so you can compare behavior before/after a release without guessing.
### Filter (call-level filters)
The filters panel allows you to narrow down the set of calls displayed in the call paths view. By applying filters, you can focus on specific call behaviors, time ranges, outcomes, or call characteristics. This is especially useful when you want to investigate patterns such as short calls, after-hours activity, calls that ended unexpectedly, or calls related to specific customer intents.
To open the panel, click **Filters** in the top-right corner of the page. After selecting the desired criteria, click **Apply** to refresh the view using only the calls that match the selected filters.
**Duration**
The duration filter lets you focus on calls based on how long they lasted.
You can use the preset options:
* **\< 1 min** – very short calls, often useful for identifying greeting hang-ups or abandoned calls
* **1–5 min** – medium-length interactions that typically represent quick inquiries
* **> 5 min** – longer conversations that may indicate complex issues or detailed support interactions
You can also adjust the duration slider to define a custom range between 0 seconds and 60+ minutes. This allows you to precisely isolate calls within a specific duration.
**Day of Week**
The day of week filter lets you analyze calls based on when they occurred during the week. The timezone used for this filter is displayed next to the section title. You can choose from quick options:
* **All Days** – includes calls from the entire week
* **Weekdays** – Monday through Friday
* **Weekend** – Saturday and Sunday
Alternatively, you can select specific days using the day buttons: S · M · T · W · T · F · S. When days are selected, the system will display only calls that occurred on those days.
Click **Reset** to clear the day selection.
This is especially useful right after publishing changes, so you can compare behavior before/after a release without guessing.
### Filter (call-level filters)
The filters panel allows you to narrow down the set of calls displayed in the call paths view. By applying filters, you can focus on specific call behaviors, time ranges, outcomes, or call characteristics. This is especially useful when you want to investigate patterns such as short calls, after-hours activity, calls that ended unexpectedly, or calls related to specific customer intents.
To open the panel, click **Filters** in the top-right corner of the page. After selecting the desired criteria, click **Apply** to refresh the view using only the calls that match the selected filters.
**Duration**
The duration filter lets you focus on calls based on how long they lasted.
You can use the preset options:
* **\< 1 min** – very short calls, often useful for identifying greeting hang-ups or abandoned calls
* **1–5 min** – medium-length interactions that typically represent quick inquiries
* **> 5 min** – longer conversations that may indicate complex issues or detailed support interactions
You can also adjust the duration slider to define a custom range between 0 seconds and 60+ minutes. This allows you to precisely isolate calls within a specific duration.
**Day of Week**
The day of week filter lets you analyze calls based on when they occurred during the week. The timezone used for this filter is displayed next to the section title. You can choose from quick options:
* **All Days** – includes calls from the entire week
* **Weekdays** – Monday through Friday
* **Weekend** – Saturday and Sunday
Alternatively, you can select specific days using the day buttons: S · M · T · W · T · F · S. When days are selected, the system will display only calls that occurred on those days.
Click **Reset** to clear the day selection.
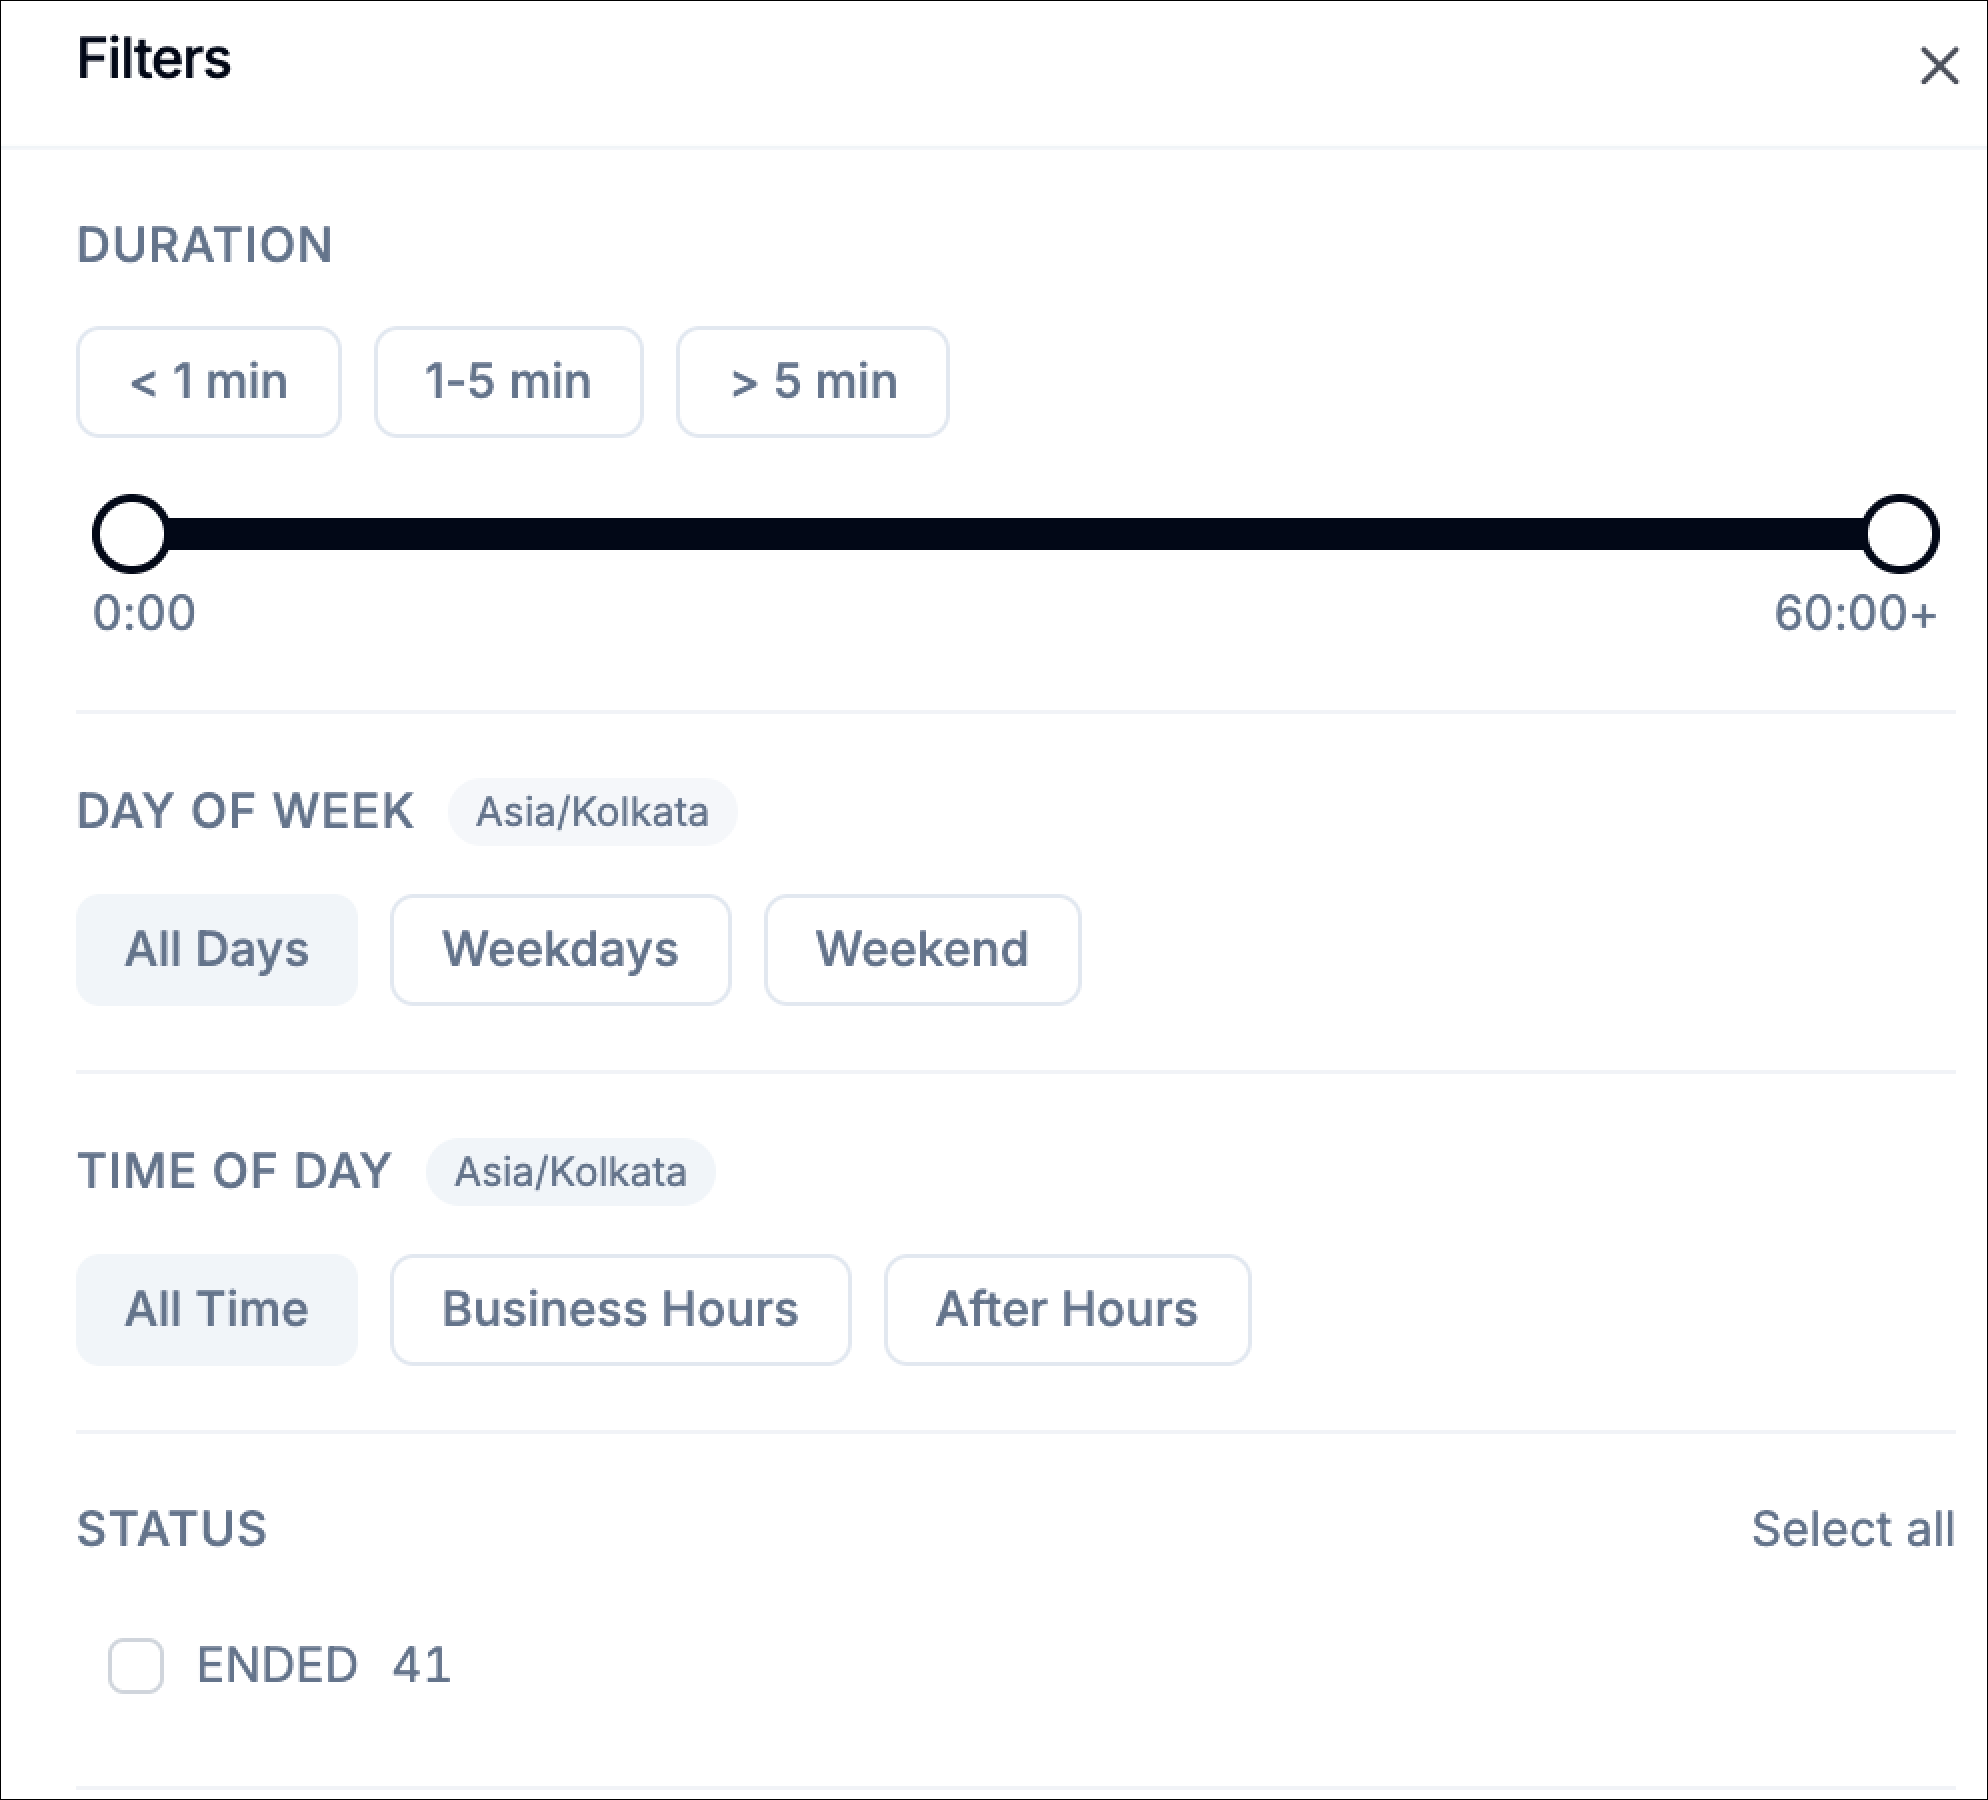 **Time of Day**
The time of day filter lets you focus on calls within a specific time window during the day. The timezone used is also displayed in this section.
Quick options include:
* **All Time** – includes calls from any time of day
* **Business Hours** – commonly used working hours (default **9:00 AM – 5:00 PM**)
* **After Hours** – calls that occur outside standard working hours
You can also manually set a custom range using the from and to dropdowns. For example from: 9:00 AM to: 5:00 PM. The panel will confirm the selection with a message such as “Showing calls from 9:00 AM to 5:00 PM.”
Click **Reset** to restore the default time range.
**Status**
The status filter allows you to include calls based on their final state. Example status values include: **Ended** – calls that completed normally
The number displayed next to each option indicates how many calls fall into that category. Use **Select all** to quickly include all statuses.
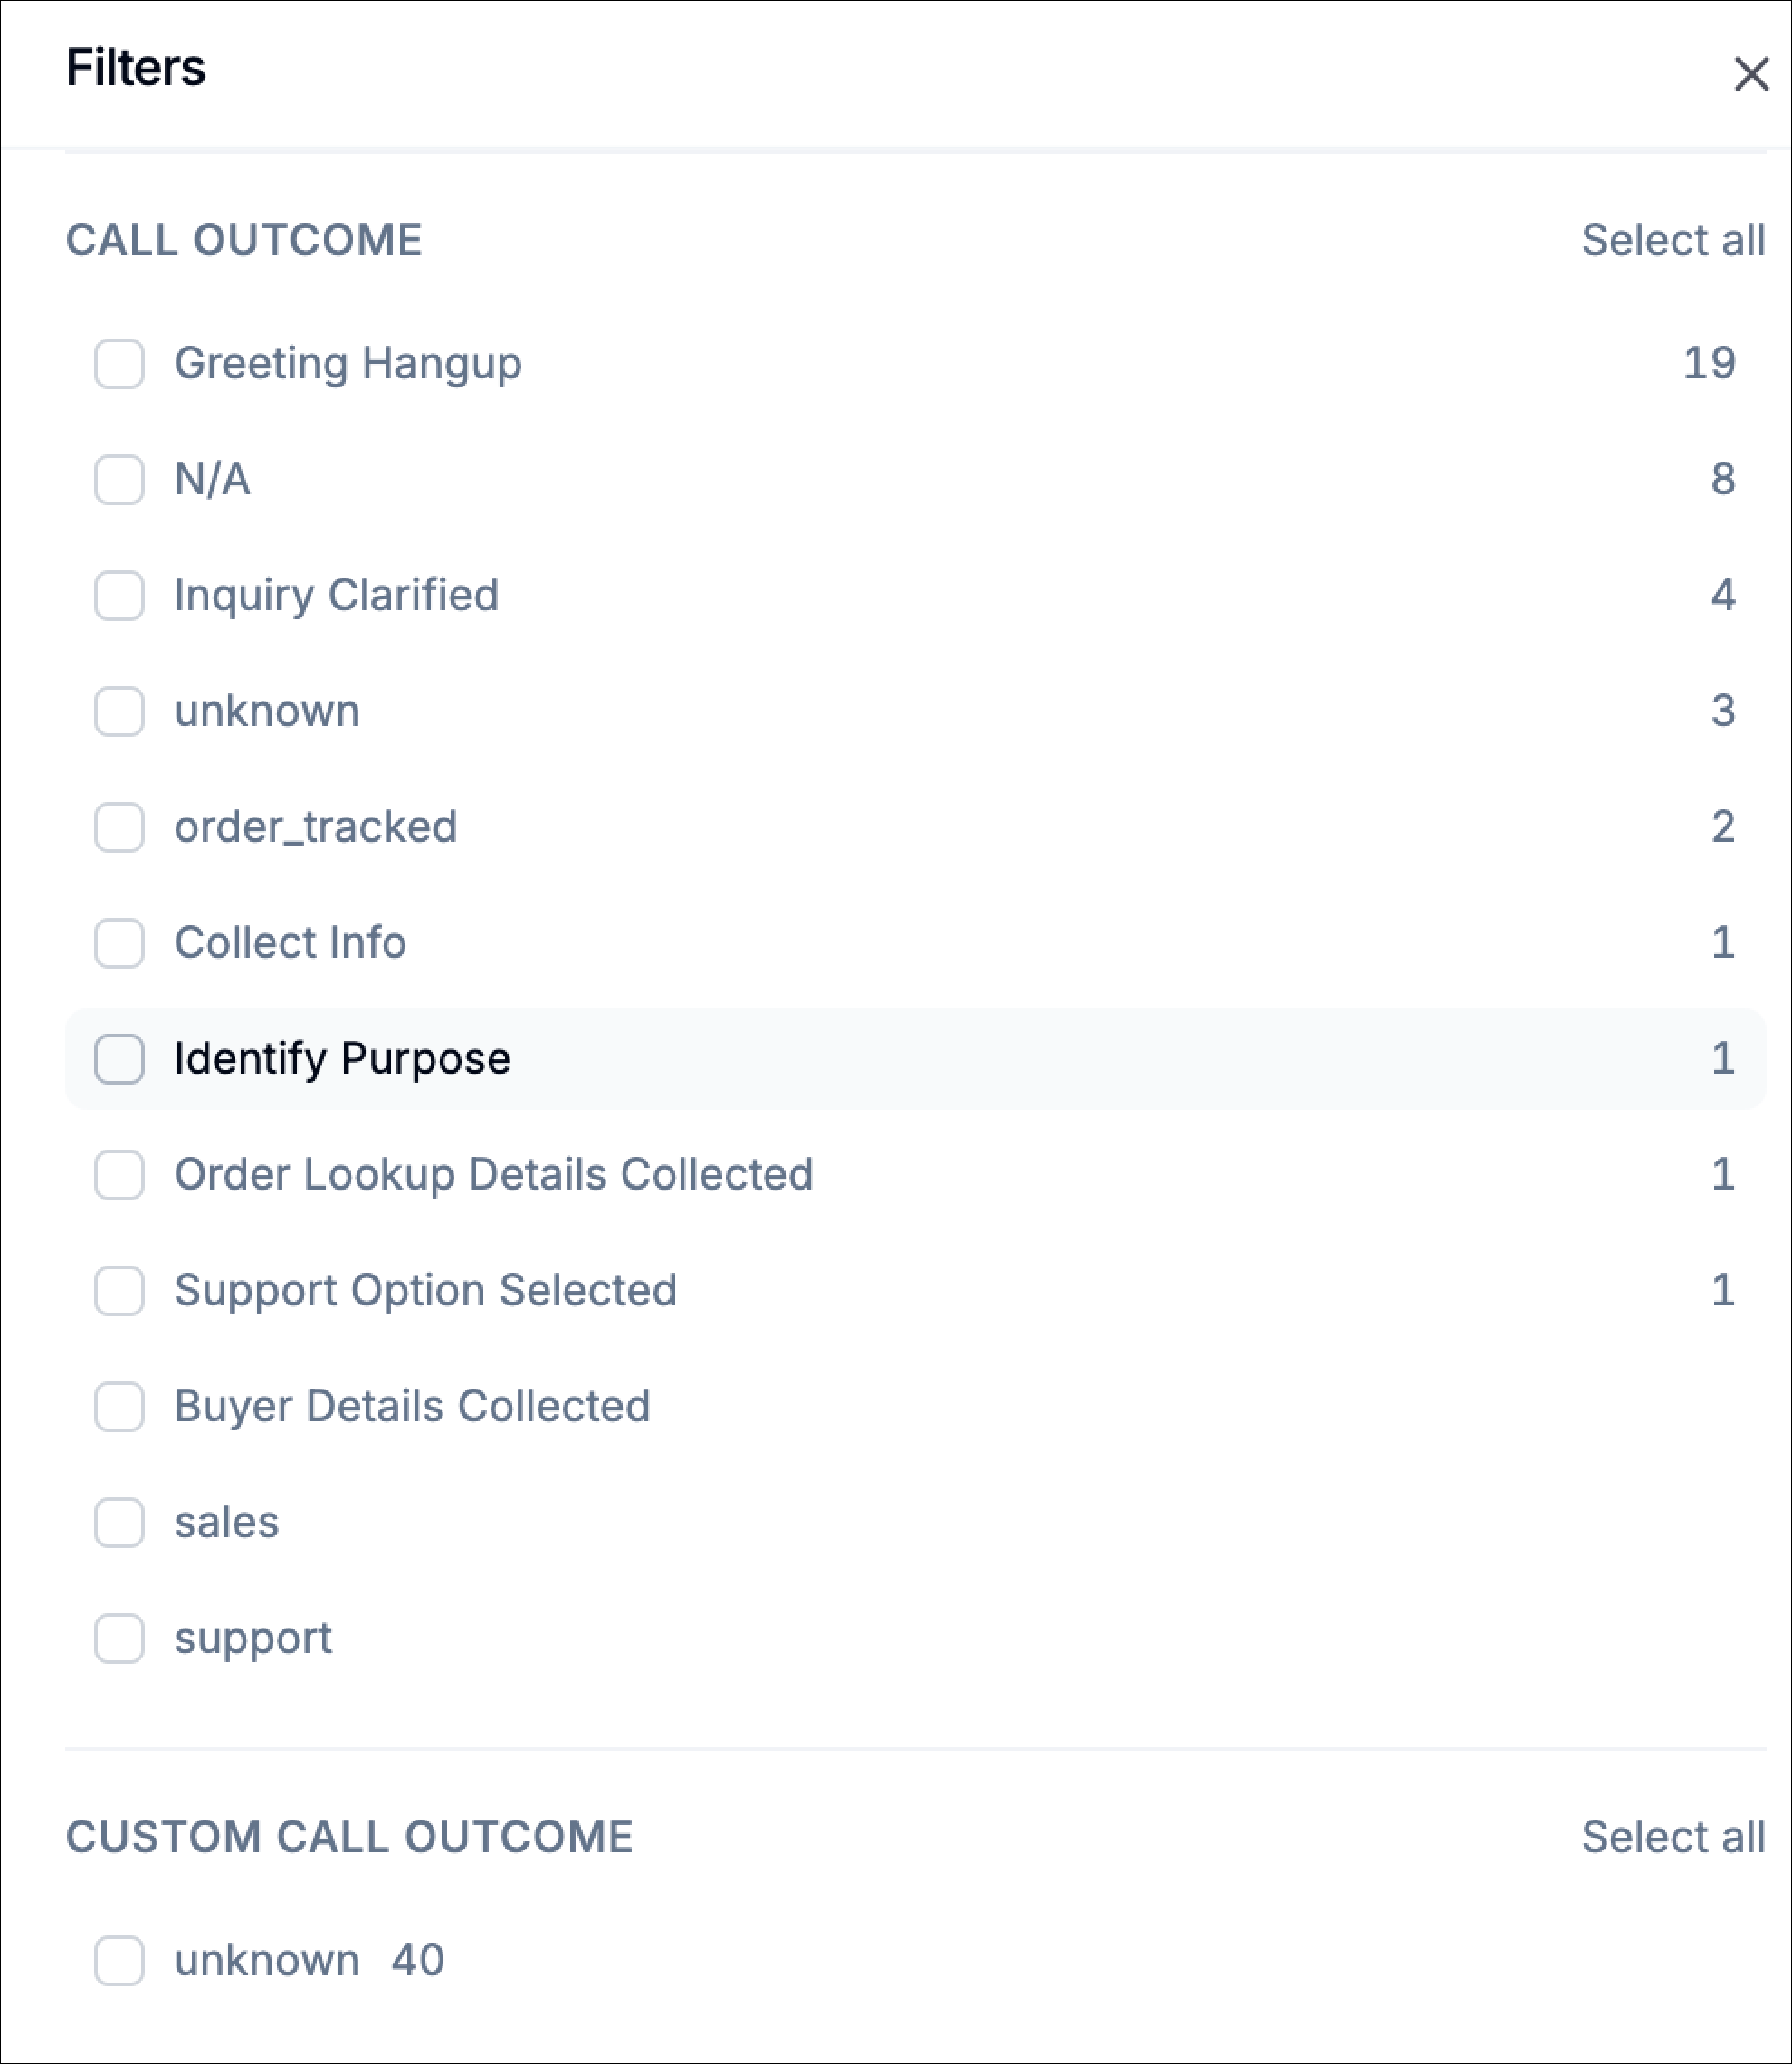
**Call Outcome**
The call outcome filter lets you analyze calls based on how the interaction concluded or what the assistant achieved during the conversation.
* **Greeting Hangup** – the caller disconnected shortly after the greeting
* **Inquiry Clarified** – the caller received an answer to their question
* **Order Tracked** – the caller successfully tracked an order
* **Collect Info** – the assistant gathered necessary information
* **Identify Purpose** – the system determined the caller’s intent
* **Order Lookup Details Collected** – order identification details were collected
* **Support Option Selected** – the caller selected a support option
* **Buyer Details Collected** – customer details were captured
Additional custom categories may appear depending on how the agent is configured (for example sales or support). The number next to each label shows how many calls fall into that category.
**Custom Call Outcome**
Some systems define custom outcomes that are specific to a workflow. This section allows you to isolate calls that fall into those custom classifications.
**Time of Day**
The time of day filter lets you focus on calls within a specific time window during the day. The timezone used is also displayed in this section.
Quick options include:
* **All Time** – includes calls from any time of day
* **Business Hours** – commonly used working hours (default **9:00 AM – 5:00 PM**)
* **After Hours** – calls that occur outside standard working hours
You can also manually set a custom range using the from and to dropdowns. For example from: 9:00 AM to: 5:00 PM. The panel will confirm the selection with a message such as “Showing calls from 9:00 AM to 5:00 PM.”
Click **Reset** to restore the default time range.
**Status**
The status filter allows you to include calls based on their final state. Example status values include: **Ended** – calls that completed normally
The number displayed next to each option indicates how many calls fall into that category. Use **Select all** to quickly include all statuses.
**Call Outcome**
The call outcome filter lets you analyze calls based on how the interaction concluded or what the assistant achieved during the conversation.
* **Greeting Hangup** – the caller disconnected shortly after the greeting
* **Inquiry Clarified** – the caller received an answer to their question
* **Order Tracked** – the caller successfully tracked an order
* **Collect Info** – the assistant gathered necessary information
* **Identify Purpose** – the system determined the caller’s intent
* **Order Lookup Details Collected** – order identification details were collected
* **Support Option Selected** – the caller selected a support option
* **Buyer Details Collected** – customer details were captured
Additional custom categories may appear depending on how the agent is configured (for example sales or support). The number next to each label shows how many calls fall into that category.
**Custom Call Outcome**
Some systems define custom outcomes that are specific to a workflow. This section allows you to isolate calls that fall into those custom classifications.
 **Call Topic**
The call topic filter groups calls by the primary topic or request identified during the conversation.
* **callback requested** – the caller asked to be contacted later
* **caller transferred** – the call was transferred to another destination
* **appointment booked** – the caller scheduled an appointment
* **caller asked to speak to representative** – the caller requested a human agent
Filtering by topic helps you quickly identify patterns in customer requests.
**Call Type**
The call type filter lets you separate calls based on how they were initiated.
Common examples include:
* **webCall** – calls initiated from a web interface
* **inboundPhoneCall** – calls coming directly from a phone number
This can help you compare behavior between web-initiated and phone-initiated conversations.
**Call Topic**
The call topic filter groups calls by the primary topic or request identified during the conversation.
* **callback requested** – the caller asked to be contacted later
* **caller transferred** – the call was transferred to another destination
* **appointment booked** – the caller scheduled an appointment
* **caller asked to speak to representative** – the caller requested a human agent
Filtering by topic helps you quickly identify patterns in customer requests.
**Call Type**
The call type filter lets you separate calls based on how they were initiated.
Common examples include:
* **webCall** – calls initiated from a web interface
* **inboundPhoneCall** – calls coming directly from a phone number
This can help you compare behavior between web-initiated and phone-initiated conversations.
 **Ended Reason**
The ended reason filter explains why the call ended.
* **customer-ended-call** – the caller hung up
* **assistant-ended-call** – the AI assistant intentionally ended the call
* **user-ended-call** – the user triggered call termination through the interface
* **silence-timeout** – the call ended automatically due to inactivity
Filtering by ended reason can help identify issues such as silence timeouts or unexpected call terminations.
**Sentiment**
The sentiment filter categorizes calls based on the detected emotional tone of the conversation.
Examples include:
* **Neutral** – standard interactions without strong sentiment
* **Positive** – conversations where the caller expressed satisfaction
Sentiment filtering can help teams evaluate customer experience and identify calls that may require review.
**Applying Filters**
After selecting the desired criteria:
Using filters effectively allows you to quickly isolate specific types of calls and gain deeper insights into how your agent handles different scenarios.
## Switching workflows
Along the bottom of the page, you’ll see the available workflows.
* Click a workflow name to load its call path diagram.
* The page updates the canvas to show the selected workflow’s pathing and volumes.
This makes it easy to compare how different workflows perform, without leaving the Call Path page. The canvas shows your workflow as a connected set of nodes (blocks) and paths.
## Paths (connections)
The connections between blocks represent transitions callers took between steps. Typically:
* Thicker / more prominent paths indicate higher call volume.
* End nodes on the right often represent where calls concluded (for example: Customer Ended Call, Silence Timeout, Assistant Ended Call).
## Nodes (blocks)
Each node (block) in **Call Path** represents a step in your workflow. When you click a node, Phonely opens a **right-side panel** that lets you inspect what the node is, what it’s configured to do, and how calls behaved at that step.
What you see depends on the node type
### Start node
The Start node is the entry point for the flow. Currently, it does not show additional node-level details in the panel.
### Action nodes
Action nodes show the most detail because they represent an actual workflow step (for example: collect details, route, API request, transfer, etc.).
When you click an action node a right-side panel opens with two tabs: Details and Metrics. Together, these tabs answer two different questions:
* **Details** = *What is this node configured to do (right now)?*
* **Metrics** = *What actually happened here in the selected calls?*
**Details tab**
The details tab shows the node’s configuration extracted from the current version of the flow (the workflow as it exists now in the builder), not the historical configuration from older versions.
**Ended Reason**
The ended reason filter explains why the call ended.
* **customer-ended-call** – the caller hung up
* **assistant-ended-call** – the AI assistant intentionally ended the call
* **user-ended-call** – the user triggered call termination through the interface
* **silence-timeout** – the call ended automatically due to inactivity
Filtering by ended reason can help identify issues such as silence timeouts or unexpected call terminations.
**Sentiment**
The sentiment filter categorizes calls based on the detected emotional tone of the conversation.
Examples include:
* **Neutral** – standard interactions without strong sentiment
* **Positive** – conversations where the caller expressed satisfaction
Sentiment filtering can help teams evaluate customer experience and identify calls that may require review.
**Applying Filters**
After selecting the desired criteria:
Using filters effectively allows you to quickly isolate specific types of calls and gain deeper insights into how your agent handles different scenarios.
## Switching workflows
Along the bottom of the page, you’ll see the available workflows.
* Click a workflow name to load its call path diagram.
* The page updates the canvas to show the selected workflow’s pathing and volumes.
This makes it easy to compare how different workflows perform, without leaving the Call Path page. The canvas shows your workflow as a connected set of nodes (blocks) and paths.
## Paths (connections)
The connections between blocks represent transitions callers took between steps. Typically:
* Thicker / more prominent paths indicate higher call volume.
* End nodes on the right often represent where calls concluded (for example: Customer Ended Call, Silence Timeout, Assistant Ended Call).
## Nodes (blocks)
Each node (block) in **Call Path** represents a step in your workflow. When you click a node, Phonely opens a **right-side panel** that lets you inspect what the node is, what it’s configured to do, and how calls behaved at that step.
What you see depends on the node type
### Start node
The Start node is the entry point for the flow. Currently, it does not show additional node-level details in the panel.
### Action nodes
Action nodes show the most detail because they represent an actual workflow step (for example: collect details, route, API request, transfer, etc.).
When you click an action node a right-side panel opens with two tabs: Details and Metrics. Together, these tabs answer two different questions:
* **Details** = *What is this node configured to do (right now)?*
* **Metrics** = *What actually happened here in the selected calls?*
**Details tab**
The details tab shows the node’s configuration extracted from the current version of the flow (the workflow as it exists now in the builder), not the historical configuration from older versions.
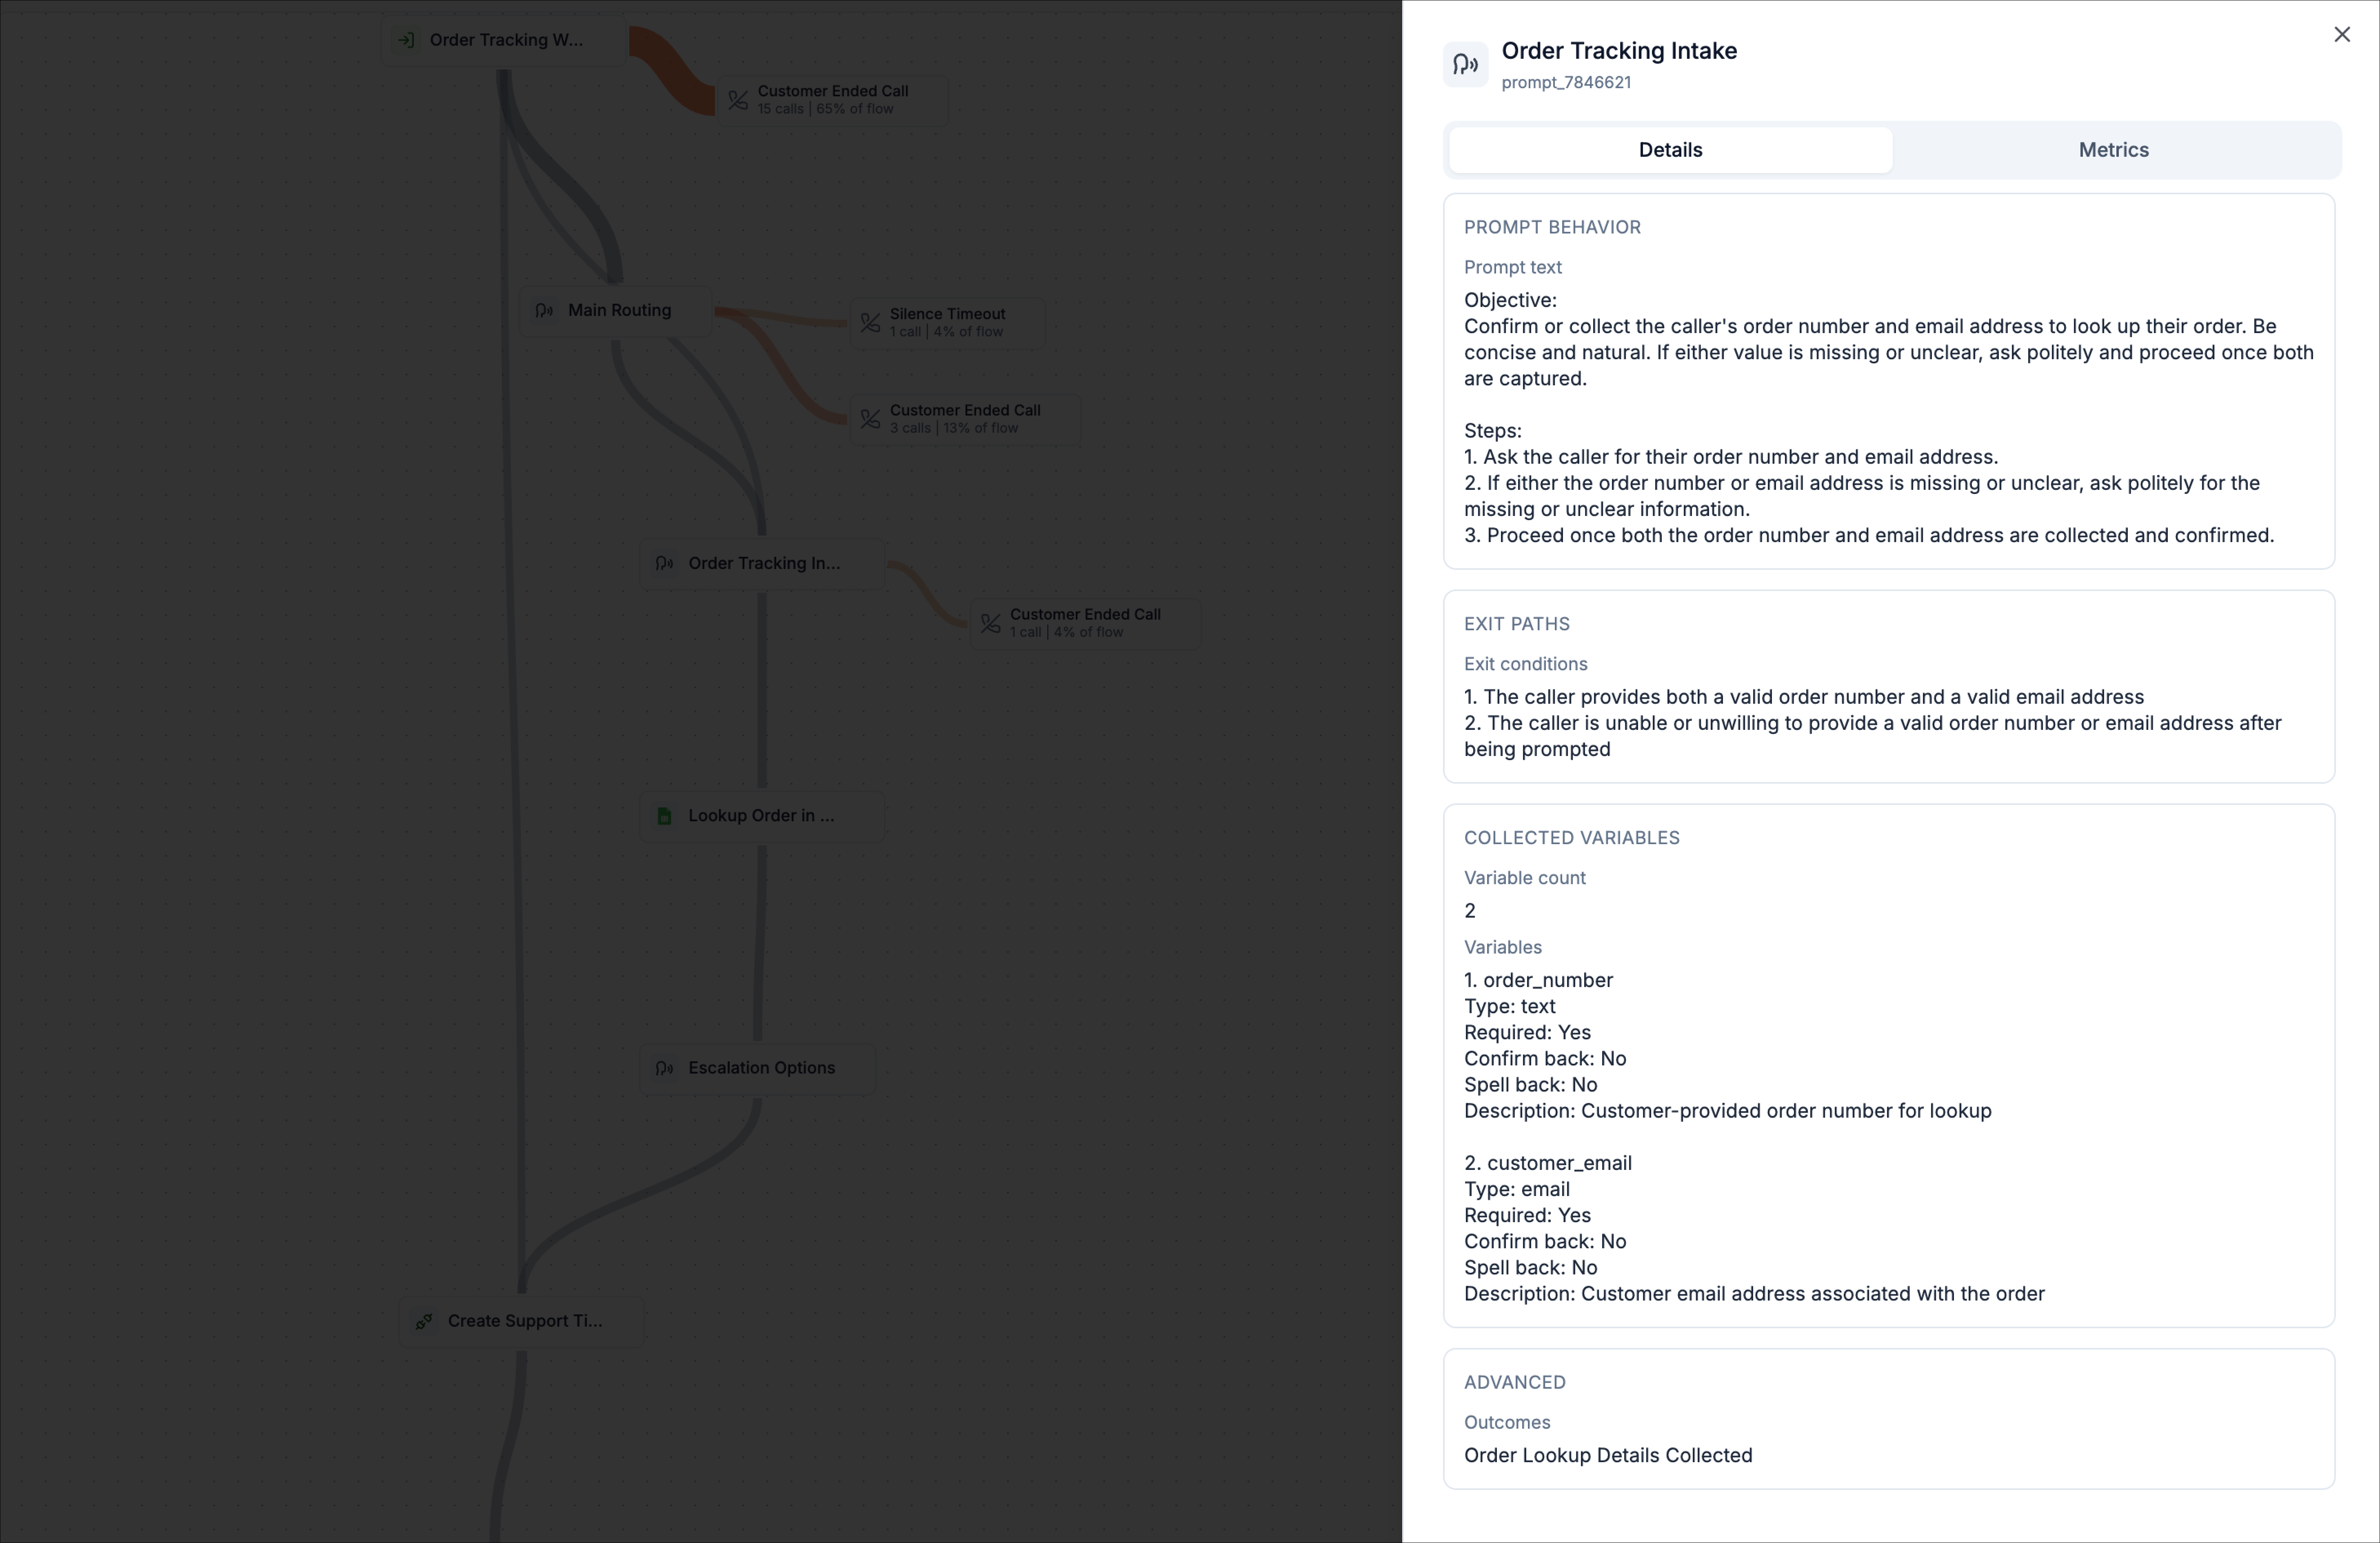 Depending on the node, you may see:
**Objective**: what the node is trying to achieve in the conversation
**Steps**: the intended sequence of prompts/actions inside the node
**Exit conditions**: the conditions that determine how the node completes and where the call can go next (for example, “caller provides both order number and email” vs “caller can’t provide valid details”)
A variable count plus a list of variables this node collects (for example `order_number`, `customer_email`)
Per-variable metadata like:
* **Type** (text, email, etc.)
* **Required** (Yes/No)
* **Confirm back** / **Spell back** (Yes/No)
* **Description** (what the variable represents)
**Exit conditions**: the conditions that determine how the node completes and where the call can go next (for example, “caller provides both order number and email” vs “caller can’t provide valid details”)
Any additional configuration tied to the node, such as **outcomes** that may be tagged when the node completes (for example, “Order Lookup Details Collected”)
Because details reflects the current flow configuration, it’s best used to confirm what’s configured right now while you’re analyzing behavior in the call path.
**Metrics tab**
The metrics tab summarizes how calls behaved at that node for the currently selected time range, filters, and (if applied) flow version filter.
Depending on the node, you may see:
**Objective**: what the node is trying to achieve in the conversation
**Steps**: the intended sequence of prompts/actions inside the node
**Exit conditions**: the conditions that determine how the node completes and where the call can go next (for example, “caller provides both order number and email” vs “caller can’t provide valid details”)
A variable count plus a list of variables this node collects (for example `order_number`, `customer_email`)
Per-variable metadata like:
* **Type** (text, email, etc.)
* **Required** (Yes/No)
* **Confirm back** / **Spell back** (Yes/No)
* **Description** (what the variable represents)
**Exit conditions**: the conditions that determine how the node completes and where the call can go next (for example, “caller provides both order number and email” vs “caller can’t provide valid details”)
Any additional configuration tied to the node, such as **outcomes** that may be tagged when the node completes (for example, “Order Lookup Details Collected”)
Because details reflects the current flow configuration, it’s best used to confirm what’s configured right now while you’re analyzing behavior in the call path.
**Metrics tab**
The metrics tab summarizes how calls behaved at that node for the currently selected time range, filters, and (if applied) flow version filter.
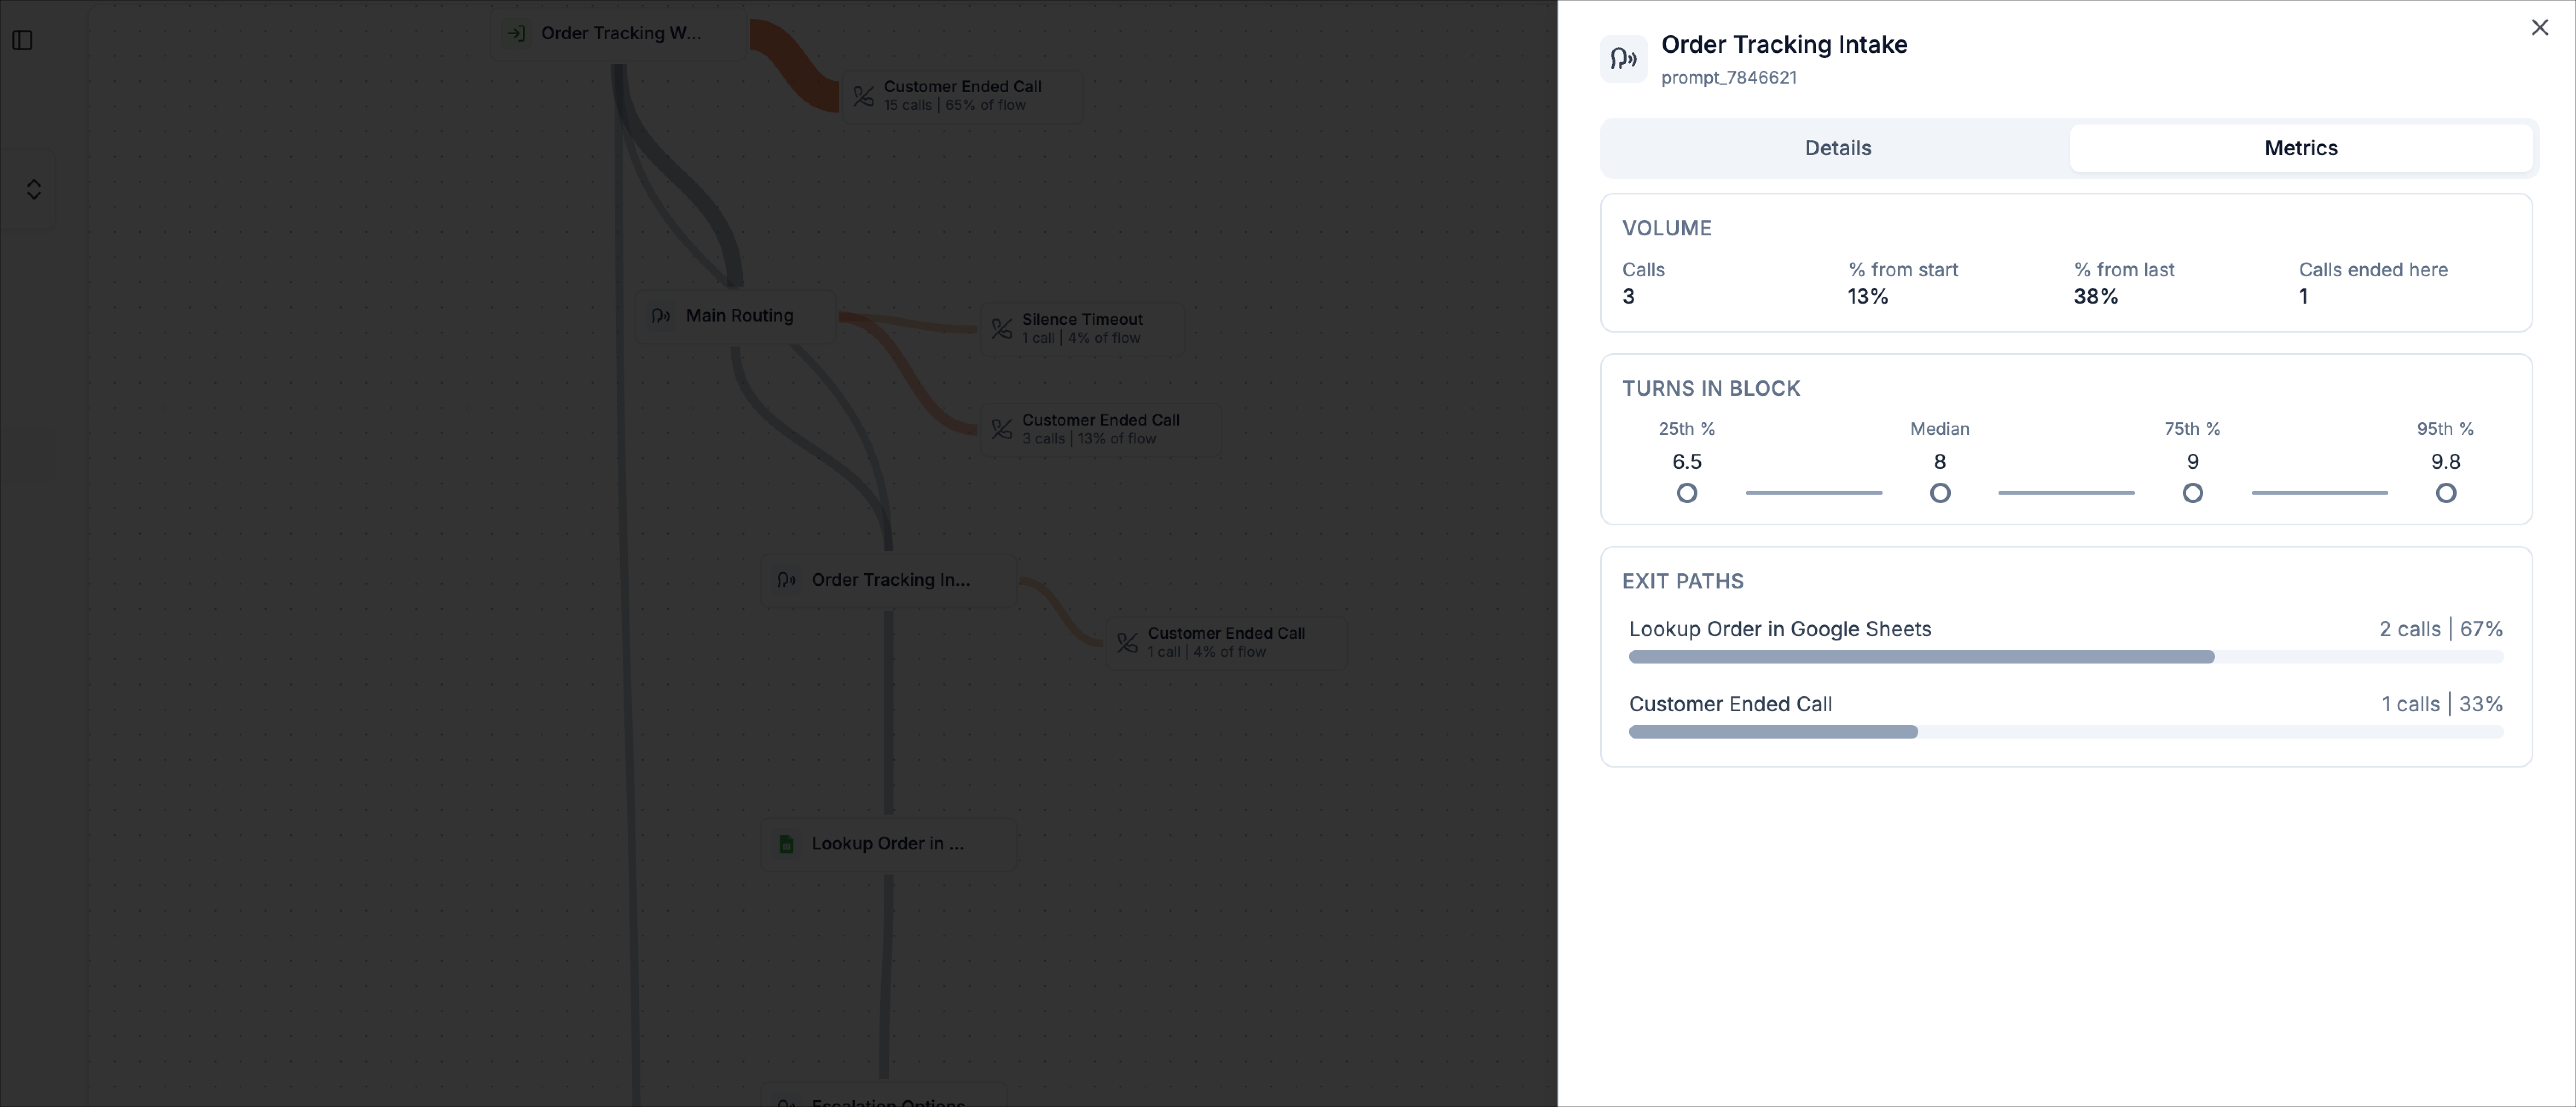 This section shows how much traffic reached the node and how it relates to the rest of the flow:
* **Calls**: number of calls that reached this node
* **% from start**: share of all calls in the flow that made it to this node
* **% from last**: share of calls from the previous *node* that continued into this node
* **Calls ended here**: number of calls that terminated at this node (drop-off point)
Use this to quickly spot “high traffic” vs “high drop-off” nodes.
This section shows how long conversations tend to stay in this node, measured in interaction turns:
* **25th percentile**: a “fast path” baseline (calls that moved through quickly)
* **Median**: the typical number of turns in this node
* **75th percentile**: calls that needed more back-and-forth than usual
* **95th percentile**: outliers where callers spent the most time here
Use this to find nodes where callers get stuck or need repeated clarification.
This section shows where calls went *after* this node, including both the distribution and counts:
* Each exit path lists the **next step** (for example, “Lookup Order in Google Sheets”)
* It also shows call count and percentage for that path (for example, “2 calls | 67%”)
* If calls ended at this node, you’ll see an end outcome listed as an exit path (for example, “Customer Ended Call”)
Use this to understand the most common routing outcome after the node and to identify unexpected paths.
### End nodes
End nodes summarize where calls terminate. When you click an end node, the panel shows simple call volume analytics so you can quickly understand how many calls ended there and how significant that end point is relative to the rest of the flow.
This section shows how much traffic reached the node and how it relates to the rest of the flow:
* **Calls**: number of calls that reached this node
* **% from start**: share of all calls in the flow that made it to this node
* **% from last**: share of calls from the previous *node* that continued into this node
* **Calls ended here**: number of calls that terminated at this node (drop-off point)
Use this to quickly spot “high traffic” vs “high drop-off” nodes.
This section shows how long conversations tend to stay in this node, measured in interaction turns:
* **25th percentile**: a “fast path” baseline (calls that moved through quickly)
* **Median**: the typical number of turns in this node
* **75th percentile**: calls that needed more back-and-forth than usual
* **95th percentile**: outliers where callers spent the most time here
Use this to find nodes where callers get stuck or need repeated clarification.
This section shows where calls went *after* this node, including both the distribution and counts:
* Each exit path lists the **next step** (for example, “Lookup Order in Google Sheets”)
* It also shows call count and percentage for that path (for example, “2 calls | 67%”)
* If calls ended at this node, you’ll see an end outcome listed as an exit path (for example, “Customer Ended Call”)
Use this to understand the most common routing outcome after the node and to identify unexpected paths.
### End nodes
End nodes summarize where calls terminate. When you click an end node, the panel shows simple call volume analytics so you can quickly understand how many calls ended there and how significant that end point is relative to the rest of the flow.
