> ## Documentation Index
> Fetch the complete documentation index at: https://docs.phonely.ai/llms.txt
> Use this file to discover all available pages before exploring further.
# Google Sheets - Search Row
> Setting Up Google Sheets Integration to Retrieve real-time Information
You can connect your Phonely workflows to Google Sheets to instantly retrieve or update live data during calls. This is useful for real-time order tracking, customer data lookups, or referencing information stored in spreadsheets, without any manual work.
With this integration, you can:
* Look up order information in real time, such as status, shipping date, or product details.
* Automate responses to common order inquiries without human intervention.
* Leverage Google Sheets to store and organize data for seamless integration with Phonely.
## Example Use Case
Let’s say a customer calls to check their **order status**. Instead of transferring them to a support agent, Phonely can automatically:
1. Ask for their order number.
2. Search Google Sheets for that order.
3. Retrieve and speak the live order status and shipping date back to the customer.
## Start a New Flow
1. From the **Agent Design** menu, click **Create Flow**.
2. Add a **Start Flow** block to define when the flow should trigger.
* Example trigger: “When a customer asks about their order.”
3. Add a **Collect** or **Ask Exactly** block to capture the **order number** or any variable you’ll use for lookup.
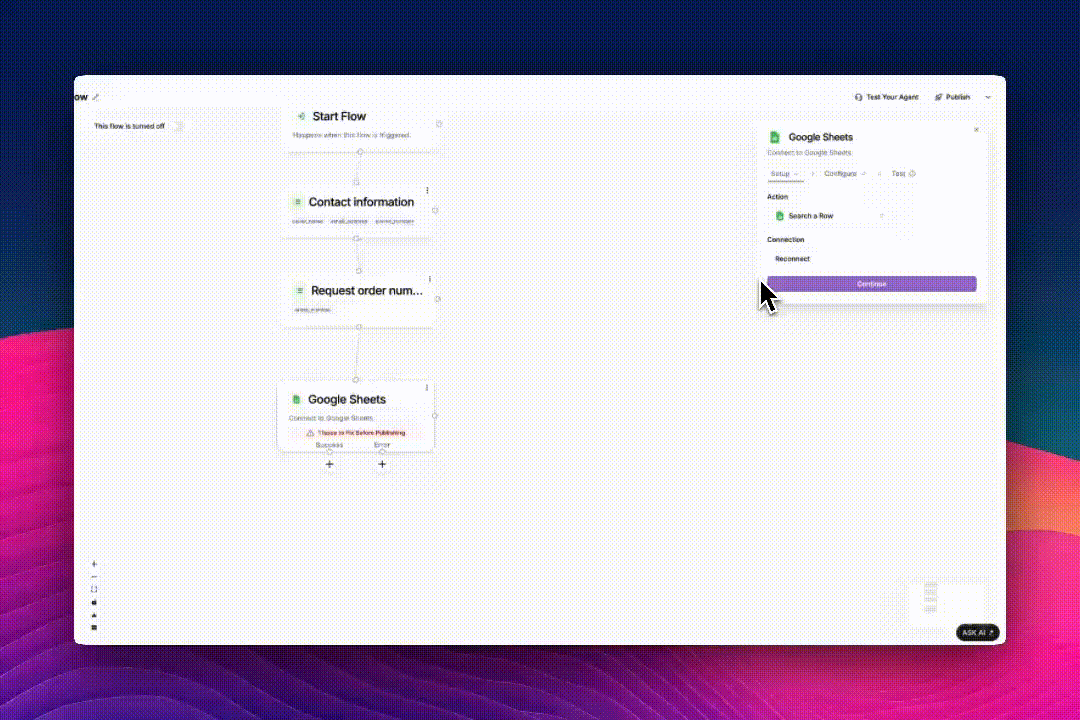
## Add the Google Sheets Action
1. Click the **(+)** icon below your block to add a new connection.
2. Under **Live Call Actions**, select **Google Sheets**.
3. Choose the action **Search a Row** from the dropdown.
* This action allows Phonely to search your sheet for a value (e.g., an order number) and return matching data.
4. Click **Connect to Google Sheets** to begin linking your account.
 ## Link Your Google Account
1. A browser window will appear asking you to **choose a Google account**.
2. Log in and **select all permissions** to allow Phonely access your Sheets\*\*.\*\*
Your login credentials are never stored by Phonely.
3. After authorization, the **Connect to Continue** button will activate.
4. Click it to proceed.
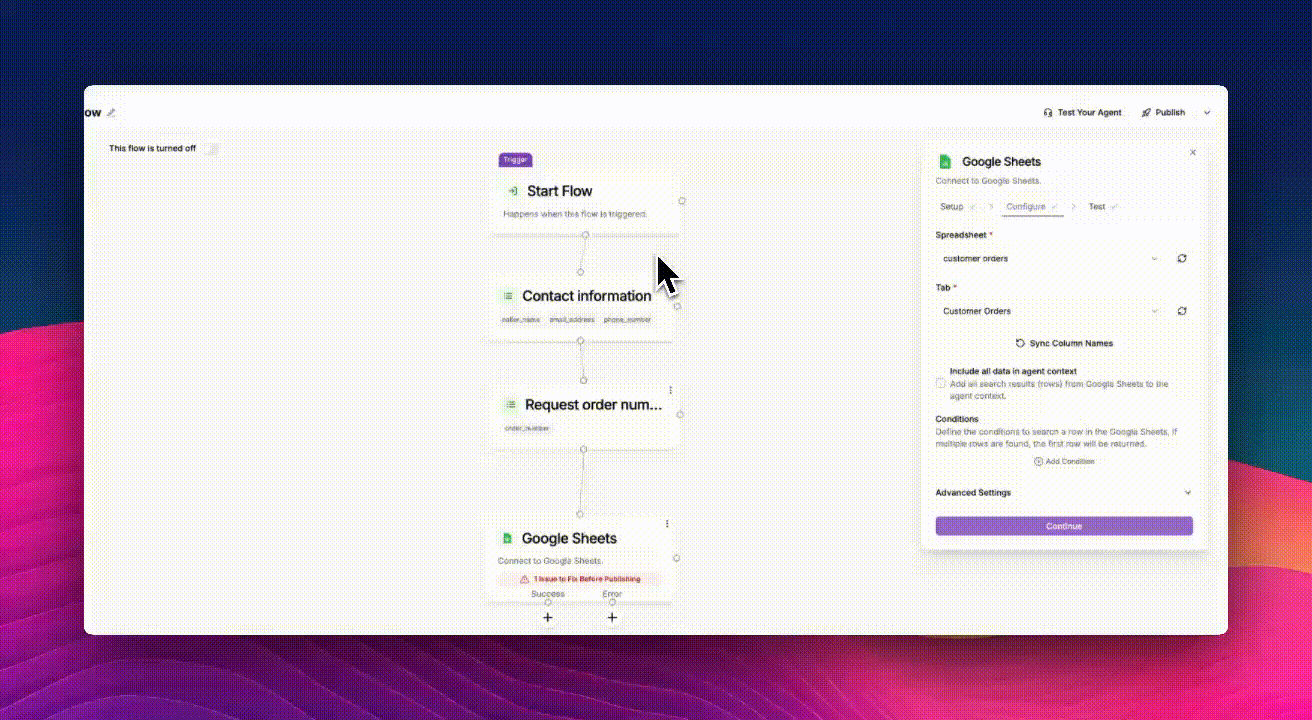
## Configure the Search
1. **Select Spreadsheet and Tab** - Choose the Google Sheet you want to connect under **Spreadsheet**, then select the specific **Tab** (worksheet) that contains your data.
2. **Sync Columns** - Click **Sync Column Names** to automatically fetch all column headers from your sheet for use in conditions or variable mapping.
3. **Include All Data (Optional)** - You can enable Include all data in agent context if you want Phonely to load all search results into the AI’s context for later use in conversation.
4. **Define Search Conditions** - Under **Conditions**, specify how Phonely should search for the data:
* Click **Add Condition**
* Select a field (e.g., `order_number`)
* Choose a comparison type (e.g., *is equal to*)
* Enter the matching variable or value (e.g., the caller’s provided order number)\
If multiple rows match, Phonely will return the first row by default.
## Link Your Google Account
1. A browser window will appear asking you to **choose a Google account**.
2. Log in and **select all permissions** to allow Phonely access your Sheets\*\*.\*\*
Your login credentials are never stored by Phonely.
3. After authorization, the **Connect to Continue** button will activate.
4. Click it to proceed.
## Configure the Search
1. **Select Spreadsheet and Tab** - Choose the Google Sheet you want to connect under **Spreadsheet**, then select the specific **Tab** (worksheet) that contains your data.
2. **Sync Columns** - Click **Sync Column Names** to automatically fetch all column headers from your sheet for use in conditions or variable mapping.
3. **Include All Data (Optional)** - You can enable Include all data in agent context if you want Phonely to load all search results into the AI’s context for later use in conversation.
4. **Define Search Conditions** - Under **Conditions**, specify how Phonely should search for the data:
* Click **Add Condition**
* Select a field (e.g., `order_number`)
* Choose a comparison type (e.g., *is equal to*)
* Enter the matching variable or value (e.g., the caller’s provided order number)\
If multiple rows match, Phonely will return the first row by default.
 5. **Advanced Settings (Optional)** — Enable **Interim Message** to let the caller know the agent is processing their request (e.g., “Please hold while I look that up”).
**Next steps**
* **Continue** — Once everything is configured, click **Continue** to move to the **Test** step.
* **Test the Connection** — Click **Test** to confirm that Phonely can successfully find a row in your selected sheet.
If you set any conditions earlier, testing will search for a row in your spreadsheet that matches those conditions. You can skip this test if you’re confident in your setup.
* If successful, you’ll see a “**Match found**” message showing the returned data.
* You can also choose **Skip Test** if you’re confident in your setup.
5. **Advanced Settings (Optional)** — Enable **Interim Message** to let the caller know the agent is processing their request (e.g., “Please hold while I look that up”).
**Next steps**
* **Continue** — Once everything is configured, click **Continue** to move to the **Test** step.
* **Test the Connection** — Click **Test** to confirm that Phonely can successfully find a row in your selected sheet.
If you set any conditions earlier, testing will search for a row in your spreadsheet that matches those conditions. You can skip this test if you’re confident in your setup.
* If successful, you’ll see a “**Match found**” message showing the returned data.
* You can also choose **Skip Test** if you’re confident in your setup.
 ## Test and Publish
1. Click **Test Your Agent** to simulate a call and verify that the correct data is fetched.
2. If everything works, click **Publish** to make the workflow live.
3. Any time a customer calls about their order, Phonely will automatically look up the latest data in Google Sheets.
## Handle Success and Error Paths
Once the search action runs, Phonely creates two possible branches:
* **Success** — the row was found in Google Sheets.
* **Error** — no match was found or the sheet could not be accessed.
Under each branch, you can add blocks to:
* Speak or message the result.
* Apologize or ask for a new input if no match is found.
## Test and Publish
1. Click **Test Your Agent** to simulate a call and verify that the correct data is fetched.
2. If everything works, click **Publish** to make the workflow live.
3. Any time a customer calls about their order, Phonely will automatically look up the latest data in Google Sheets.
## Handle Success and Error Paths
Once the search action runs, Phonely creates two possible branches:
* **Success** — the row was found in Google Sheets.
* **Error** — no match was found or the sheet could not be accessed.
Under each branch, you can add blocks to:
* Speak or message the result.
* Apologize or ask for a new input if no match is found.
 **Example:**
* On Success → **Say Exactly**:\
“Your order status is `order_status` and your expected delivery date is `ship_date`.”
* On Error → **Say Exactly**:\
“I couldn’t find that order number. Could you repeat it once more?”
## Common Use Cases
| Scenario | Example |
| :----------------- | :--------------------------------------------------------------- |
| Order tracking | Retrieve order status, ship date, and tracking link |
| Appointment lookup | Find next available appointment or meeting details |
| Support info | Pull troubleshooting steps or policy details from a shared sheet |
| CRM sync | Search or log caller details during inbound calls |
**Pro Tips**
1. **Automate Updates:** Use tools like Zapier to automatically update your Google Sheets with new order data from your CRM or shipping provider.
2. **Include Multiple Variables:** Add as much relevant data as possible (e.g., product details, tracking numbers) for a more comprehensive response.
3. **Optimize Workflow Logic:** Use filters to ensure accurate matches between customer input and your data.
## Conclusion
With Phonely’s Google Sheets integration, you can automate complex tasks, such as order tracking, and provide real-time, accurate updates to your customers. This setup reduces the need for manual intervention, saving time and improving customer satisfaction.
**Example:**
* On Success → **Say Exactly**:\
“Your order status is `order_status` and your expected delivery date is `ship_date`.”
* On Error → **Say Exactly**:\
“I couldn’t find that order number. Could you repeat it once more?”
## Common Use Cases
| Scenario | Example |
| :----------------- | :--------------------------------------------------------------- |
| Order tracking | Retrieve order status, ship date, and tracking link |
| Appointment lookup | Find next available appointment or meeting details |
| Support info | Pull troubleshooting steps or policy details from a shared sheet |
| CRM sync | Search or log caller details during inbound calls |
**Pro Tips**
1. **Automate Updates:** Use tools like Zapier to automatically update your Google Sheets with new order data from your CRM or shipping provider.
2. **Include Multiple Variables:** Add as much relevant data as possible (e.g., product details, tracking numbers) for a more comprehensive response.
3. **Optimize Workflow Logic:** Use filters to ensure accurate matches between customer input and your data.
## Conclusion
With Phonely’s Google Sheets integration, you can automate complex tasks, such as order tracking, and provide real-time, accurate updates to your customers. This setup reduces the need for manual intervention, saving time and improving customer satisfaction.