> ## Documentation Index
> Fetch the complete documentation index at: https://docs.phonely.ai/llms.txt
> Use this file to discover all available pages before exploring further.
# Connect your Google Calendar
> Description of your new file.
The Google calendar integration allows your Phonely agent to check availability or create appointments directly during a live call. Follow the steps below to connect your Google account and configure this integration.
## Add Google Calendar to Your Flow
1. In your Call Flow editor, click the **“+”** button below your **Flow**.
2. Under **Live Call Actions**, select **Google Calendar**.
* You can use the search bar to find it quickly.
* The Google calendar block will appear in your flow connected to the Start Flow trigger.
## Choose an Action
1. On the right-hand panel, you’ll see the Google Calendar setup screen.
2. Under **Action**, choose one of the following:
* **Check Availability** – Allows your agent to verify open time slots in your calendar.
* **Create an Appointment** – Lets the agent automatically schedule a new event.
3. Select your preferred option.
 ## Connect Your Google Account
1. Click **“Connect to Google Calendar.”**
* A pop-up will appear prompting you to link your Google account.
2. Select the Google account you want to connect.
* Choose from the list of accounts or click **“Use another account”** if not listed.
3. Review the permissions requested and click **“Continue.”**
* This authorizes Phonely to securely access your calendar.
4. Once authenticated, Phonely will display **“Reconnected”** or **“Connected”** under the connection field.
## Verify and Continue
1. Once your Google Calendar is connected, the **Setup** step will be marked complete with a checkmark.
2. Click **“Continue”** to proceed to the **Configure** stage.
3. Depending on your selected action:
* For **Check Availability**, specify the time range and conditions for checking free/busy slots.
* For **Create Appointment**, define event details like title, time, and attendees.
## Configure the Google Calendar.
After connecting your Google Calendar, the Configure step changes depending on the Action you selected in the Setup stage.
### Configuration options for "Check Availability" Action
1. **Calendar ID**
* Open the **Calendar ID** dropdown and pick the calendar you authorized (personal calendar, team calendar, or a resources calendar).
* If you recently created or shared a calendar, hit the **refresh** icon to re-load the list.
* Tip: Use a dedicated “Bookings” calendar so customer appointments don’t mix with your personal events.
2. **Start Time**
* Set when the search should begin (ISO timestamp is accepted, but you can click the **clock** icon to use *now*).
3. **Duration**
* Enter the meeting length using natural units like `15m`, `30m`, `1h`.
* This duration defines the size of each candidate slot the agent will look for.
4. **Search Period**
* How far into the future to scan for open times, in days.
* Longer windows increase options but also time to evaluate—keep it reasonable.
5. **Available Time Slots (count)**
* Set how many distinct slots to retrieve and present.
* This doesn’t change your calendar- only how many options the caller hears before choosing.
6. **Available Times (per-day windows)**
Define the business hours the agent should consider **within** the search period. Each weekday has:
* A **toggle** to enable/disable that day entirely.
* A **from > to** time window (e.g., `9:00 am → 5:00 pm`).
* **+** to add another window for split shifts (e.g., `9–12` and `2–5`).
* **✕** to remove a window.
* **Notes:**
* These hours gate the search; if your calendar is open at 7pm but the day is disabled or outside the window, it won’t be offered.
* Timezone respects your agent/project settings, ensure your business hours align with the intended timezone.
### 7) Advanced Settings
* **Interim Message**\
When enabled, the agent narrates what it’s doing (“One moment while I check availability…”), which reduces dead air.
* **Post Interim Message Delay**\
Adds a short pause after the interim message to avoid talking over the API response on slower networks.
* **Interim Message Prompt**
* **Fixed** – always use the text you provide verbatim.
* **Promptable** – let the LLM vary the phrasing while keeping your intent (good for more natural conversations).
* **Call Outcome Tagging**
* Add keywords (e.g., `booking_created`, `no_availability`, `calendar_error`) to tag call analytics when this block completes.
* These tags help reporting and downstream automation.
When you’ve filled the required fields, the **Continue** button activates. Click it to advance.
#### **Configuration options for “Create Appointment” Action**
Choose this action when the Phonely agent should **book an event directly** in Google Calendar.\
This setup shares some base fields (like Calendar ID, Start Time, and Advanced Settings) but also includes unique fields specific to appointment creation.
## Connect Your Google Account
1. Click **“Connect to Google Calendar.”**
* A pop-up will appear prompting you to link your Google account.
2. Select the Google account you want to connect.
* Choose from the list of accounts or click **“Use another account”** if not listed.
3. Review the permissions requested and click **“Continue.”**
* This authorizes Phonely to securely access your calendar.
4. Once authenticated, Phonely will display **“Reconnected”** or **“Connected”** under the connection field.
## Verify and Continue
1. Once your Google Calendar is connected, the **Setup** step will be marked complete with a checkmark.
2. Click **“Continue”** to proceed to the **Configure** stage.
3. Depending on your selected action:
* For **Check Availability**, specify the time range and conditions for checking free/busy slots.
* For **Create Appointment**, define event details like title, time, and attendees.
## Configure the Google Calendar.
After connecting your Google Calendar, the Configure step changes depending on the Action you selected in the Setup stage.
### Configuration options for "Check Availability" Action
1. **Calendar ID**
* Open the **Calendar ID** dropdown and pick the calendar you authorized (personal calendar, team calendar, or a resources calendar).
* If you recently created or shared a calendar, hit the **refresh** icon to re-load the list.
* Tip: Use a dedicated “Bookings” calendar so customer appointments don’t mix with your personal events.
2. **Start Time**
* Set when the search should begin (ISO timestamp is accepted, but you can click the **clock** icon to use *now*).
3. **Duration**
* Enter the meeting length using natural units like `15m`, `30m`, `1h`.
* This duration defines the size of each candidate slot the agent will look for.
4. **Search Period**
* How far into the future to scan for open times, in days.
* Longer windows increase options but also time to evaluate—keep it reasonable.
5. **Available Time Slots (count)**
* Set how many distinct slots to retrieve and present.
* This doesn’t change your calendar- only how many options the caller hears before choosing.
6. **Available Times (per-day windows)**
Define the business hours the agent should consider **within** the search period. Each weekday has:
* A **toggle** to enable/disable that day entirely.
* A **from > to** time window (e.g., `9:00 am → 5:00 pm`).
* **+** to add another window for split shifts (e.g., `9–12` and `2–5`).
* **✕** to remove a window.
* **Notes:**
* These hours gate the search; if your calendar is open at 7pm but the day is disabled or outside the window, it won’t be offered.
* Timezone respects your agent/project settings, ensure your business hours align with the intended timezone.
### 7) Advanced Settings
* **Interim Message**\
When enabled, the agent narrates what it’s doing (“One moment while I check availability…”), which reduces dead air.
* **Post Interim Message Delay**\
Adds a short pause after the interim message to avoid talking over the API response on slower networks.
* **Interim Message Prompt**
* **Fixed** – always use the text you provide verbatim.
* **Promptable** – let the LLM vary the phrasing while keeping your intent (good for more natural conversations).
* **Call Outcome Tagging**
* Add keywords (e.g., `booking_created`, `no_availability`, `calendar_error`) to tag call analytics when this block completes.
* These tags help reporting and downstream automation.
When you’ve filled the required fields, the **Continue** button activates. Click it to advance.
#### **Configuration options for “Create Appointment” Action**
Choose this action when the Phonely agent should **book an event directly** in Google Calendar.\
This setup shares some base fields (like Calendar ID, Start Time, and Advanced Settings) but also includes unique fields specific to appointment creation.
 1. **End Time**
* Defines when the scheduled event ends.
* Must be later than the start time.
2. **Email**
* Required field where you enter the attendee’s email.
* The system automatically sends a Google Calendar invitation to this address once the booking is created.
* You can use dynamic variables (e.g., caller email) if captured earlier in the flow.
3. **Appointment Name**
* The event title as it appears in your calendar and the attendee’s invite.
Example: *Consultation with Jane Doe* or *Onboarding Call – Product Demo*.
4. **Appointment Description**
* A short summary of what the appointment is about.
* Appears inside the calendar event’s description field.
Example: *Discuss project requirements and timeline for Q4 deliverables.*
5. **Advanced Settings**
* Here you can add an optional Interim Message, Post Message Delay, and Call Outcome Tagging.
Example interim message: *“Hold on while I book that time for you.”*
## Test the configuration
Once configuration is complete, move to the **Test** tab to confirm that your Google Calendar connection and parameters work correctly.\
The behavior of the test depends on which **Action** you chose earlier, **Check Availability** or **Create Appointment**.
### **When Action = Check Availability**
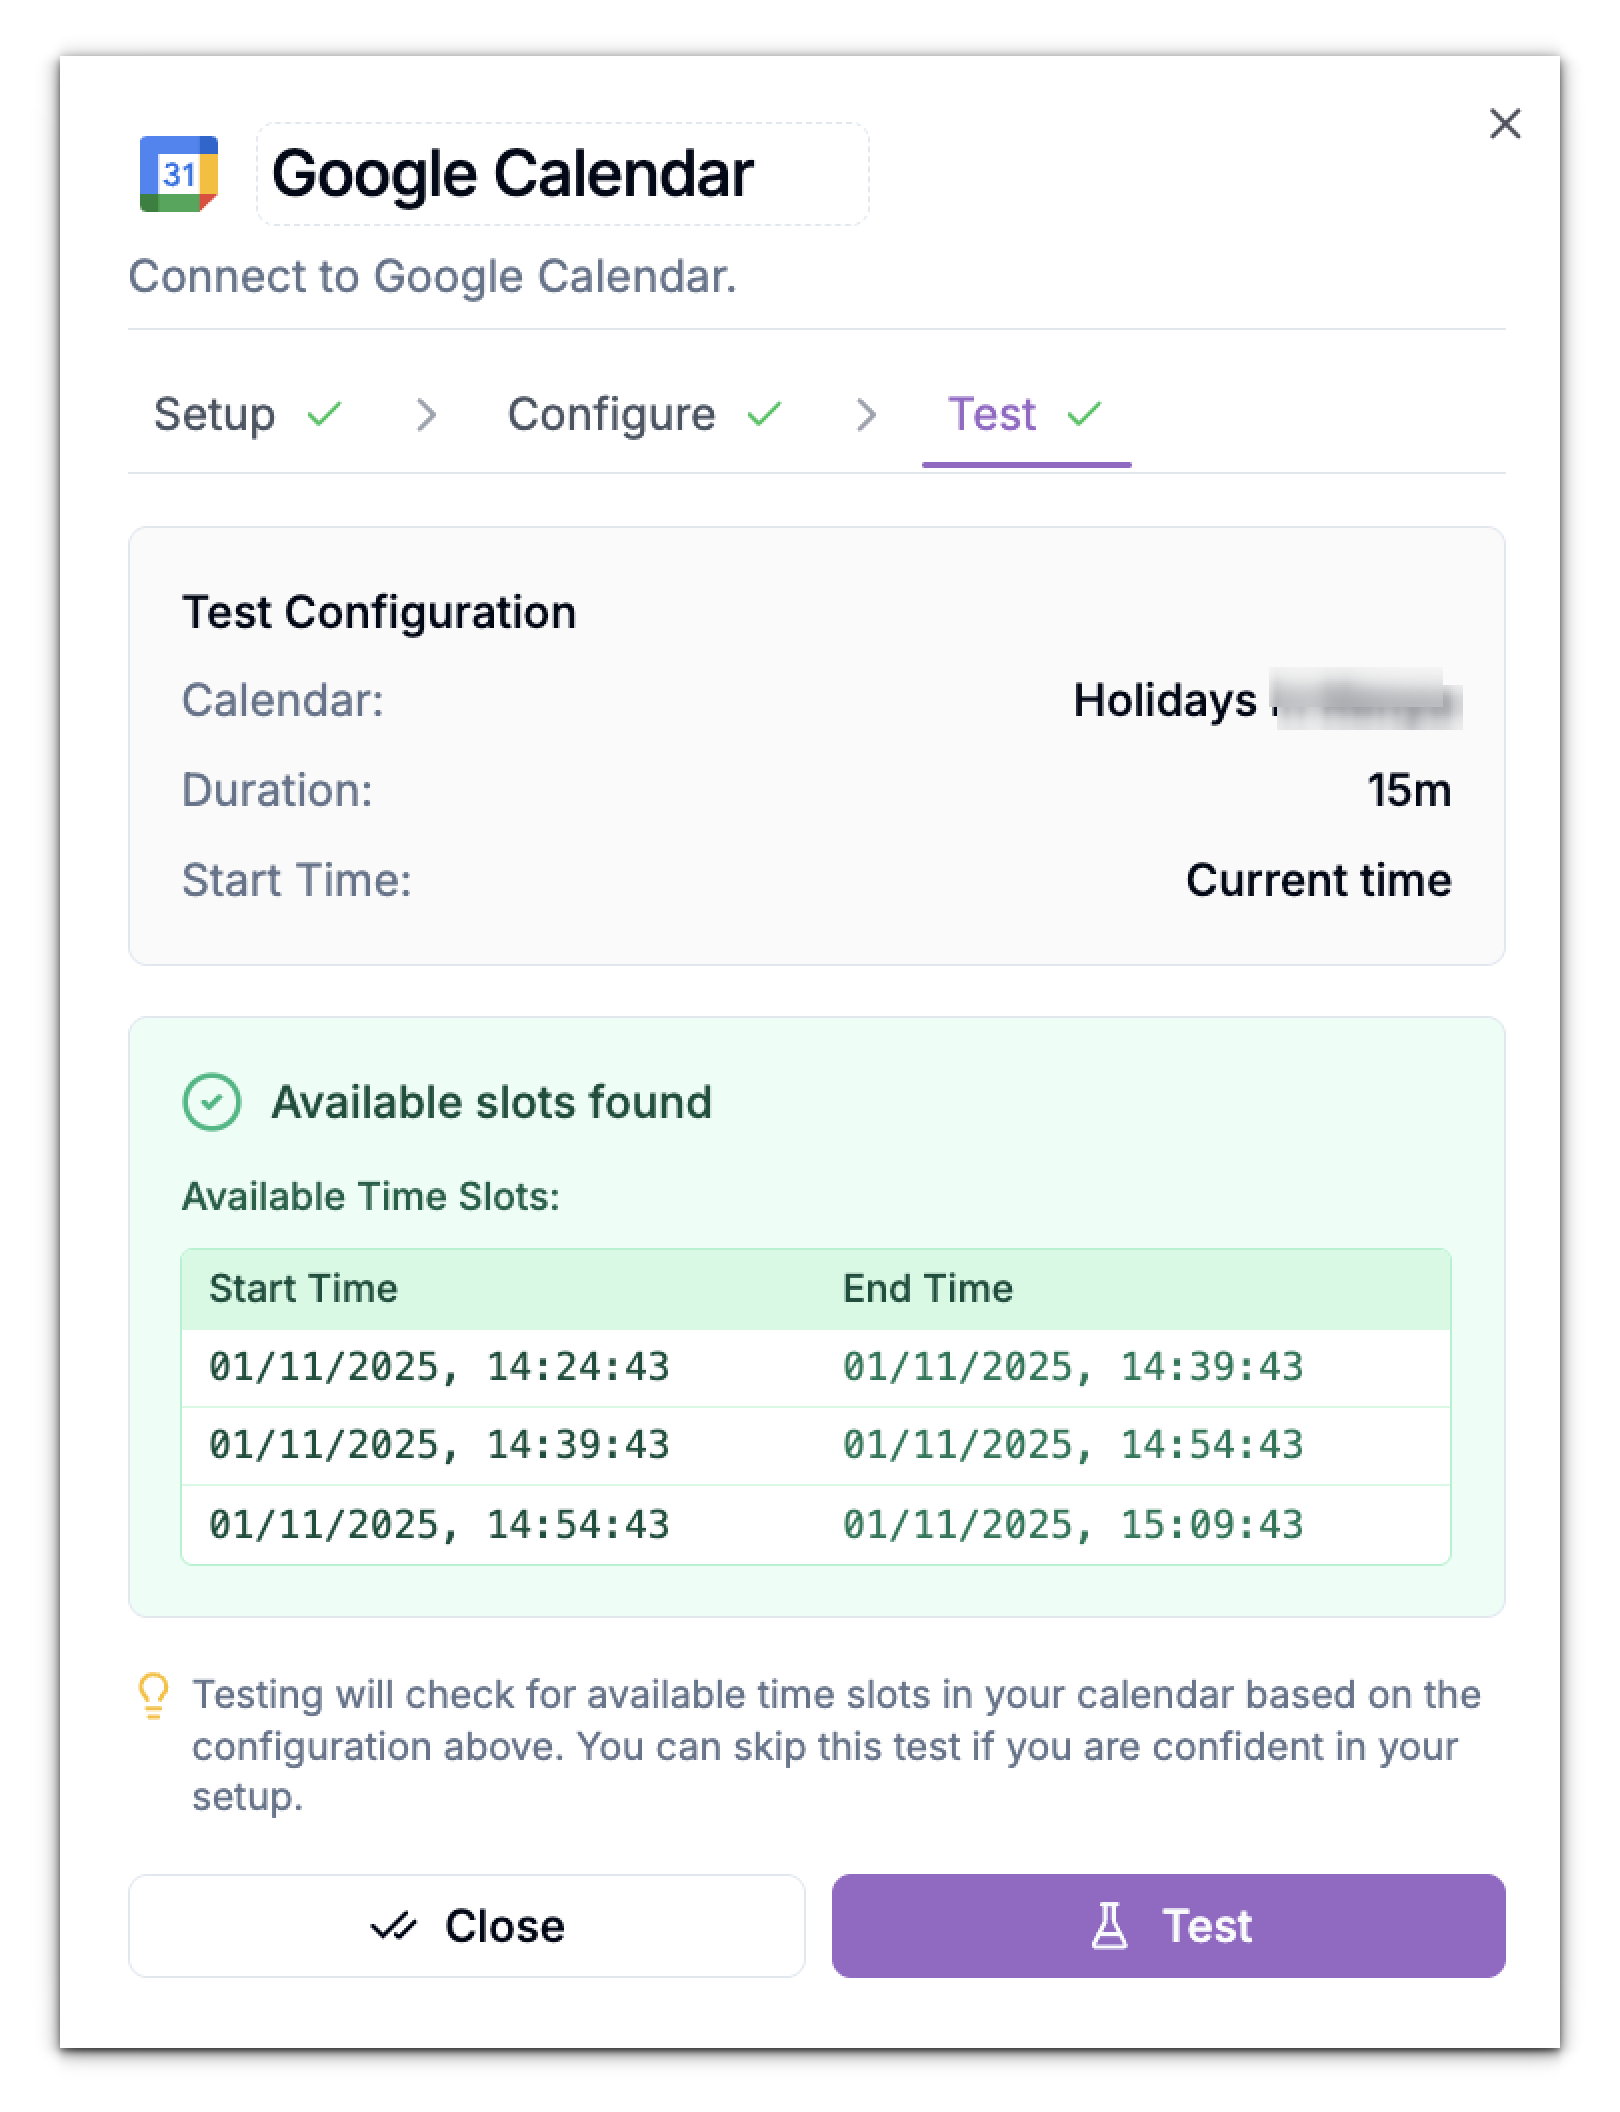
The **Test** tab runs a dry-run against your calendar with the exact parameters you configured. It checks your defined working hours, slot duration, and search period, then lists which time slots are open.
#### What You’ll See
1. **Test Configuration Summary:**\
Displays the configuration details that were used for the test.
* **Selected Calendar** – which Google Calendar is being queried
* **Duration** – length of each slot (e.g., 15m or 30m)
* **Start Time** – the point from which the system begins checking (usually “Current time” if you clicked the clock icon)
2. **Available Slots Found Panel:**\
Shows a table of available slots.
* Each row includes Start Time > End Time pairs.
* These are real, conflict-free ranges within your defined working hours.
1. **End Time**
* Defines when the scheduled event ends.
* Must be later than the start time.
2. **Email**
* Required field where you enter the attendee’s email.
* The system automatically sends a Google Calendar invitation to this address once the booking is created.
* You can use dynamic variables (e.g., caller email) if captured earlier in the flow.
3. **Appointment Name**
* The event title as it appears in your calendar and the attendee’s invite.
Example: *Consultation with Jane Doe* or *Onboarding Call – Product Demo*.
4. **Appointment Description**
* A short summary of what the appointment is about.
* Appears inside the calendar event’s description field.
Example: *Discuss project requirements and timeline for Q4 deliverables.*
5. **Advanced Settings**
* Here you can add an optional Interim Message, Post Message Delay, and Call Outcome Tagging.
Example interim message: *“Hold on while I book that time for you.”*
## Test the configuration
Once configuration is complete, move to the **Test** tab to confirm that your Google Calendar connection and parameters work correctly.\
The behavior of the test depends on which **Action** you chose earlier, **Check Availability** or **Create Appointment**.
### **When Action = Check Availability**
The **Test** tab runs a dry-run against your calendar with the exact parameters you configured. It checks your defined working hours, slot duration, and search period, then lists which time slots are open.
#### What You’ll See
1. **Test Configuration Summary:**\
Displays the configuration details that were used for the test.
* **Selected Calendar** – which Google Calendar is being queried
* **Duration** – length of each slot (e.g., 15m or 30m)
* **Start Time** – the point from which the system begins checking (usually “Current time” if you clicked the clock icon)
2. **Available Slots Found Panel:**\
Shows a table of available slots.
* Each row includes Start Time > End Time pairs.
* These are real, conflict-free ranges within your defined working hours.
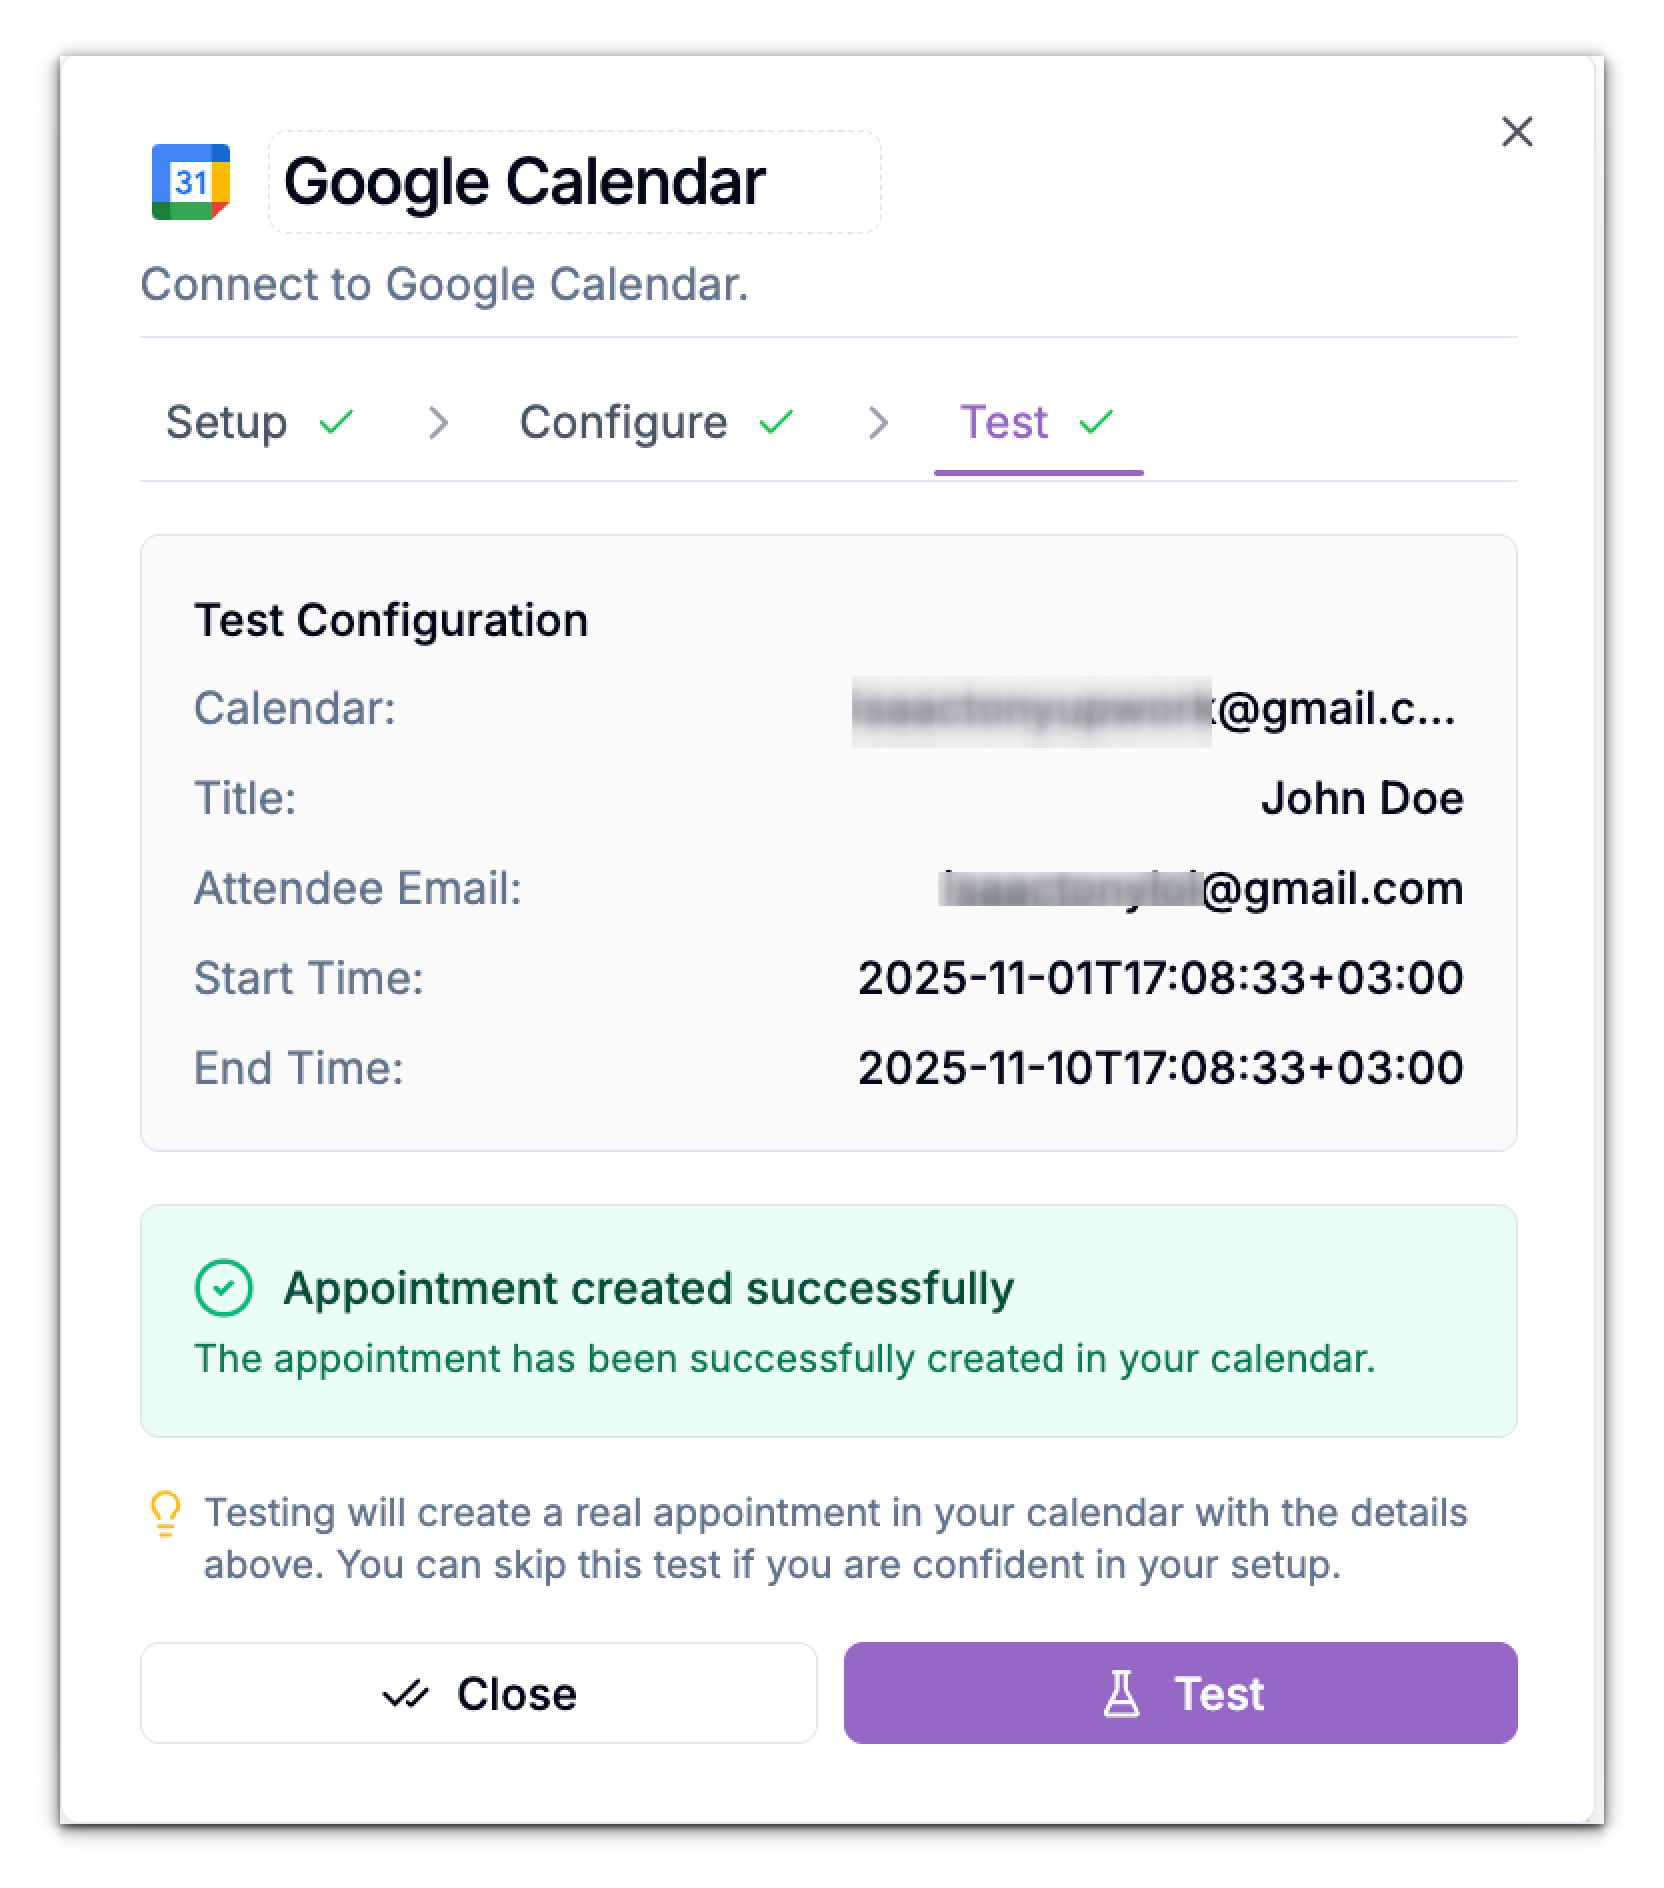
 ### When Action = Create Appointment
The Test tab performs a live test that actually creates an appointment in your Google Calendar using the parameters you defined.
#### What You’ll See
1. **Test Configuration Summary:**\
Lists the appointment details that will be used for the event creation, including: **Calendar**, **Title**, **Attendee Email**, and **Start Time / End Time** – the scheduled duration of the appointment
2. **Appointment Created Successfully Panel:**
* Shows a confirmation message.
### When Action = Create Appointment
The Test tab performs a live test that actually creates an appointment in your Google Calendar using the parameters you defined.
#### What You’ll See
1. **Test Configuration Summary:**\
Lists the appointment details that will be used for the event creation, including: **Calendar**, **Title**, **Attendee Email**, and **Start Time / End Time** – the scheduled duration of the appointment
2. **Appointment Created Successfully Panel:**
* Shows a confirmation message.
 ### Outcome
Once successfully connected, your Phonely agent can:
* Instantly check your availability during a call.
* Automatically schedule or confirm appointments in your connected Google Calendar.
- Ensure your Google account has Calendar API access enabled.
- If you switch accounts or permissions change, click Reconnect to reauthorize access.
- You can connect multiple Google accounts for different agents if needed.
### Outcome
Once successfully connected, your Phonely agent can:
* Instantly check your availability during a call.
* Automatically schedule or confirm appointments in your connected Google Calendar.
- Ensure your Google account has Calendar API access enabled.
- If you switch accounts or permissions change, click Reconnect to reauthorize access.
- You can connect multiple Google accounts for different agents if needed.